Post a Free Blog

Submit A Press Release

At CWEB, we are always looking to expand our network of strategic investors and partners. If you're interested in exploring investment opportunities or discussing potential partnerships and serious inquiries. Contact: jacque@cweb.com

Generic selectors
Exact matches only
Search in title
Search in content
Post Type Selectors
Filter by Categories
Action
Animation
Anime
ATP Tour (ATP)
Auto Racing
Baseball
Basketball
Boxing
Breaking News
Business
Business
Business Newsletter
Call of Duty (CALLOFDUTY)
Canadian Football League (CFL)
Car
Celebrity
Champions Tour (CHAMP)
Comedy
CONCACAF
Counter Strike Global Offensive (CSGO)
Crime
Dark Comedy
Defense of the Ancients (DOTA)
Documentary and Foreign
Drama
eSports
European Tour (EPGA)
Fashion
FIFA
FIFA Women’s World Cup (WWC)
FIFA World Cup (FIFA)
Fighting
Football
Formula 1 (F1)
Fortnite
Golf
Health
Hockey
Horror
IndyCar Series (INDY)
International Friendly (FRIENDLY)
Kids & Family
League of Legends (LOL)
LPGA
Madden
Major League Baseball (MLB)
Mixed Martial Arts (MMA)
MLS
Movie and Music
Movie Trailers
Music
Mystery
NASCAR Cup Series (NAS)
National Basketball Association (NBA)
National Football League (NFL)
National Hockey League (NHL)
National Women's Soccer (NWSL)
NBA Development League (NBAGL)
NBA2K
NCAA Baseball (NCAABBL)
NCAA Basketball (NCAAB)
NCAA Football (NCAAF)
NCAA Hockey (NCAAH)
Olympic Mens (OLYHKYM)
Other
Other Sports
Overwatch
PGA
Politics
Premier League (PREM)
Romance
Sci-Fi
Science
Soccer
Sports
Sports
Technology
Tennis
Thriller
Truck Series (TRUCK)
True Crime
Ultimate Fighting Championship (UFC)
US
Valorant
Western
Women’s National Basketball Association (WNBA)
Women’s NCAA Basketball (WNCAAB)
World
World Cup Qualifier (WORLDCUP)
WTA Tour (WTA)
Xfinity (XFT)
XFL
0
Home Blog Page 85

Chicken with olives and dates

0

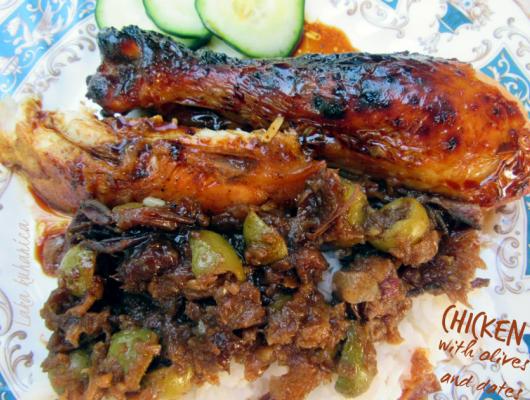
In this Moroccan style chicken briny olives counter the sweetness of dried fruit and sautéed onions.

Ingredients

1200 g chicken ( ½ chicken)
For the marinade:
80 g runny honey
Juice of 2 lemons
50 ml olive oil
1 tsp salt
1 tsp black pepper
1 tsp smoked paprika
1 big onion, finely chopped
4 cloves garlic, minced
2 tbs olive oil
40 g butter
4 tsp Ras el Hanout spice blend*
1 tsp cayenne pepper
240 ml water
130 g green olives, without pits, halved
6 dates, without pits, chopped

Preparation

1. In a bowl, whisk the honey, lemon juice, olive oil, salt, pepper and paprika together. Pour it over the chicken and let it marinate for at least 1 hour or overnight.
2. Sauté, over a medium flame, onion and garlic in olive oil and butter for about 3 – 4 minutes.
3. Add Ras el Hanout and cayenne pepper. Stir until fragrant.
4. Add water, halved olives and chopped dates, and cook covered for 20 minutes. Uncover the pan and let the sauce reduce until thickened and syrupy. Set aside.
5. Meanwhile, take the chicken out of marinade and arrange it on a baking sheet. Bake in the oven at 210 °C for 30 minutes. Then, lower the temperature to 180 °C and cook for another 20 minutes until the skin is golden brown and the chicken is cooked through.
6. Serve with olive and date sauce over Basmati rice.
7. If you don’t have it, whisk your own version: blend equal parts of ground cinnamon, cumin,ground coriander, ground ginger, ground turmeric, saffron and ground cardamom.
Credit: Foodista

Turkey Meatballs with Buttery Rice Pilaf

0
Photo Credit:- Cosori Air Fryers
Here’s a great one-pot casserole for whenever time’s tight. Note that you must heat the liquid in the cooker before you add the frozen meatballs. Otherwise, they’ll drop the temperature of the liquid too low, the rice will fall to the bottom of the pot before it can come to pressure, and you’ll end up with a burn notice.

INGREDIENTS

  • 2 1/2  cups  chicken broth
  • 1  cup  raw white basmati rice  plus  1 tbsp
  • 1/2  cup  frozen chopped onion  or  1 small  yellow or white onion; peeled and chopped
  • 2  tsp  stemmed and minced fresh sage leaves  or  1 tsp  dried sage
  • 1  tsp  stemmed fresh thyme leaves  or  1/2 tsp  dried thyme
  • 1/2  tsp  table salt
  • 1 1/2  lbs  frozen mini or bite- ­sized turkey meatballs  (a gluten- ­free version if that’s a concern),  1/2-1 ounce  each
  • 2  tbsp  butter

INSTRUCTIONS

  1. Press the button SAUTÉ and set it for HIGH, MORE, or CUSTOM  400 °F. Set the timer for  10 minutes.
  2. Mix the broth, rice, onion, sage, thyme, and salt in an Instant Pot. Cook, stirring occasionally, until many wisps of steam rise from the liquid. Stir in the frozen meatballs, then turn off the SAUTÉ function. Set the butter in the mixture and lock the lid onto the pot.
  3. Option 1  Max Pressure Cooker
    Press Pressure cook on Max pressure for  10 minutes  with the Keep Warm setting off.
  4. Option 2  All Pressure Cookers
    Press Poultry, Pressure cook or Manual and set for High pressure for  12 minutes  with the Keep Warm setting off.
  5. Use the  quick- ­release method  to bring the pot’s pressure back to normal– but do not open the lid. Leave the pot undisturbed for 10 minutes after the pressure has been released. Unlatch the lid and open the cooker. Stir well before serving.

RECIPE NOTES

Beyond

– For an 8-quart Instant Pot, you must increase all the ingredients by 50 percent.

– Swap out the herbs for any you prefer. We’ve skewed these to match the Italian flavoring in most meatballs. But if you’ve got plain meatballs, try a mix of dried thyme and dried dill, or even stemmed and minced fresh parsley and tarragon leaves.

– Cheese is a welcome garnish, particularly finely grated Parmigiano-Reggiano or another hard, aged cheese.

*Using a — ­20 °F CHEST FREEZER?

There is no difference in cooking times.

Source:- Cosorithis


Road Map: Pot Pie

0
Photo Credit:- Cosori Air Fryers
Here’s one recipe with dozens of ways to make pot pie using frozen meat and vegetables in the cooker. Admittedly, the process is a tad complicated. First, you steam the frozen meat until thawed and partially ready, then you add frozen vegetables and heat them to simmering before thickening the sauce. Finally, you make a drop-biscuit dough and use the pot’s SLOW COOK function to create the topping. See? It’s all a fair amount of work. But worth it, for sure. The drop biscuits can be sprinkled with cheese, but they should be sprinkled with paprika no matter what. The little dumplings won’t brown in the pot and the paprika gives them a more appealing appearance.

INGREDIENTS

For the Stew
  • 2  cups  broth of any sort
  • 1  tbsp  Worcestershire sauce
  • 1  lb  frozen ground meat  Choose from beef, buffalo, venison, pork, turkey, chicken, or even sausage meat–or a combo of any two you prefer.
  • 2  tsp  dried seasoning blend  Choose either a prepared seasoning such as Italian or Tex-Mex or a blend you create (rosemary, oregano, thyme, parsley, and basil are the norms, but enhance them with a little ground allspice or grated nutmeg).
  • 1/2  tsp  table salt  optional (check to see if the seasoning blend includes salt)
  • 1/2  tsp  ground black pepper
  • 1  lb  frozen unseasoned mixed vegetables  (4-5 cups  ) Choose from any unseasoned blend, so long as you omit any flavoring packets. Or use a combination of frozen corn kernels, bell pepper strips, chopped onion, and/or sliced carrots.
  • 1/2  cup  heavy or light cream  but not “fat- ­free” cream
  • 2 1/2  tbsp  all-purpose flour
For the Biscuit Topping
  • 1 1/4  cups  all-purpose flour
  • 1 1/2  tsp  baking powder
  • 1/2  tsp  table salt
  • 6  tbsp  whole or low- ­fat milk
  • 1  tbsp  butter  melted and cooled; or  1 tbsp  oil of any sort you prefer
  • 1  large egg
  • 4  oz  shredded semi- ­firm cheese  (1 cup) such as Cheddar, Swiss, or even a prepared blend, optional.
  • 1/2  tsp  mild paprika

INSTRUCTIONS

  1. To make the stew, pour the broth and Worcestershire sauce into an Instant Pot. Set the pot’s rack (with the handles up) or a large, open vegetable steamer inside the pot. Set the ground meat on the rack or in the steamer. Sprinkle the seasoning blend, salt (if using), and pepper over the meat. Lock the lid onto the pot.
  2. Option 1  Max Pressure Cooker
    Press Pressure cook on Max Pressure for  18 minutes  with the Keep Warm setting off and the valve closed.

    Option 2  All Pressure Cookers
    Press Meat/Stew or Pressure cook or Manual on High pressure for 20 minutes with the Keep Warm setting off and the valve closed.

  3. Use the quick- ­release method to bring the pot’s pressure back to normal. Unlatch the lid and open the cooker. Use silicone cooking mitts or thick hot pads to remove the rack or steamer, letting the meat fall down into the liquid below. Use the edge of a large, metal spoon and a meat fork to break the meat up into little chunks, about the size of very small meatballs. Stir in the frozen vegetables.
  4. Press the  SAUTÉ  button. Set it for HIGH, MORE or CUSTOM  400 °F. Set the time for  5 Minutes  and if necessary press  START
  5. Whisk the cream and flour in a small bowl until smooth. Once the liquid is simmering in the pot, add this cream mixture and whisk until bubbling. Turn off the  SAUTÉ  function.
  6. To make the biscuit topping, stir the flour, baking powder, and salt in a medium bowl until uniform. Add the milk, melted butter or oil, and the egg. Continue stirring until the mixture has no dry ingredients in the bottom of the bowl.
  7. Drop the mixture by eight blobs on top of the hot stew. Sprinkle the cheese (if using) over each of the blobs, then sprinkle each with a little paprika. Latch the lid onto the pot but do not engage the pressure valve.
  8. Set the Instant Pot for  SLOW COOK, set the level for HIGH and the valve must be OPEN. Set the timer for  30 minutes  with the KEEP WARM setting off, and if necessary press the START button.
  9. When the machine has finished cooking, turn it off and open the lid. Cool for a few minutes, then use a large cooking spoon to scoop the biscuits and stew into serving bowls.

RECIPE NOTES

Beyond
– For a simpler recipe, there’s no need to make your own drop biscuits. Instead, set  eight of the ten  or so biscuits from a  10-ounce can right on top of the stew, top them with cheese (if you want) and paprika, then cook with the SLOW COOK function as directed.
– If you want to make your own dried seasoning blend, try  1/2 teaspoon  dried sage,  1/2 teaspoon  dried thyme,  1/2 teaspoon  garlic powder, and  1/2 teaspoon  onion powder. Or experiment with a blend of all sorts of dried herbs and even spices (thyme, parsley, and cinnamon make a good grouping). Use only dried herbs, not fresh. The fresh don’t add quite the punch to this long, involved cooking process.

Source:- Cosorithis

Chicken with Marsala Mushroom Sauce

0

Chicken with Marsala Mushroom Sauce is tender chicken breasts sautéed and covered with a fabulously rich Marsala wine mushroom sauce.

Ingredients

¼ ounce dried Porcini mushrooms
2 teaspoons olive oil
2 boneless, skinless chicken breasts
¼ teaspoon salt
Pinch of pepper
3 green onions, thinly sliced and separate white ends from green ones
½ cup Marsala wine
2 ½ teaspoons chicken demi-glace
Pinch of Garlic powder
Pinch of Onion powder
¼ teaspoon dried oregano
Pinch of black pepper
2 tablespoons butter

Preparation

1. In a small bowl, cover the dried Porcini mushrooms with 1 cup warm water for a minimum of 20 minutes (you will be saving the liquid for later, so don’t discard).
2. Rinse and pat dry the chicken breasts, then season both sides with salt and pepper.
3. Heat a medium non-stick skillet over medium heat. Add olive oil and chicken and cook until chicken is deep brown, about 5-6 minutes per side until it reaches a minimum internal temperature of 165 °F. Transfer the chicken to a plate and loosely cover with aluminum foil (we will be using the same pan in a minute, so do not rinse out chicken juices).
4. Remove rehydrated mushrooms from water (reserve soaking liquid) and coarsely chop the mushrooms.
5. Return the pan used to cook the chicken to medium heat and add white portions of green onions and mushrooms. Cook until fragrant, about 1 minute. Add the Marsala wine and cook 1 minute. Add almost all of the soaking mushroom liquid (leave any sediment from mushrooms at the bottom in the bowl) and the chicken demi-glace, garlic powder, onion powder, oregano and pepper to the pan and cook until reduced by half, about 5 minutes. Remove from heat and stir in butter.
6. Slice the chicken and arrange on a plate. Pour the sauce over the chicken, sprinkle with leftover green onions
Credit: Foodista

French Dip Sandwiches

0
Photo Credit:- Cosori Air Fryers
An old-school diner sandwich, a French dip is really only as good as the bread it’s made with– which should be a baguette or a narrow French loaf that is decidedly crunchy, not soft and gummy. If the baguette is soft, put it in a  300 °F oven for perhaps 10 minutes to get it crisp. That way, it’ll stand up to the “dip” (the pan juices) without becoming soggy. There’s a slight chance the cooked beef might still be pink inside, depending on the thickness and density of the frozen shaved beef. If the meat is pink, turn the pot to HIGH on its SAUTÉ function after cooking under pressure and breaking up the beef. Cook, stirring often, until the meat is cooked through, about 2 minutes.

INGREDIENTS

  • 3  cups  beef or chicken broth
  • 1/2  cup  frozen chopped onion  or  1 small  yellow or white onion; peeled and chopped
  • 1  tbsp  stemmed thyme leaves  or  1 1/2 tsp  dried thyme
  • 1  tsp  onion powder
  • 1  tsp  garlic powder
  • 1/2  tsp  table salt
  • 1/2  tsp  ground black pepper
  • 2  lbs  frozen shaved beef
  • butter  for the sandwiches
  • A French baguette  (gluten- ­free if that is a concern), cut into  4‑ to 6‑inch  lengths, each sliced open length wise

INSTRUCTIONS

  1. Stir the broth, onion, thyme, onion powder, garlic powder, salt, and pepper in an Instant Pot. Set the frozen block of meat in the liquid and lock the lid onto the pot.
  2. Option 1  Max Pressure Cooker
    Press Pressure cook on Max pressure for  8 minutes  with the Keep Warm setting off.
  3. Option 2  All Pressure Cookers
    Press Meat/Stew, Pressure cook or Manual on High pressure for  10 minutes  with the Keep Warm setting off. The valve must be closed.
  4. Use the  quick- ­release method  to bring the pot’s pressure back to normal. Unlatch the lid and open the cooker. Use the edge of a large, metal spoon and a meat fork to break the meat into chips and strips.
  5. Lightly butter the inside of the baguette slices. Use tongs to transfer the strips of meat to the buns to make sandwiches. Pour the (hot!) liquid from the cooker into a serving bowl or small soup bowls. Use this broth as a dip for the sandwiches.

RECIPE NOTES

Beyond
– To simplify this recipe,substitute  three  9-ounce  boxes of frozen Steak-umm sliced steaks for the shaved beef. Break each Steak-umm sheet into three or four long strips. Cook these at MAX for 1 minute or at HIGH for 2 minutes with a QUICK RELEASE.
– For a more sweet-and-sour flavor, add up to  2 tablespoons  steak sauce (such as A.1.) and  1 teaspoon  granulated sugar
* Using a — ­20 °F CHEST FREEZER?
There is no difference in cooking times.

Source:- Cosorithis

Road Map: Barbecue Pork Loin

0
Photo Credit:- Cosori Air Fryers
This one is not pulled pork. Rather, the pork loin is sliced into rounds and served with the barbecue sauce. Remember that the liquid you choose will dramatically affect the sweetness of the finished dish. If you go with beer or cider, you’ll want to use a far less-sweet barbecue sauce, probably a hot one with chipotles in the mix.

INGREDIENTS

  • 1 1/2  cups  purchased barbecue sauce of any sort
  • 1  cup  thin liquid  Choose from water, broth of any sort, beer of any sort (gluten-free, if that is a concern), or unsweetened apple cider
  • 3  lbs  frozen boneless center-cut pork loin  (1 package)

INSTRUCTIONS

  1. Stir the barbecue sauce and liquid in an Instant Pot. Set the pork loin fat-side down in the pot and turn it to coat it in the sauce, leaving it fat-side up. Lock the lid onto the cooker.
  2. Option 1  Max Pressure Cooker
    Press Pressure cook on Max pressure for  45 minutes  with the Keep Warm setting off.
  3. Optional 2  All Pressure Cookers
    Press Meat/Stew, Pressure Cook or Manual on High pressure for  50 minutes  with the Keep Warm setting off. The valve must be closed.
  4. When the machine has finished cooking, turn it off and let its pressure return to normal naturally, about  45 minutes. Unlatch the lid and open the cooker. Insert an instant-read meat thermometer into the center of the pork loin and check that the meat registers  145 °F. If not, lock the lid back onto the cooker and cook for another  10 minutes  at  HIGH  pressure, followed by a quick release. Transfer the pork loin to a nearby cutting board. Set aside for 10 minutes.
  5. Press the button for. Set it for MEDIUM, NORMAL, or CUSTOM 300 °F and set the time for  20 minutes.
  6. Bring the sauce in the cooker to a simmer, stirring occasionally. Cook, stirring once in a while, until reduced to the consistency of a thick barbecue sauce, about  12 minutes. Turn off the  SAUTÉ  function. Slice the pork loin into  1/2-inch-thick rounds and serve with the sauce ladled on top

RECIPE NOTES

Beyond
– Since this dish isn’t pulled, it’s best over a bed of vegetables or grains. Try steamed or sautéed spinach or kale. Or serve it over a cooked whole grain like wheat berries mixed with herbs and/or diced carrots. Or go all out with a wild rice pilaf.

– This is probably the best pork dish in this book for sandwiches. Slice the pork loin into 1/4-inch-thick rounds, then store in the reduced sauce in a sealed container in
the fridge for up to 3 days. Lift them out of the sauce and serve them on kaiser rolls with purchased coleslaw or thinly sliced red onions and lots of pickle relish.

Source:- Cosorithis

Chicken Wing Drummettes – gluten free, dairy free

0

Honey Tabasco Sauced Chicken Wing Drummettes with a dairy free Ranch dip. The perfect appetizer (or meal) for game day, or when you need an appetizer with a kick. The sweet and spicy wings pair so well with the ranch dip (and celery, of course). What’s nice about these is that you marinade ahead and bake them! More time for football 🙂

Ingredients

3 1/3 pounds organic chicken drummettes
2 tablespoons taco seasoning (Trader Joes’s brand)
2 tablespoons brown sugar
1 tablespoon kosher salt
2 teaspoons ground cumin
1 teaspoon garlic powder
Honey
Tabasco Sauce
For the “Ranch” Dip:
3 tablespoons gf, vegan chive & garlic cream cheese (Galaxy Nutritional Foods brand, at health food stores)
2 tablespoons plain coconut yogurt (So Delicious brand)

Preparation

1. Add chicken into a large glass or stainless steel bowl.
2. Season the chicken with taco seasoning, salt, cumin, garlic powder, and brown sugar.
3. Cover with plastic wrap and refrigerate for 2 hours.
4. Preheat the oven temperature to 400 degrees F.
5. Place all the seasoned chicken onto a parchment lined baking sheet spread out so that they don’t touch. If you are doubling the recipe use two pans.
6. Bake for 35 minutes.
7. Transfer to a heatproof bowl.
8. Add about 2 tablespoons of honey (or more if you like) and a few splashes of tabasco sauce (less or more to your liking).
9. Add the chicken, if it feels to hot to toss, wait a few minutes or use two spoons to coat the chicken.
10. Serve hot or warm.
11. For the “Ranch” Dip:
12. Add to a small bowl and mix well.
13. Serve chilled with celery sticks and chicken wings.
Credit: Foodista

Meatball Chili

0
Photo Credit:- Cosori Air Fryers
Dinner can’t get much easier! You can use this recipe as a road map of sorts. Vary the salsa (maybe even a green salsa?) and the type of meatballs. We tested this with Italian-style meatballs, but there are lots of other varieties on the market. And it needn’t be beef meatballs. Consider turkey, even buffalo. Or make a vegan chili with vegan meatballs and vegetable broth. The only trick is to use frozen mini meatballs.

INGREDIENTS

  • 3  cups  chunky- ­style mild or hot red salsa  (24 ounce  jar)
  • 3 1/2  cups  white, black, or navy beans  (30 ounce) jar drained and rinsed
  • 2  cups  beef  chicken, or vegetable broth
  • 8  ounces  frozen bell pepper strips  or  2 medium  red or green bell peppers; stemmed, cored, and cut into thin strips,  2 cups
  • 1/4  cup  chili powder
  • 1  tsp  ground cumin
  • 1/2  tsp  table salt
  • 25  ounce  frozen mini or bite- ­sized meatballs  1 ounce  each, even vegan and/or gluten- ­free if that’s a concern (1 bag)
  • 2/3  cup  tomato paste  1 can  6 ounce

INSTRUCTIONS

  1. Press the button for  SAUTÉ  and set it for HIGH, MORE, or CUSTOM  400 °F. Set the time for  10 minutes,
  2. Mix the salsa, beans, broth, bell pepper strips, chili powder, cumin, and salt in an Instant Pot. Cook, stirring often, until many wisps of steam rise from the liquid. Turn off the  SAUTÉ  function and stir in the meatballs. Lock the lid onto the cooker.
  3. Option 1  Max Pressure Cooker
    Press Pressure cook on Max pressure for  5 minutes  with the Keep Warm setting off.
  4. Option 2  All Pressure Cookers
    Press Bean/Chili, Pressure cook or Manual. Set if for High pressure for  8 minutes  with the Keep Warm setting off. The vent must be closed
  5. Use the  quick- ­release method  to bring the pot’s pressure back to normal. Unlatch the lid and open the cooker.
  6. Press the button  SAUTÉ  and set it for HIGH, MORE, or CUSTOM  400 °F. Set the timer for  5 minutes.
  7. As the chili comes to a simmer, stir in the tomato paste until smooth. Continue cooking, stirring often, until somewhat thickened, 1—2 minutes. Turn off the SAUTÉ function and set aside for 5 minutes to continue to blend the flavors and help the chili to set up.

RECIPE NOTES

Beyond

– Of all the chilis in this book, this one calls out most to be served over cooked, long-grain, white rice.

– Or go all out and serve it over cooked buckwheat (not kasha, but dried, plain buckwheat).

– Garnish the servings with sour cream, pickled jalapeño rings, minced fresh jalapeño, minced red onion, pickled onions, and/or shredded cheese, particularly sharp
Cheddar.

Source:- Cosorithis

All-American Pot Roast

0
Photo Credit:- Cosori Air Fryers
This recipe is like a road map because you can customize the root vegetables to whatever you prefer. The classics, of course, are carrots and potatoes; but there’s no need to go with the same-old, same-old. Look around the supermarket for a selection of roots. Just remember the rule: The vegetables have to be in fairly large, 2-inch chunks so they cook evenly (and don’t turn to mush). And remember that it’s best to pair a “sweet” winter-keeping vegetable like butternut or winter squash with something a little more earthy or even bitter, like potatoes, turnips, or rutabaga. We give the second cooking, the one after the root vegetables are added, only HIGH pressure (not MAX) to keep them a little less mushy. Note that these are fresh, not frozen, root vegetables. The fresh will yield a better flavor and texture with this timing. We call for a lot of Worcestershire sauce in our recipes. It adds more flavor than salt, an umami richness that fills out a sauce better than some of the chemical “browning” enhancers on the store’s shelves. If you want to go over the top, we’ve got an amazing recipe for homemade Worcestershire sauce on our website, bruceandmark.com. (Warning: It takes a few months to ripen in the fridge.)

INGREDIENTS

  • 1 1/2  cups  beef broth
  • 1/2  cup  frozen chopped onion  or  1 small  yellow or white onion; peeled and chopped
  • 1  tbsp  Worcestershire sauce  (or a gluten- ­free version if that’s a concern)
  • 2  tsp  peeled and minced garlic
  • 1  frozen boneless beef chuck roast  3‑3 1/2 lbs
  • 1  tsp  mild paprika
  • 1  tsp  onion powder
  • 1  tsp  dried thyme
  • 1/2  tsp  ground black pepper
  • 2  lbs  peeled root vegetables  such as carrots, potatoes, turnips, sweet potatoes, rutabaga, butternut squash, and/or any winter squash, cut into 2‑inch chunks, and seeded as necessary

INSTRUCTIONS

  1. Mix the broth, onion, Worcestershire sauce, and garlic in an Instant Pot. Set the pot’s rack (with the handles up) or a large, open vegetable steamer inside the pot. Set the frozen chuck roast on the rack or in the steamer. Sprinkle the top of the meat evenly with the paprika, onion powder, thyme, and pepper. Lock the lid onto the pot.
  2. Option 1  Max Pressure Cooker
    Press Pressure cook on Max pressure for  1 hour 20 minutes with the Keep Warm setting off.
  3. Option 2  All Pressure Cookers
    Press Meat/Stew, Pressure Cook or Manual on High pressure for  1 hour 30 minutes  (90 minutes) with the Keep Warm setting off. The valve must be closed.
  4. Use the  quick- ­release method  to bring the pot’s pressure back to normal. Unlatch the lid and open the cooker. Use kitchen tongs, silicone cooking mitts, or thick hot pads to remove the rack or steamer from the cooker, letting the chuck roast fall into the sauce below. Scatter the root vegetables over everything. Lock the lid back onto the pot.
  5. Press Meat/Stew, Pressure Cook or Manual on High pressure for  10 minutes  with the Keep Warm setting off. The valve must be closed.
  6. When the machine has finished cooking, turn it off and let its pressure return to normal naturally, about 30 minutes. Unlatch the lid and open the cooker again. Using a large slotted spoon or large metal spatula and a meat fork, transfer the chuck roast to a nearby cutting board. Cool for a couple of minutes, then slice the meat into chunks to be served with the vegetables and sauce from the pot.

RECIPE NOTES

Beyond

– To thicken the sauce, remove the meat and the vegetables from the pot. Skim the sauce of any surface fat with a flatware spoon. Then bring the sauce to a simmer with the SAUTÉ function on HIGH, MORE, or CUSTOM  400 °F. Whisk  1 1/2 tablespoons  cornstarch with  2 tablespoons  water in a small bowl until uniform, then whisk this slurry into the simmering sauce. Cook, whisking all the while, until somewhat thickened, about 1 minute. Turn off the SAUTÉ function and serve the thickened sauce on the side.

– For a more complex stew, use a 50-50 combo of broth and either red wine or a dark beer.

– And for an even more complex stew, also add up to  1 tablespoon  minced fresh sage leaves.

Source:- Cosorithis

Chicken Verde Enchilada Casserole

0

This is a very easy way to prepare a tasty Mexican dish. All the flavor of enchiladas without the hassle of prep. A favorite of my children and leftovers are tasty the next day and easily microwavable!

Ingredients

4 Large Boneless Skinless Chicken Breasts
Lawry’s Garlic Salt and Pepper, to taste
2 tablespoons Olive Oil
6 ounces Shredded Cheddar Cheese
6 ounces Shredded Mozzarella Cheese
19 ounces La Victoria Chile Verde Enchilada Sauce
12 Corn Tortillas
Sour Cream
Guacamole
Tomatoes, chopped
Green Onions, chopped

Preparation

1. Preheat oven to 350 degrees.
2. In a large skillet, heat olive oil.
3. Sprinkle both sides of chicken breasts with seasoning to taste.
4. Brown chicken in olive oil. Cook 10 minutes. (chicken will cook more later)
5. Cut/Shred cooked chicken into small pieces, set aside in small bowl.
6. Combine shredded cheeses into a small bowl, set aside.
7. Empty enchilada sauce into large bowl, set aside.
8. Wrap tortillas in a moist paper towel and microwave for 1 minute to steam.
9. Dip one warm corn tortilla into the enchilada sauce, coat both sides.
10. Cover the bottom of a 13 x 9 baking dish with dipped tortillas (approx 4).
11. Layer in the shredded/diced chicken on top of the tortillas.
12. Layer in the cheeses on top of the chicken.
13. Repeat layering dipped tortillas, chicken and cheese until baking dish is full.
14. Finish with a layer of dipped tortillas topped with a layer of cheese.
15. Bake at 350 degrees for 30-40 minutes or until cheese is melted.
16. Top with your choice of sour cream, guacamole, diced tomatoes and/or chopped green onions.
Credit: Foodista