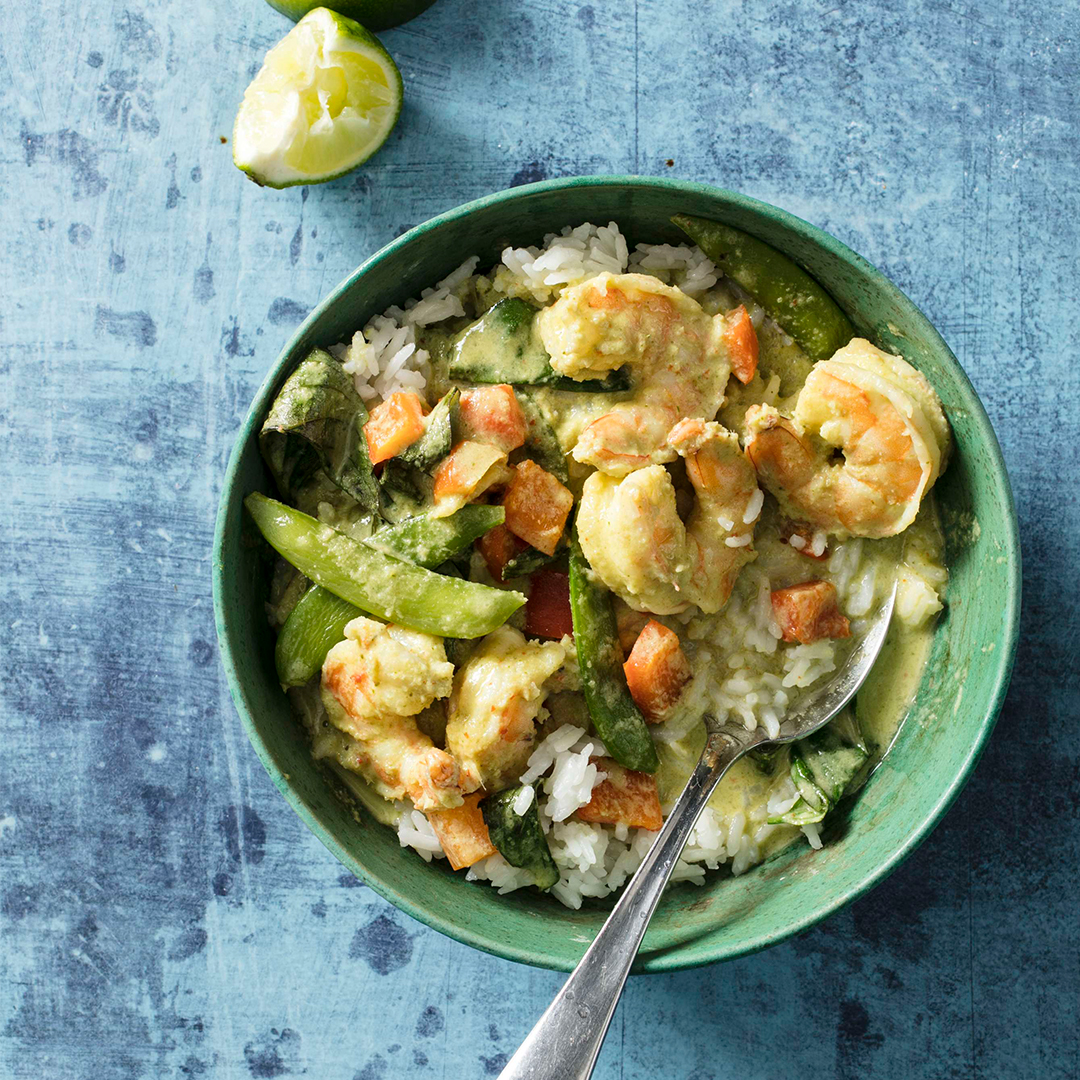
Post a Free Blog

Submit A Press Release

At CWEB, we are always looking to expand our network of strategic investors and partners. If you're interested in exploring investment opportunities or discussing potential partnerships and serious inquiries. Contact: jacque@cweb.com

Generic selectors
Exact matches only
Search in title
Search in content
Post Type Selectors
Filter by Categories
Action
Animation
Anime
ATP Tour (ATP)
Auto Racing
Baseball
Basketball
Boxing
Breaking News
Business
Business
Business Newsletter
Call of Duty (CALLOFDUTY)
Canadian Football League (CFL)
Car
Celebrity
Champions Tour (CHAMP)
Comedy
CONCACAF
Counter Strike Global Offensive (CSGO)
Crime
Dark Comedy
Defense of the Ancients (DOTA)
Documentary and Foreign
Drama
eSports
European Tour (EPGA)
Fashion
FIFA
FIFA Women’s World Cup (WWC)
FIFA World Cup (FIFA)
Fighting
Football
Formula 1 (F1)
Fortnite
Golf
Health
Hockey
Horror
IndyCar Series (INDY)
International Friendly (FRIENDLY)
Kids & Family
League of Legends (LOL)
LPGA
Madden
Major League Baseball (MLB)
Mixed Martial Arts (MMA)
MLS
Movie and Music
Movie Trailers
Music
Mystery
NASCAR Cup Series (NAS)
National Basketball Association (NBA)
National Football League (NFL)
National Hockey League (NHL)
National Women's Soccer (NWSL)
NBA Development League (NBAGL)
NBA2K
NCAA Baseball (NCAABBL)
NCAA Basketball (NCAAB)
NCAA Football (NCAAF)
NCAA Hockey (NCAAH)
Olympic Mens (OLYHKYM)
Other
Other Sports
Overwatch
PGA
Politics
Premier League (PREM)
Romance
Sci-Fi
Science
Soccer
Sports
Sports
Technology
Tennis
Thriller
Truck Series (TRUCK)
True Crime
Ultimate Fighting Championship (UFC)
US
Valorant
Western
Women’s National Basketball Association (WNBA)
Women’s NCAA Basketball (WNCAAB)
World
World Cup Qualifier (WORLDCUP)
WTA Tour (WTA)
Xfinity (XFT)
XFL
0
Home Blog Page 84

Thai Shrimp Curry

0
Photo Credit:- Cosori Air Fryers
Why This Recipe Works  â€‚Unlike Indian curries, Thai curries almost always contain coconut milk. Also, they tilt the spice balance towards fresh aromatics in the form of a homemade chile paste. For a streamlined Thai shrimp curry dish that was scaled down in effort but not in flavor, we eliminated homemade curry paste and went with a ­simplified sauce that could be easily assembled in the blender. A little chicken broth cut through the richness of a full can of coconut milk, while easy-to-find Thai staples such as Thai chiles (serrano or jalapeño chiles make great substitutes), fish sauce, lemon grass, brown sugar, lime juice, cilantro, and basil offered welcome complexity. Quick-cooking shrimp, snap peas, and red bell pepper paired well with our flavorful sauce. For a smooth sauce we found we needed to blend the ingredients first before heating it up in the blender. The vegetables needed a quick spin in the microwave to ensure tenderness and we also drained off excess liquid so as not to dilute our delicious curry sauce. We added the vegetables and the shrimp to the blender partway through the cook cycle. Note that because of the volume in the blender, the temperature of the sauce drops dramatically when you add the vegetables and shrimp–the shrimp effectively poaches at a low gentle temperature until just cooked and tender, while the snap peas and bell pepper remain tender ­crisp. If you can’t find Thai basil leaves, regular basil will work fine. Serve over rice.

INGREDIENTS

  • 1  can coconut milk  14‑ounce
  • 3  Thai chiles  stemmed, seeded, and chopped
  • 1/4  cup  fresh cilantro leaves
  • 6  garlic cloves  peeled and smashed
  • 1  lemon grass stalk  trimmed to bottom  6 inches  and chopped
  • 1  2-inch piece of ginger  peeled and chopped
  • 1  tbsp  fish sauce
  • 2  tsp  packed brown sugar
  • 1  tsp  grated lime zest  plus lime wedges for serving
  • 1  tsp  ground cumin
  • 6  oz  sugar snap peas  strings removed
  • 1  red bell pepper  stemmed, seeded, and cut into ½-inch pieces
  • 1  tsp  vegetable oil
  • 1  lb  extra-large shrimp  (21 to 25 per  pound) peeled, deveined, and tails removed
  • 1/4  cup  fresh Thai basil leaves
  • Lime wedges

INSTRUCTIONS

  1. Place coconut milk, chiles, cilantro, garlic, lemon grass, ginger, fish sauce, sugar, lime zest, and cumin in Ace blender. Lock lid in place, then process on  high speed  until smooth, about  2 minutes. Scrape down sides of blender jar. Return lid and Select  Soup Program 1  (for chunky soups).
  2. Meanwhile, microwave snap peas, bell pepper, and oil in bowl until vegetables are just beginning to soften, about  3 minutes; drain and set aside.
  3. Pause program  12 minutes  before it has completed. Carefully remove lid and stir snap peas, bell pepper, and shrimp into sauce until fully submerged. Return lid and replace lid cap with food tamper. Resume program, using tamper as needed to stir ingredients. Once program has completed, stir in basil and season with salt to taste. Serve with lime wedges.

Source:- Cosorithis

Chicken’s Piccata

0

Since moving to digital photos years back, I have developed a happy finger when it comes to taking pictures, so going thru all the pictures that I took, not only it’s fun, but I get to re-enjoy the happy moments shared with friends and family.

Going thru memory lane however, made me realize that I never shared this most recent recipe with all of you for Chicken Piccata.

Piccata is almost a staple in our house. I will prepare it with veal, chicken, fish… you name it and I try to pass it along for dinner. Fun and quick meal and you can prepare it with almost any side dishes. Mashed potatoes, pasta with lemon sauce, roasted vegetables…. The possibilities are endless.

Bon Appetit!!Giangi

Ingredients

8 chicken tights, skinless and boneless
Salt and Pepper
2 Tbsp. unsalted butter
1/2 cup dry white wine
1 tsp. minced garlic
¼ cup chicken broth
2 Tbsp. fresh lemon juice
1 Tbsp. capers, drained
Fresh lemon slices (optional)
2 Tbsp. unsalted butter
Chopped fresh parsley

Preparation

1. Season the chicken tights with salt and pepper. In a skillet add the butter and heat over medium-high.
2. Sauté the chicken tights for 5 to 6 minutes on one side. Turn them over and sauté the other side 5 to 6 minutes or until nicely browned and no juices are running, 5 go 6 minutes.
3. Add the wine and chicken broth to the pan and bring to a boil. Add minced garlic. Cook until garlic is slightly brown and liquid is nearly evaporated, about 2 minutes.
4. Add lemon juice, parsley and capers and continue cooking for another 3 to 5 minutes. Finish sauce with butter and lemons slices. Once butter melts and sauce is starting to get a bit thick, it is ready to serve.
5. Garnish with chopped fresh parsley and serve.
Credit: Foodista

Vortex Plus Pistachio-Crusted Rack of Lamb

0
Photo Credit:- Cosori Air Fryers

INGREDIENTS

  • 1  rack of lamb  trimmed and frenched, not more than  7 inch  wide and  7 inch  length
  • 1  tsp  kosher salt
  • 1/4  tsp  pepper
  • 1/3  cup  finely chopped pistachios
  • 2  tbsp  panko breadcrumbs
  • 1  tsp  fresh rosemary  finely chopped
  • 2  tsp  fresh thyme  finely chopped
  • 1  tbsp  butter  melted
  • 1  tbsp  dijon

OrganicGreek.com — Vitamin Bottles


INSTRUCTIONS

  1. Insert the spit into the rack on the meaty side of the ribs, right next to the bone. Use a pointed metal skewer to make an initial hole if needed. Thread the rotisserie forks from each side and tighten the screws to hold the rack firmly in place. Season the rack with salt and pepper.
  2. Place the drip pan in the bottom of the cooking chamber. Using the display panel, select  AIRFRY, then adjust the temperature to  380 degrees  and the time to  12 minutes, then touch  START.
  3. When the display indicates  “Add Food”  use the rotisserie fetch tool to lift the spit into the cooking chamber, using the red rotisserie release lever to secure the ends of the spit. Close the door and touch  ROTATE.
  4. Meanwhile, in a small bowl, combine pistachios, panko and herbs, then drizzle on butter and toss to distribute.
  5. When the AirFry program is complete, remove the rack, brush the meaty side with the dijon and press the pistachio mixture firmly on all sides of the meat. Place the rack on a cooking tray, meaty side up.
  6. Using the display panel, select  AIRFRY, then adjust the temperature to  380 degrees  and the time to  7 minutes, then touch  START.
  7. When the display indicates  “Add Food”  insert the cooking tray in the center position. When the display indicates  “Turn Food,”  do nothing.
  8. When the AirFry program is complete, check to make sure the thickest portion of the meat reads at least  140 degrees, then remove the rack and let it rest for at least  10 minutes  before slicing into individual chops and serving.
Source:- Cosorithis

Ace Plus Blender Chicken Tortilla Soup

0
Photo Credit:- Cosori Air Fryers

INGREDIENTS

  • 14  oz  can diced tomatoes
  • 1/2  tsp  ground cumin
  • 3  cloves  garlic  minced
  • 1-2  chipotles in adobo sauce
  • 1  small onion  roughly chopped
  • 2/3  cup  diced or shredded carrots
  • 2  cups  chicken broth
  • 1  lb  chicken breast cut into 1/2” cubes
  • 1  cup  frozen corn kernels
  • 3  Corn tortillas  cut into shreds
  • Shredded cheese and diced avocado  for garnish

INSTRUCTIONS

  1. Add diced tomatoes, cumin, garlic, chipotles, onion and carrots–in that order–to the blender pitcher and secure the lid.
  2. Touch  PULSE, then touch  START. After  3 pulses, touch  CANCEL.
  3. Add broth, chicken and corn to the pitcher and stir to combine, scraping down the sides and bottom of pitcher.
  4. Touch  SOUP  once (chunky soup) and use  +/-  to set the time to  15:00 minutes, then touch  START.
  5. When  Soup  program is complete, use a thermometer to ensure the soup is at least  165 degrees  and chicken is cooked through.
  6. Add tortilla shreds and pulse once to combine.
  7. Serve hot garnished with cheese and diced avocado.
Source:- Cosorithis

Chicken With Rosemary and Balsamic

0

This is a quick and easy dish that goes very well with Parmesan Polenta, pasta or Garlic Mashed Potatoes.

Ingredients

4 to 6 Boneless  Chicken Breasts
Olive Oil
Garlic,  6 to 8 cloves, minced
Fresh  Rosemary,  a couple of tablespoons, snipped
Coarse Ground  Pepper
Sea Salt
Balsamic Vinegar

Preparation

1. Using a mallet, pound chicken to a uniform thickness. Putting it inside a big ziploc bag contains the mess nicely.
2. Strip rosemary leaves from stem and snip with kitchen shears until it is moderately fine.
3. Lightly cover the bottom of a large saute pan with olive oil.
4. Heat  over medium  heat  until well-heated but not  smoking.
5. Carefully arrange chicken in pan and  season  with  salt  and pepper.
6. Cook until the bottom half of each piece  turns  white and it comes up easily when you  turn  it with a spatula.
7. Turn  chicken and  season  this side with  minced  garlic and snipped rosemary.
8. Cook until it again comes up easily when  turned  with a spatula.
9. Sprinkle generously with maybe a 1/4 to 1/3 cup balsamic vinegar.
10. Reduce  heat  to low and cook just until chicken is done,  turning  occasionally.
11. Remove to platter and cover with pan  juices,  scraping up bits of garlic and rosemary.
Credit: Foodista

Road Map: Bone-In Chicken Breasts

0
Photo Credit:- Cosori Air Fryers
Unlike boneless breasts, bone-in chicken breasts are thicker and thus benefit from being set down in the liquid in the pot (rather than up on a rack or in a steamer). You’ll use less liquid here than with our technique for boneless skinless breasts because these breasts will thaw and release water and other liquid into the pot as they cook.Because of the way the bones add a distinct depth of flavor to the meat, bone-in chicken breasts are a great choice if you want to debone and chop the meat for chicken salad and pasta salad, or to slice the meat for sandwiches. Be forewarned: You must check the internal temperature of the meat with an instant-read meat thermometer. Bone-in breasts have varying thicknesses – and varying amounts of internal moisture depending on whether they’ve been injected with a brining solution. While our timing worked several times in testing, there are safety concerns with eating undercooked poultry. Better safe than sorry. See step 3 for more details on checking the meat’s internal temperature.Finally, to get the skin crisp, transfer the cooked breasts skin side up onto a lipped baking sheet. Set the oven rack about 6 inches from the broiler, heat the broiler, then brown the breasts under it for 1— 2 minutes.

INGREDIENTS

  • 1  cup  liquid  Choose  from water, broth of any sort, wine of any sort, beer of any sort, unsweetened apple cider or a combination of any of these.
  • 6  frozen bone‑in skin‑on chicken breasts  12-14 ounces
  • 2  tbsp  dried seasoning blend  Choose  from Provençal, Cajun, poultry, taco, Italian, or another blend you prefer or create.
  • 1 1/2  tsp  table salt  Optional (check to see if the seasoning blend includes salt)

INSTRUCTIONS

  1. Pour the liquid into a Instant Pot. Position the bone-in chicken breasts in the liquid in a crisscross pattern (rather than stacking them on top of each other) so that steam can circulate among them. Sprinkle the top of each with  1 tsp  dried seasoning blend and  1/4 tsp  salt (if using). Lock the lid onto the pot.
  2. Optional 1  Max Pressure Cooker
    Press Pressure cook on Max pressure for 35 minutes with the Keep Warm setting off.
  3. Optional 2  All Pressure Cookers
    Press Poultry, Pressure Cook or Manual on High pressure for 40 minutes with the Keep Warm setting off. (The Valve must be closed)
  4. Use the quick- ­release method to bring the pot’s pressure back to normal. Unlatch the lid and open the cooker. Insert an instant-read meat thermometer into the center of a couple of the breasts, without touching bone, to make sure their internal temperature is  165 °F. The meat can be a little pink at the bone and still perfectly safe to eat, so long as its internal temperature is correct. If the internal temperature is below  165 °F  (or if you’re worried about the color), lock the lid back onto the pot and give the breasts 3 extra minutes at MAX, or 4 minutes at HIGH. Again, use the quick- ­release method to bring the pot’s pressure back to normal.
  5. Use kitchen tongs to transfer the breasts to serving plates or a serving platter to serve. Or cool them at room temperature for 10 minutes or so, then store in a sealed container in the fridge for up to 3 days.

RECIPE NOTES

Beyond
– For an 8-quart Instant Pot,you must use 1 1⁄2 cups liquid.You can also fit up to eight 12- to 14-ounce bone-in chicken breasts in the larger pot. There is no change in the cooking timing under pressure (although the pot will take longer to come to pressure).
– If you’ve used water and/or broth, the resulting liquid in the pot is an astounding chicken stock. Don’t throw it out! Save it in a sealed container in the fridge for up to 2 days or in the freezer for up to 3 months. Use it in place of chicken broth in any recipe.
– Consider making the liquid in the pot a 50-50 split of broth and the brine from a jar of pickles, pepperoncini, or pickled jalapeño rings. In this case, omit the salt. (And the
remaining liquid in the pot won’t be fit to be used as stock.)
*Using a — ­20 °F CHEST FREEZER?

Cook under pressure in step 2 for 40 minutes on the MAX setting, or for 45 minutes on the HIGH setting, followed by a quick release.

Source:- Cosorithis

Chicken Fajitas

0
Photo Credit:- Cosori Air Fryers
Fajitas are so easy when you start with frozen chicken tenders! You may need to cut the tenders into smaller bits before serving them, depending on how stuffed you like the tortillas. We prefer them filled to the brim with whole tenders in the mix. You may want to take more, um, delicate bites. The best way to cut them to bits is to use kitchen shears after cooking. The pickling brine from the jalapeño rings adds salt and a little sour kick to the dish. The amount you use is not crucial (there’s already enough liquid in the pot). Just stick a tablespoon into the jar and pull out some of the rings with their brine. A little more or less won’t change the overall character of the dish. Unfortunately, because of the way the timing works in this recipe, you can’t use fresh bell pepper strips. They get too soggy with the longer cooking time that the chicken tenders require.

INGREDIENTS

  • 1  large onion  peeled, halved, and sliced into thin half- ­moons
  • 3/4  cup  chicken broth
  • 12  ounces  fajita seasoning  (1 package) (a gluten- ­free version if that’s a concern)
  • 2  tbsp  pickled jalapeño rings with some of the pickling juice
  • 2  lbs  frozen chicken tenders
  • 1  lb  frozen bell pepper strips  (4 cups

INSTRUCTIONS

  1. Place the onion slices in an Instant Pot. Add the broth, half the seasoning blend, and all the pickled jalapeño rings with their juice and stir well. Set the pot’s rack (with its handles up) or a large, open vegetable steamer in this mixture.
  2. Set half the chicken tenders on the rack. Sprinkle them with half the remaining seasoning blend (that is, a quarter of the original volume). Top with the remaining chicken tenders and sprinkle with the remaining seasoning blend. Top everything with the bell pepper strips. Do not stir or toss. Lock the lid onto the pot.
  3. Optional 1  Max Pressure Cooker
    Press Pressure cook on Max pressure for  12 minutes  with the Keep Warm setting off.
  4. Optional 2  All Pressure Cookers
    Press Poultry, Pressure Cook or Manual on High pressure for  15 minutes  with the Keep Warm setting off.
  5. Use the quick- ­release method to bring the pot’s pressure back to normal. Unlatch the lid and open the cooker. Use kitchen tongs, silicone cooking mitts, or thick hot pads to remove the rack or steamer from the pot, letting the chicken fall into the sauce below. Stir well.
  6. Press the button for SAUTE, set it for High, More or Custom  400 °F. Set the timer for  15 minutes.
  7. As the sauce comes to a simmer, use a slotted spoon to transfer the chicken tenders and the vegetables to a serving platter. Boil the sauce, stirring often, until reduced to a glaze, about  10 minutes. Turn off the SAUTÉ function and pour the sauce over the chicken and vegetables before serving.

RECIPE NOTES

Beyond
– For an 8-quart Instant Pot, you must either use  1 1/4 cups  broth or increase all the ingredients by 50 percent. (The sauce will take up to 5 minutes longer to reduce in step 6.)
– This recipe delivers only the chicken and vegetables for fajitas. You’ll also need warmed flour or corn tortillas; peeled, pitted, and thinly sliced avocados; shredded Monterey Jack, Cheddar, or Swiss cheese (or even a purchased Tex-Mex blend); minced scallions; sour cream; and/or stemmed, minced fresh cilantro leaves.
– If you want to make your own seasoning blend, skip the packet and mix the following in a small bowl:  1 tbsp  chili powder,  1 tbsp  mild smoked paprika,  1 tbsp  ground cumin,  1 tbsp  dried oregano,  1 tbsp  dark brown sugar, and  1 tbsp  table salt.
*Using a — ­20 °F CHEST FREEZER?
There is no difference in cooking times.

Source:- Cosorithis

Chicken with Peas, Sage and Bacon

0

How do you like your chicken? I am always in the quest for a great recipe.   With winter very mild here in the South West, the warmth and rich winter fare is not so present in our dinner table.   However, this recipe can transport to that cold weather vibe.

An easy sauce that goes perfectly with chicken, mashed potatoes and even poached egg as something new and exciting.   Do, however, make it at the last minute as the cream as a tendency to harden and you want it a bit runny. Delicious either way.

Ingredients

1 tablespoon olive oil
2 shallots finely sliced
1 garlic clove smashed
3/4 cup white wine
1 1/3 cup heavy cream
3/4 cup frozen peas
1 tablespoon chopped sage
8 chicken tights, bone and skin on

Preparation

1. Preheat oven at 350F.
2. Remove all the extra fat from the chicken and place skin up in an ovenproof dish. Salt and pepper abundantly and sprinkle a bit of olive oil over the chicken. Bake in a hot oven for 30 minutes.
3. In a large with high side pan, add the olive oil and sauté the shallots, bacon, and garlic. Stir regularly. When the bacon is cooked to crisp add the wine and bring it to a boil. Lower the heat and simmer for 2 minutes and reduce to half.
4. Add the heavy cream and peas. Bring back to a boil before lowering the heat to a simmer. Simmer for 4 minutes stirring occasionally. Add the sage and cook at low heat for another 2 minutes.
Credit: Foodista

Chicken Teriyaki

0
Photo Credit:- Cosori Air Fryers
Why use bottled teriyaki sauce when it’s so easy to make your own with all the “chicken goodness” in the pot from the meat thawing and cooking? Teriyaki is usually grilled, of course. To make a successful version of teriyaki in the pot, it’s best to cook the chicken in the aromatic sauce, then boil that sauce down to a thick glaze to use as a coating for the meat. Think of its final viscosity as about like duck sauce or Thai sweet chili sauce. Stir a lot as it cooks down because the sugars can start to burn.

INGREDIENTS

  • 3/4  cup  chicken broth
  • 1/2  cup  regular or reduced-sodium soy sauce or tamari
  • 1/2  cup  frozen chopped onion  or  1 small  yellow or white onion peeled and chopped
  • 3  tbsp  light brown sugar
  • 2  tbsp  fresh ginger  peeled and minced
  • 1  tbsp  garlic  peeled and minced
  • 3  lbs  frozen boneless skinless chicken thighs

INSTRUCTIONS

  1. Mix the broth, soy sauce or tamari, onion, brown sugar, ginger, and garlic in an Instant Pot. Add the block or hunks of frozen chicken, stir well, and lock the lid onto the pot.
  2. Optional 1  Max Pressure Cooker
    Press Pressure cook on Max pressure for  17 minutes  with the Keep Warm setting off.
  3. Optional 2  All Pressure Cookers
    Press Poultry, Pressure cook or Manual on High pressure for  20 minutes  with the Keep Warm setting off.
  4. When the machine has finished cooking, turn it off and let its pressure return to normal naturally, about 25 minutes. Unlatch the lid and open the cooker. Use tongs or a slotted spoon to transfer the chicken thighs to a bowl.
  5. Press the button for  SAUTE. Set it for HIGH, MORE or CUSTOM  400 °F. Set the time for  15 minutes  and if necessary, press START.
  6. Bring the sauce in the pot to a boil, stirring often. Continue boiling, stirring more and more frequently until almost constantly, until the sauce is a thick glaze, about 7 minutes. Turn off the  SAUTÉ  function. Return the chicken thighs and any juices to the cooker. Stir until the chicken is coated in the glaze. Transfer the pieces to a serving platter or plates.

RECIPE NOTES

Beyond
– For an 8-quart Instant Pot,you must increase all the ingredients by 50 percent.
– Garnish the chicken with minced scallions and/or sesame seeds.
– Or drizzle with toasted sesame oil.
– Serve the chicken teriyaki over sticky, cooked, short-grain white rice (such as sushi rice) or cooked and drained millet.

*Using a — ­20 °F CHEST FREEZER?
There is no difference in cooking times.

Source:- Cosorithis

Buffalo Chicken Wings

0
Photo Credit:- Cosori Air Fryers
Frozen wings are so easy in the cooker! And so delicious. The wings thaw quickly and cook in no time. Although we assume you’ll use both the wingette and the drumette portion of the wing, you can use just one or the other at your preference. At the supermarket, look for individually frozen chicken wings. If you buy fresh wings on sale and want to freeze them, take the wings out of their packaging and freeze them in a fairly condensed hunk in a plastic bag for up to 3 months. In that case, you’ll need to set the hunk on the cooker’s rack, slanting up to the pot’s insert, and cook on MAX for 18 minutes or on HIGH for 22 minutes, followed by a quick release. You’ll also need to break the wings apart when you open the pot. If they’re still not cooked through (because of the density of the mass), cook them for another 3 minutes on either MAX or HIGH followed by a quick release.

INGREDIENTS

  • 1/2  cup  red hot sauce  preferably Texas Pete or Frank’s Red Hot
  • 1/4  cup  chicken broth
  • 4  tbsp  butter  (1/2 stick) cut into three or four pieces
  • 2  tbsp  dried Cajun seasoning blend  (a gluten- ­free version if that’s a concern)
  • 3  lbs  not- ­breaded frozen chicken wings  (preferably individually frozen wings (sometimes called “ice glazed”)
  • 1/2  cup  mayonnaise  regular or low- ­fat
  • 1/2  cup  sour cream  regular or low- ­fat
  • 2  oz  crumbled blue cheese  1/2 cup
  • 1/2  tsp  onion powder
  • 1/2  tsp  ground black pepper

INSTRUCTIONS

  1. Stir the hot sauce, broth, butter, and seasoning blend in an Instant Pot. Set the wings in the sauce and toss well. Lock the lid onto the pot.
  2. Optional 1  Max Pressure Cooker
    Press Pressure cook on Max pressure for  12 minutes with the Keep Warm setting off.
  3. Optional 2  All Pressure Cookers
    Press Poultry, Pressure cook or Manual on High pressure for  15 minutes  with the Keep Warm setting off.
  4. Use the  quick- ­release method  to bring the pot’s pressure back to normal. Unlatch the lid and open the cooker. Use tongs to transfer the wings to a large serving platter.
  5. Whisk the mayonnaise, sour cream, blue cheese, onion powder, and pepper in a small bowl until creamy. Serve alongside the hot wings as a dip (perhaps with some of the boiled-down liquid from the machine for a second dip).

RECIPE NOTES

Beyond
– For an 8-quart Instant Pot, you must increase all the ingredients by 50 percent.
– To make these wings crisp (and thus take them over the top): In step 3, use tongs to transfer them from the cooker to a large, lipped baking sheet. Position the oven rack about 4 inches from the broiler and heat the broiler. Broil the wings until crunchy, basting several times with the pot’s juices and turning once, 2—3 minutes.
– Buffalo wings need celery and carrot sticks!
– Although this blue cheese dip is traditional, we’ll confess we’ve come to like the wings with ranch dressing that’s been mixed with minced pickled jalapeño rings and minced chives.

*Using a — ­20 °F CHEST FREEZER?
There is no difference in cooking times.

Source:- Cosorithis