At CWEB, we are always looking to expand our network of strategic investors and partners. If you're interested in exploring investment opportunities or discussing potential partnerships and serious inquiries. Contact:jacque@cweb.com
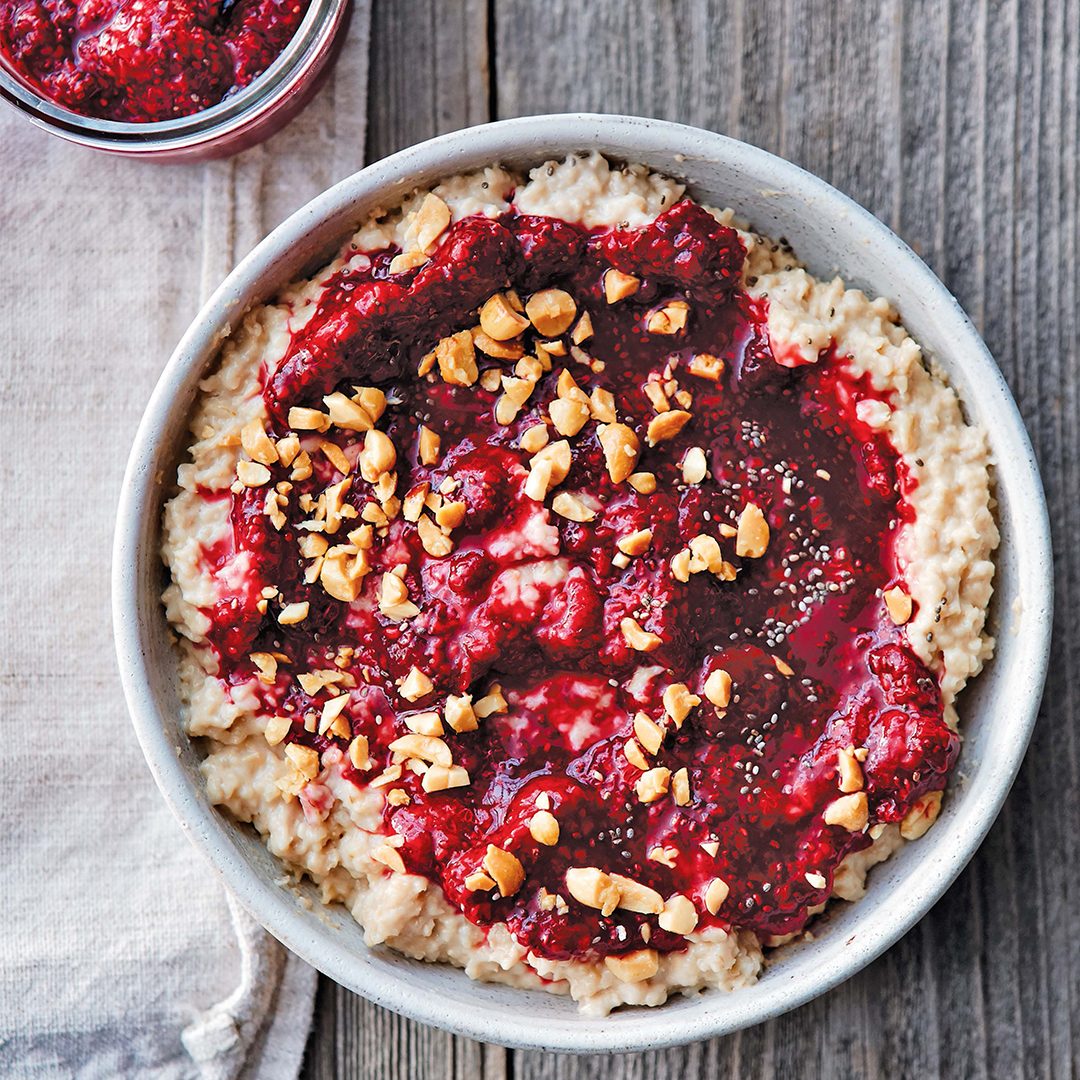
PBJ sandwiches were one of my favorite foods growing up. I still love that flavor combination to this day, even in oatmeal form. Peanut butter is stirred into steel-cut oats, making them extra creamy, and a sprinkle of chopped peanuts on top adds a little crunch. The jam is a no-cook affair–it’s thickened with chia seeds, and you can make it with frozen raspberries year-round.
INGREDIENTS
Jam
12ozfrozen raspberries1 bag, frozen, thawed the fridge overnight,
1/4cupagave nectaror brown rice syrup
1tbspchia seeds
1pinchfine sea salt
Oatmeal
2tbspcoconut oil
1 1/2cupssteel cut oats
4 1/2cupsWater
1/4cupsmooth natural peanut butter
1/2cuproasted salted peanutschopped
INSTRUCTIONS
To make the jam: In a bowl, combine the thawed raspberries, agave, chia seeds, and salt. Stir for about 1 minute, until the raspberries are mostly broken up, the agave nectar is dissolved, and the chia seeds are distributed evenly throughout. Cover and transfer to the refrigerator to firm up for at least 2 hours, or up to overnight. The jam will keep in an airtight container, refrigerated, for up to 1 week. Stir once more before serving.
Secure the lid and set the Pressure Release to Sealing. Press the Cancel button to reset the cooking program. Then select the Porridge setting and set the cooking time for 12 minutes at High pressure. (The pot will take about 10 minutes to come up to pressure before the cooking program begins.)
When the cooking program ends, let the pressure release naturally for 10 minutes, then move the Pressure Release to Venting to release any remaining steam. Open the pot and stir in the peanut butter, as well as any liquid sitting on top of the oatmeal.
To serve, ladle the oatmeal into bowls and serve with a dollop of jam swirled in and the chopped peanuts sprinkled on top.
I really wanted Chile Rellenos for dinner, but I don’t want to fry them. I came up with this version, that is lighter, healthier, and delicious. It’s got all the nice lightness of whipped egg whites, and all the flavor of the fried version.
Ingredients
12 ANAHEIM OR POBLANO CHILES
1 cup GRATED SHARP CHEDDAR
3 EGGS- SEPARATED
3 tablespoons FLOUR
1 tablespoon GRATED ONION
1/4 teaspoon PEPPER
1/2 teaspoon SALT
1/2 teaspoon GARLIC SALT
1 tablespoon WATER
Preparation
1. Roast or broil the chilies.
2. Peel, stem and seed them. Set aside.
3. Preheat oven to 400*
4. In a small bowl, stir the egg yolks together. Add the flour, grated onion, pepper, salt garlic salt and water.
5. Stir well to combine.
6. In a medium bowl, beat the egg whites until stiff. Add the yolk mixture and stir to combine.
7. In a small casserole dish, layer 4 of the chiles, top with about 1/3 cup grated cheese.
8. Top with about 1/3 of the egg mixture.
9. Repeat this for two more layers.
10. Bake for 20 minutes until the casserole is bubbling and the top is lightly browned.
Ras el hanout is one of my favorite spice blends, and it works well in this Moroccan-inspired stew of great Northern beans and soft, silky carrots. Recipes vary for the spice blend (my favorite comes from Oaktown Spice Shop), but it’s always warmly sweet with paprika, cinnamon, and at least a hint of heat. Serve the tagine over couscous or with flatbread on the side. Low-sodium vegetable broth Makes about 2 Quarts This broth contains a fairly low level of sodium. It is comparable to store-bought low-sodium vegetable broth, low-sodium bouillon, and reduced-sodium Better Than Bouillon. If you use a full-sodium, store-bought broth in the recipes in this book, you may need to reduce the amount of salt and/or other salty ingredients.
INGREDIENTS
Low-sodium vegetable broth
1tbspextra-virgin olive oil
1large yellow oniondiced
4clovesgarlicsmashed
2large carrotsdiced
4celery stalksdiced
2tspfine sea salt
2tbsptomato paste
2tbspnutritional yeast
8cupsWater
1tspblack peppercorns
2leavesbay
3ozflat-leaf parsley1 bunch
White Bean and Carrot Tagine
2 1/2cupsdried great Northern beans1 pound
1/4cupextra-virgin olive oilplus more for serving
4clovesgarlicminced
1yellow onionsliced
3cupslow sodium vegetable brothrecipe above
1lbscarrots8 medium, peeled and cut into 1â„2-inch rounds,
Secure the lid and set the Pressure Release to Sealing. Press the Cancel button to reset the cooking program. Then select the Soup/Broth setting and set the cooking time for 10 minutes at High pressure. (The pot will take about 20 minutes to come up to pressure before the cooking program begins.)
Place a wire-mesh strainer over a large stainless-steel bowl. For a clearer broth, line the strainer with a double layer of cheesecloth.
When the cooking program ends, let the pressure release naturally for 30 minutes, then move the Pressure Release to Venting to release any remaining steam. Open the pot and, wearing heat-resistant mitts, lift out the inner pot and pour the broth through the prepared strainer into the bowl. Discard the vegetables. Let the broth cool to room temperature. (To speed the cooling process, set the bowl in a larger bowl containing an ice bath.)
The broth can be used right away, stored in an airtight container in the refrigerator for up to 3 days, or frozen for up to 6 months.
Secure the lid and set the Pressure Release to Sealing. Press the Cancel button to reset the cooking program. Then select the Manual or Pressure Cook, or Bean/Chili setting and set the cooking time for 30 minutes at High pressure. (The pot will take about 15 minutes to come up to pressure before the cooking program begins.)
When the cooking program ends, let the pressure release naturally (this will take about 40 minutes). Open the pot and stir in the tomato paste and lemon juice. Taste and adjust the seasoning with salt, if needed.
Ladle the tagine into bowls. Drizzle with oil and sprinkle with mint. Serve hot, with couscous or flatbread.
RECIPE NOTES
If you don’t have ras el hanout, make your own by combining 2 teaspoons paprika, 1/2 teaspoon ground cinnamon, 1/2 teaspoon ground coriander, 1/2 teaspoon ground cumin, and 1/4 teaspoon cayenne pepper.
In a bowl, combine the beans with 4 cups water and 1 teaspoon of the salt. Let soak for 10 to 12 hours, or overnight. Drain the beans and set aside.
September 1 marks an important day in food culture: It’s the day it becomes socially acceptable to put pumpkin in everything. But, the real star of fall should be kabocha squash. Its light, velvety texture and sweet, nutty notes make it the perfect mash-up between a sweet potato and a pumpkin.
You can find this underrated winter squash (also known as a Japanese pumpkin) at farmers’ markets, Asian grocers, and stores like Trader Joe’s and Whole Foods. Its peak season is late summer and fall, though you may find it year-round.
The sweetness of the kabocha squash shines in this soup and is underscored by a sweetness from juicy Fuji apples. There’s a little heat from Thai chile peppers and a pungency from fresh ginger and lemongrass. The result is a harmoniously flavored soup that is light yet creamy, making it the ideal starter at your Thanksgiving table.
INGREDIENTS
1 1/2tbspgrapeseed oil or other neutral high-heat cooking oil
1Kabocha squash
1large yellow oniondiced
2medium carrotsdiced
4garlic clovesminced
2-inchpiece fresh gingergrated or minced
3Thai green chile peppersthinly sliced (seeded for a milder heat or omit entirely)
4cupslow sodium vegetable broth
2large Fuji applesunpeeled and roughly chopped
1 1/2tspkosher salt
13.5ouncefull fat coconut milk1 can
1tbspreduced- sodium tamari or soy sauce
2pieceslemongrass stalkstough outer layers removed and stalks cut into 6-inch, optional but highly recommended
Using a large, sharp knife, halve the squash through the stem and cut off the stem. You may need to microwave the whole squash for 2 to 3 minutes to soften it and make it easier to slice. Once halved, use a large spoon to scoop out the seeds and gunk. Cut each half into 3 or 4 wedges, lay each wedge flat on its side, and use a knife to cut the peel off. Then, cut the squash into 1 1/2-inch chunks. You should end up with about 5 cups of squash.
Add the garlic, ginger, and chiles (if using) and cook for 1 minute, stirring frequently.
Pour in the vegetable broth to deglaze the pan and use a wooden spoon to scrape up any browned bits on the bottom of the pot. Add the kabocha squash, apples, salt, coconut milk, tamari, and lemongrass. Stir to combine well. Select the Cancel setting.
Secure the lid and set the Pressure Release to Sealing. Select the Soup setting at high pressure and set the cook time to 12 minutes.
Once the 12-minute timer has completed and beeps, allow a natural pressure release for 5 minutes and then switch the Pressure Release knob from Sealing to Venting to release any remaining steam.
Open the pot and discard the lemongrass stalks. Using an immersion blender, puree the soup for a few minutes until you have a thick and creamy soup. (Alternatively, blend the soup in batches in a high-powered blender. Be sure to remove the center cap from the blender lid to vent steam, but cover the hole with a kitchen towel.)
Stir in 1 tsp lime juice and taste. Add another tsp of lime juice, if desired, and adjust the seasonings accordingly. Transfer the soup to bowls and garnish as desired.
RECIPE NOTES
As much as I love kabocha squash in this soup, if you can’t find it, you can replace it with butternut squash or sweet potatoes. Butternut squash is earthier and less sweet than kabocha, so I recommend adding either a tablespoon of maple syrup or 2 more Fuji apples. Sweet potatoes are sweeter, so you can omit the apples.
Eggs Benedict with slow cooked barbacoa and a green chili hollandaise served on a chilaquiles base.
Ingredients
1 (14.5-oz) can fire roasted diced tomato with green chili
12 6-inch corn tortillas
1 cup Mexican four cheese blend
2 egg yolks
1 teaspoon lemon juice
1/2 teaspoon kosher salt
1 pinch cayenne pepper
1/4 cup melted butter, warm
1 cup your favorite green chili sauce (I used a mild green enchilada sauce)
4 eggs, poached
2 cups beef barbacoa, warm
Freshly ground pepper
Chopped fresh parsley for garnishing
Preparation
1. Preheat oven to 400 °F.
2. Place fire roasted diced tomatoes with green chili in a food processor and pulse chop a few times until the tomatoes are not chunky anymore. But do not puree them.
3. Spray a 8X10″ baking sheet with cooking oil and line it with 4 corn tortillas, ensuring that there are no gaps.
4. Spread 1/3 of the tomatoes and chili mixture on the tortillas and add 1/3 cup cheese. Repeat the process until all the chilaquiles base ingredients are used.
5. Bake for 10 minutes or until the cheese has completely melted and the tomato and chili mixture has soaked into the tortillas. Let cool.
6. While the chilaquiles base is in the oven, start making the Hollandaise sauce by combining the egg yolks, lemon juice, salt and cayenne pepper. Whisk over double boiler until doubled in volume. If you don’t have a double boiler (I don’t), you can do this in a porcelain bowl over a medium sauce pan with a bit simmering water. Keep your heat moderate to avoid curdling the yolks.
7. Remove from heat and slowly drizzle the warm melted butter in as you whisk until all butter has been incorporated in the sauce (if the butter is added too fast, the sauce will break). Adjust seasoning if desired.
8. Keep the sauce in a warm place at approximately 150 °F. I kept mine over the saucepan with low heat on. Add the warm green chili sauce and stir until blend.
9. Poach 4 eggs and place them in cold water to stop them from cooking.
10. Cut the chilaquiles base into 4 circles with a biscuit cutter. If you don’t have a biscuit cutter, just cut it into 4 squares with a knife. Prepare two serving plates and place two pieces of the base on each plate.
11. To assemble the Eggs Benedict, top each base with 1/2 cup barbacoa, followed by a poached egg. Drizzle with green chili hollandaise. Repeat to finish the other three Eggs Benedict.
12. Sprinkle with freshly ground pepper and chopped fresh parsley. Serve with your favorite pico de gallo.
There are three keys to making tofu taste delicious. First, select the right variety. Tofu comes in many forms, but the extra-firm variety–with its spongy, dense texture and low water content–is best for frying, as in this recipe. Second, unless you are using a soft or silken tofu, you’ll almost always want to press out the excess water in tofu. This drastically improves the texture, helps the tofu hold its shape when cooked, and enables more flavor to seep into the tofu. Finally, don’t be stingy with seasonings, whether it’s spices, aromatics, or sauces. Tofu is a blank canvas and easily takes on the flavors it’s given. For the tofu skeptics in my life, I often recommend trying this Chinese takeout-style tofu. It’s a little crispy on the outside, soft and tender in the inside, and saturated with lots of bold flavors like ginger, Sriracha, and toasted sesame. Since broccoli cooks very quickly in the Instant Pot, this recipe calls for pressure-cooking the tofu for a few minutes before adding the broccoli. To make this a complete, balanced meal, serve alongside rice or your favorite grain.
INGREDIENTS
MARINATED TOFU
14ozextra firm tofu1 block
3tbspreduced- sodium tamari or soy sauce
2tspSriracha or similar chili-garlic sauce
1tsptoasted sesame oil
2tsprice vinegar
GINGER-CHILI SAUCE
1/4cupreduced- sodium tamari or soy sauce
1/4cupagave nectar or coconut nectar(or maple syrup but that will have a more robust, less neutral flavor)
2tbspWater
1 1/2tbspSriracha or similar chili-garlic sauce
1tbsptoasted sesame oil
1tbsprice vinegar
1/2inchpiece fresh gingergrated or finely minced
FOR FINISHING
1 1/2tbspgrapeseed oilor other neutral high-heat cooking oil
2medium heads broccolicut into small florets (about 4 cups)
2tbspcornstarch
FOR SERVING
White rice or brown rice
INSTRUCTIONS
Marinate the tofu: Drain the tofu and cut into 4 slabs . Place the tofu on a cutting board lined with paper towels. Place more paper towels on top of the tofu and weight them down with a few heavy cookbooks or a heavy skillet filled with a few cans of beans. Let sit for at least 30 minutes or ideally 1 hour , changing the paper towels in between to drain all of the moisture. Cut the tofu into 3/4-inch cubes.
Place the tofu in a gallon-size zip-top bag and add the tamari, Sriracha, sesame oil, and vinegar. Toss to combine and let the tofu rest in the marinade for 5 minutes , massaging occasionally.
Meanwhile, make the ginger-chili sauce: In a medium bowl, whisk together the tamari, agave nectar, water, the Sriracha, sesame oil, vinegar, and ginger until well combined.
Secure the lid and set the Pressure Release to Sealing. Select the Pressure Cook setting at high pressure and set the cook time to 3 minutes .
Once the 3-minute timer has completed and beeps, perform a quick pressure release by carefully switching the Pressure Release knob from Sealing to Venting .
Open the pot. Add the broccoli florets to the tofu and stir with the sauce to combine. Secure the lid and set the Pressure Release to Sealing. Select the Pressure Cook setting to low pressure and set the cook time to 1 minute . Once the 1-minute timer has completed and beeps, carefully perform another quick pressure release.
My ï¬rst date with my partner was at a Vietnamese restaurant. I had never tasted pho, and he insisted that I try it. I became hooked immediately. Nearly ï¬ve years later, we found ourselves crouched on tiny plastic stools in the alleyways of Hanoi’s Old Quarter, devouring bowls of steaming broth and noodles that were remarkably light yet complex in flavor. The richness of the broth was perfectly balanced by the endless array of toppings– fresh herbs, spicy chile peppers, tangy lime wedges, and crunchy bean sprouts. To achieve this depth of flavor, pho broth is traditionally simmered for hours. However, with pressure cooking, you can achieve a richly flavored broth in a fraction of the time. Begin by charring onions and ginger for smokiness and sweetness. And some tips about this step: Don’t skimp on the oil, or you’ll have a mess to scrape up; and you may want to wear long sleeves or gloves, as the hot oil can splatter. When topping the pho, tear up the fresh herbs, as it releases their essential oils and perfumes the soup with an intoxicating aroma.
INGREDIENTS
12ouncesdried rice noodlesdried rice sticks, or banh pho (see Tips)
BROTH
2tablespoonsgrapeseed oil or other neutralhigh- heat cooking oil
2medium yellow onionspeeled and halved
4inchpiece fresh gingerthinly sliced
3cardamom podslightly smashed with the back of a knife
3whole star anise pods
4whole cloves
1cinnamon stick
1tablespooncoriander seeds
1teaspoonfennel seeds
1/2teaspoonwhole black peppercorns
1Fuji applepeeled and cut into large chunks
1/2cupfresh cilantroroughly chopped
2tablespoonsreduced- sodium tamari or soy sauce
1tablespooncoconut sugar
2cupssliced shiitake mushroom caps(5- 6 ounces) 8 cups low-sodium vegetable broth (you can substitute water for up to 4 cups)
1teaspoonkosher saltplus more to taste
TOPPINGS
1block baked tofucut into cubes, 6-8 ounce, see Tips
3scallionssliced on the diagonal
1cupThai basil leavestorn up
1cupCilantro leavestorn up
2limescut into wedges
2cupsbean sprouts
Thinly sliced hot chile peppers or Sriracha
INSTRUCTIONS
Place the dried rice noodles in a large bowl, cover with warm water, and soak until the noodles are pliable and opaque, 30 to 45 minutes. Drain the noodles and rinse them to remove excess starch. (Alternatively, cook the noodles according to the instructions on the package.)
Add the whole spices (cardamom pods through black peppercorns) and cook for 1 minute , stirring the mixture frequently. Add the apple, cilantro, tamari, coconut sugar, and shiitakes. Pour the vegetable broth and/or water on top and stir to combine. Select the Cancel setting.
Secure the lid and set the Pressure Release to Sealing . Select the Pressure Cook setting at high pressure and set the cook time to 15 minutes .
Once the 15- minute timer has completed and beeps, allow a natural pressure release for 10 minutes and then switch the Pressure Release knob from Sealing to Venting to release any remaining steam.
Open the pot and, using oven mitts, remove the inner pot. Carefully strain the broth into a ï¬ne- mesh sieve set over a large bowl (discard the solids). Season the broth with 1 teaspoon salt, stir, and taste. Add more salt as needed. Select the Cancel setting.
Place the cooked rice noodles in individual bowls. Pour over the strained broth and add the baked tofu cubes. Top the pho with the scallions, basil, cilantro, lime wedges, bean sprouts, and chiles or Sriracha.
RECIPE NOTES
TIP: You can ï¬nd pho noodles in well- stocked grocery stores or any Asian market, and they come in various thickness, ranging from 1/16 inch (narrow) to 1/4 inch (wide). For the baked tofu, I recommend a ï¬ve-spice flavor.
Chickweed is all over the Internet these days. It’s a great foraged green that has lots of vitamins. It can be made into soups, salads, and a chimichurri.
Ingredients
1 pound triticale
3 tablespoons Bourbon (or whiskey)
2 teaspoons sugar
5 ounces goat cheese
3 dried spicy peppers
cup olive oil
1 tablespoon lemon juice
Sea salt
1 cup hazelnuts
3 large handfuls of greens (chickweed, salad greens, forag
Preparation
1. Mince the dried peppers or pulverize them with a mortar and pestle or a food processor. Soak them in a small bit of olive oil while you continue to work on the salad.
2. Rinse the soaked triticale and boil it in a pot for 30 minutes. Drain and rinse with cold water. Set aside.
3. Toast the hazelnuts in a skillet over low heat until they give off a nice aroma and start to brown.
4. Chop the hazelnuts.
5. Mash the goat cheese and the pepper flakes soaked in olive oil.
6. Mix the 1/3 cup olive oil with the 3 Tbsp of Bourbon, 1 tsp of sugar, and the 1 Tbsp of lemon juice.
7. Mix the triticale, nuts, dressing, and greens. Season with salt and pepper. Crumble the goat cheese on top and serve.
If you want to transport yourself to a Caribbean island without the expensive airfare, I highly recommend making these jackfruit tacos. Canned jackfruit is shredded until it has the consistency of pulled pork (gasp!) and is then quickly cooked in a blend of Jamaican jerk spices. Don’t let the habanero pepper dissuade you from making this dish, as its citrusy, floral heat is well balanced by the juicy sweetness of mango and creaminess of avocado in the salsa. And a touch of liquid smoke adds a rich but subtle smokiness reminiscent of barbecue, making this the perfect dish to make for meat eaters, too.
INGREDIENTS
MANGO- AVOCADO SALSA
2cupspeeled and diced mangoabout 2 medium
1medium ripe avocadodiced
3/4cupdiced red onion
1/2cupdiced cucumber
3tbspfresh orange juice
3tbspfresh lime juiceabout 1 1/2 limes
1/2cuploosely packed fresh cilantroï¬nely chopped Kosher salt and freshly cracked black pepper
JACKFRUIT
20ouncesjackfruit brine or water(2 cans see Tip
2tbspgrapeseed oil or other neutral cooking oil
6scallionssliced, white and light- green parts only
4garlic clovesminced
1 1/2inchpiece fresh gingergrated or minced
1habanero or Scotch bonnet pepperseeded and minced (use only 1/2 pepper for less heat or substitute with a milder pepper such as serrano or jalapeño)
2tbspcoconut sugarcoconut nectar, or agave nectar
2tbsptomato paste
1/4cupreduced- sodium tamari or soy sauce
3tbspfresh lime juiceabout 1 1/2 limes
1/2tspliquid smokeoptional
Jamaican Jerk Seasoning
1 1/2tsponion powder
1tspsweet or hot paprika
1tspFreshly cracked black pepper
1tspdried thyme
1/2tspground allspice
1/2tspground cumin
1/4tspcayenne papperto taste (up to 1/2 tsp
1/4tspground cinnamon
1/4tspfreshly grated or ground nutmeg
FOR SERVING
Vegan sour creamoptional
12Corn tortillas
INSTRUCTIONS
Make the mango- avocado salsa: In a medium bowl, combine the mango, avocado, onion, cucumber, orange juice, lime juice, and cilantro and mix gently. Season to taste with salt and pepper. (Preparing the salsa in advance gives it some time to marinate and will deepen the flavor.)
Prepare the jackfruit: Drain the canned jackfruit and lightly rinse under water, shaking off excess water. Use your ï¬ngers to remove any thick cores and pull the pieces apart so that it resembles shredded pork.
Add all of the Jamaican jerk seasoning, stir to coat, and cook for 30 seconds , stirring constantly, until very fragrant. Select the Cancel setting.
Add the shredded jackfruit, along with the coconut sugar, tomato paste, tamari, lime juice, and liquid smoke (if using). Stir well. Pour in 1/2  cup water and mix again.
Secure the lid and set the Pressure Release to Sealing. Select the Pressure Cook setting at high pressure and set the cook time to 4 minutes .
Once the 4- minute timer has completed and beeps, allow a natural pressure release
Open the pot and stir well. Transfer the jackfruit to a serving bowl.
To serve: Heat the tortillas over an open flame (I place them directly on the burner of my gas stove) and use tongs to flip them after 30 to 45 seconds or when small brown spots appear, and cook for another 15 to 30 seconds . Stack them in a clean kitchen towel or in foil to keep them warm.
Serve the jackfruit with the warmed corn tortillas, mango avocado salsa, and vegan sour cream (if using).
RECIPE NOTES
TIP: You can find canned jackfruit at Asian markets, specialty or natural foods stores, Trader Joe’s, or online. You want to buy the kind canned in water or brine, not syrup.
A lasagna in the Instant Pot sounds a bit kooky, and you might be wondering why you would want to do such a thing. For starters, the look of a round, layered lasagna is unique and eye- catching. Second, you can enjoy lasagna in the summer without turning on your oven (though there is the option to broil it for a few minutes if you wish). Finally, it’s perfect if you don’t have a lot of mouths to feed and don’t want to make a huge casserole. This recipe calls for no- boil lasagna noodles, which speeds things up. To ensure there is enough moisture to cook the noodles, remember to thin out the marinara sauce with some water. The tofu “ricotta” works perfectly in this lasagna, lending a comforting, cheesy feel, along with a protein punch. I blend the ricotta in a food processor, which gives it a luxurious creamy texture, but you can also use a fork to mash every-thing up (and save yourself some dishes). Not a fan of tofu or want to keep this dish super quick and easy? Substitute your favorite store- bought vegan cheese– just be sure to use a variety that can melt nicely.
INGREDIENTS
VEGETABLE FILLING
2tbspolive oil
1small yellow oniondiced
4garlic clovesminced
1cupï¬nely chopped zucchini
3/4cupï¬nely chopped red bell pepper
1cupchopped mushrooms
1/3cupfresh basil leaveschopped, plus more for garnish
1teaspoonkosher salt
Freshly cracked black pepper
LASAGNA ASSEMBLY
1 1/2cupsmarinara sauce of choice or Fiery Arrabbiata Sauce
Add the basil, salt, and pepper to taste. Stir to combine and cook for 30 seconds . Select the Cancel setting and remove the inner pot.
To assemble the lasagna: Pour the marinara sauce into a large measuring cup and add 1/2 cup water to equal 2 cups, stirring to incorporate (thinning out the sauce with water ensures the noodles will cook evenly).
Pour 1/2 cup of the marinara sauce into the bottom of a 7-inch springform pan, spreading evenly with a silicone spatula. Top the sauce with half of the oven-ready lasagna noodles, breaking them into pieces and fitting them to cover the sauce in a mosaic-like pattern.
Add another 1/2 cup of the marinara sauce on top of the noodles. Using a silicone spatula, spread one-third of the basil ricotta (or shredded cheese) on top of the marinara sauce, followed by half of the vegetable filling and half of the spinach or kale.
Repeat the layers: Add 1/2 cup of the marinara sauce, followed by one-third of the basil ricotta (or shredded cheese), the remaining vegetable filling, and the remaining spinach or kale.
Finish with the remaining lasagna noodles (broken into pieces), the final 1/2 cup marinara sauce, and the final one-third of the basil ricotta (or shredded cheese). If you can’t fit all of the lasagna noodles, just leave a few pieces out. You don’t want to layer them on top of each other because that might cause them to cook unevenly.
Spray a piece of foil with nonstick cooking spray and tightly cover the pan.
Wipe out the inner pot of any remaining vegetables and give it a rinse. Add 1 1/2 cups water to the inner pot.
For easy removal of the pan from the Instant Pot, create a foil sling. (Alternatively, you can use oven mitts to carefully remove the pan.)
On the counter, place the pan on top of the steamer rack (with the handles facing up) and arrange the foil sling (if using) underneath the steamer rack. Carefully lower the steamer rack and pan into the inner pot using the foil sling or steamer rack handles.
Secure the lid and set the Pressure Release to Sealing. Select the Pressure Cook setting at high pressure and set the cook time to 20 minutes.
Once the 20-minute timer has completed and beeps, allow a natural pressure release. If you want to broil the lasagna in your oven, turn on your oven’s broiler.
Open the pot and, wearing oven mitts, grasp the foil sling or steamer rack handles and carefully lift the pan out of the Instant Pot. Carefully remove the foil cover, taking care to not drip any condensation on the lasagna.
If desired, top the lasagna with the 1/2 cup shredded vegan mozzarella and place the lasagna under the broiler for 1 to 3 minutes (depending on the strength of your broiler and the distance between the heat and oven rack) to brown the top. You can also broil the lasagna without adding the vegan mozzarella. Garnish with fresh basil.
Directions for Basil Ricotta
Drain the tofu and blot away the excess water with a few paper towels. For a smooth ricotta, crumble the tofu into a food processor. Add the nutritional yeast, garlic, miso, onion powder, salt, pepper, olive oil, basil, lemon zest, and lemon juice and blend until you have a creamy, smooth texture. Taste for salt, acidity, and cheesiness, adding more salt, lemon juice, or nutritional yeast, respectively, as needed. For a chunkier ricotta, place the tofu in a large bowl and break it into smaller chunks using a fork. Add the remaining ingredients and mix together until the consistency resembles ricotta cheese.