Post a Free Blog

Submit A Press Release

At CWEB, we are always looking to expand our network of strategic investors and partners. If you're interested in exploring investment opportunities or discussing potential partnerships and serious inquiries. Contact: jacque@cweb.com

Generic selectors
Exact matches only
Search in title
Search in content
Post Type Selectors
Filter by Categories
Action
Animation
Anime
ATP Tour (ATP)
Auto Racing
Baseball
Basketball
Boxing
Breaking News
Business
Business
Business Newsletter
Call of Duty (CALLOFDUTY)
Canadian Football League (CFL)
Car
Celebrity
Champions Tour (CHAMP)
Comedy
CONCACAF
Counter Strike Global Offensive (CSGO)
Crime
Dark Comedy
Defense of the Ancients (DOTA)
Documentary and Foreign
Drama
eSports
European Tour (EPGA)
Fashion
FIFA
FIFA Women’s World Cup (WWC)
FIFA World Cup (FIFA)
Fighting
Football
Formula 1 (F1)
Fortnite
Golf
Health
Hockey
Horror
IndyCar Series (INDY)
International Friendly (FRIENDLY)
Kids & Family
League of Legends (LOL)
LPGA
Madden
Major League Baseball (MLB)
Mixed Martial Arts (MMA)
MLS
Movie and Music
Movie Trailers
Music
Mystery
NASCAR Cup Series (NAS)
National Basketball Association (NBA)
National Football League (NFL)
National Hockey League (NHL)
National Women's Soccer (NWSL)
NBA Development League (NBAGL)
NBA2K
NCAA Baseball (NCAABBL)
NCAA Basketball (NCAAB)
NCAA Football (NCAAF)
NCAA Hockey (NCAAH)
Olympic Mens (OLYHKYM)
Other
Other Sports
Overwatch
PGA
Politics
Premier League (PREM)
Romance
Sci-Fi
Science
Soccer
Sports
Sports
Technology
Tennis
Thriller
Truck Series (TRUCK)
True Crime
Ultimate Fighting Championship (UFC)
US
Valorant
Western
Women’s National Basketball Association (WNBA)
Women’s NCAA Basketball (WNCAAB)
World
World Cup Qualifier (WORLDCUP)
WTA Tour (WTA)
Xfinity (XFT)
XFL
0
Home Blog Page 81

Posole

0
Photo Credit:- Cosori Air Fryers
In the Instant Pot, pork shoulder becomes as tender as if it had been simmered for hours in this classic Mexican soup. The amount of broth may seem like a lot, but it is designed to be a thinner soup. This posole is served with cilantro, radishes, avocado, and lime juice. Jar size: 3 cups

INGREDIENTS

Dry ingredients
  • 1  tablespoon  chile de árbol
  • 1  tablespoon  ancho chile powder
  • 2  teaspoons  ground cumin
  • 1  tablespoon  Dried Mexican oregano
  • 1/4  teaspoon  sea salt
  • 2  teaspoons  dried garlic
  • 1/3  cup  dried onion
  • 1  bay leaf
  • 2  cups  dried hominy
For cooking and serving
  • 2  tablespoons  canola oil
  • 1 1/2  pounds  pork shoulder  cut into 2-inch pieces
  • Salt and pepper
  • 12  cups  chicken broth
  • 1  cup  roughly chopped cilantro  to serve
  • 1  bunch radishes  thinly sliced, to serve
  • 2  avocados  diced, to serve
  • 2  limes  cut into wedges, to serve

INSTRUCTIONS

Preparation:
  1. Layer the dry ingredients in the jar in the order listed.
To Cook:
  1. Select sauté to preheat the Instant Pot. When the word  “Hot”  appears on the display, add the oil. It should thin immediately. Pat the pork shoulder dry with paper towels and season generously with salt and pepper. Sear the pork in the Instant Pot until browned on all sides, about  10 minutes.  Add all of the jarred ingredients to the Instant Pot along with the  12 cups  of broth. Stir to mix. Cover with the lid and ensure the vent is in the  “Sealed”  position.  Pressure Cook  on  High  for  30 minutes.  Allow the steam pressure to release naturally for  15 minutes,  then release any remaining pressure manually.
To Serve:
  1. Divide the soup between serving bowls and top with chopped cilantro, sliced radishes, and diced avocado. Finish with a squeeze of lime juice.

RECIPE NOTES

Tip: Dried hominy is similar to dried beans insofar as it is typically soaked and then cooked to rehydrate it. Soaking is not essential, though. And, cooking it in this rich, flavorful broth infuses the grain with flavor.

Source:- Cosorithis

Spicy Black Bean Dip

0
Photo Credit:- Cosori Air Fryers
Whenever I’m running late with dinner, it’s nice to have a healthy appetizer to snack on. This one is savory and offers protein and fiber from black beans blended with savory spices. Jar size: 4 cups

INGREDIENTS

Dry ingredients
  • 1  tablespoon  chili powder
  • 2  teaspoons  ground cumin
  • 1  tablespoon  smoked paprika
  • 1  teaspoon  sea salt
  • 1  teaspoon  dried garlic
  • 1/4  cup  dried onion
  • 2  tablespoons  dried green bell pepper
  • 2  cups  dried black beans
For cooking and serving
  • 3 1/2  cups  vegetable broth  or water; plus more as needed
  • 1/4  cup  shredded mozzarella cheese  to serve, optional
  • diced green bell peppers  to serve
  • diced red onion  to serve
  • corn chips  or raw vegetables; for dipping

INSTRUCTIONS

Preparation:
  1. Layer the dry ingredients in the jar in the order listed.
To Cook:
  1. Place all of the jarred ingredients into the Instant Pot. Add  3 1/2 cups  of vegetable broth or water. Stir to mix. Cover with the lid and ensure the vent is in the  “Sealed”  position.  Pressure cook or Manual  on  High  for  35 minutes.  Allow the steam pressure to release naturally for  20 minutes.  Use an immersion blender or carefully transfer the contents of the Instant Pot to a blender and puree until somewhat smooth, adding additional vegetable broth or water as needed to blend.
To Serve:
  1. Pour the mixture into a serving dish and top with the shredded cheese, if using. Top with diced bell peppers and onions, and serve with corn chips or raw vegetables.
Source:- Cosorithis

Chili for the Chilly

0

On October 9th, 2012, Tropical Foods had its Flavors of the Fall Recipe Contest with the culinary students at the Charlotte Campus of Johnson & Wales University. This recipe, Chili for the Chilly, was created by Rocky Jokbengboon and Kaitlyn Kuntz.

Ingredients

2 cups Tropical Food’s Mexicali Fire ®, crushed
1 lb. ground beef
¼ lb. chorizo, diced
1 poblano pepper, roasted and diced
1 cup frozen corn
1 cup canned beans, drained and rinsed
3 cups tomato sauce
½ cup barbeque sauce
¼ cup soy sauce
1 tbsp. cumin
1 tbsp. red pepper flakes
1 tbsp. dried oregano
8 bread slices, cut into triangles
Olive oil
Salt and pepper

Preparation

1. Crush Tropical Food’s Mexicali Fire ® and stir into ground beef.
2. Roast poblano pepper in oven; peel, dice and set aside.
3. Brush bread with olive oil and season with salt, pepper and oregano. Toast in oven until crispy, but still a bit soft.
4. Sauté beef and chorizo in saucepot until cooked, then add remaining ingredients.
5. Simmer for 30 minutes, and then season to taste.
Credit: Foodista

Buckwheat Pilaf with Mushrooms and Caramelized Onions

0
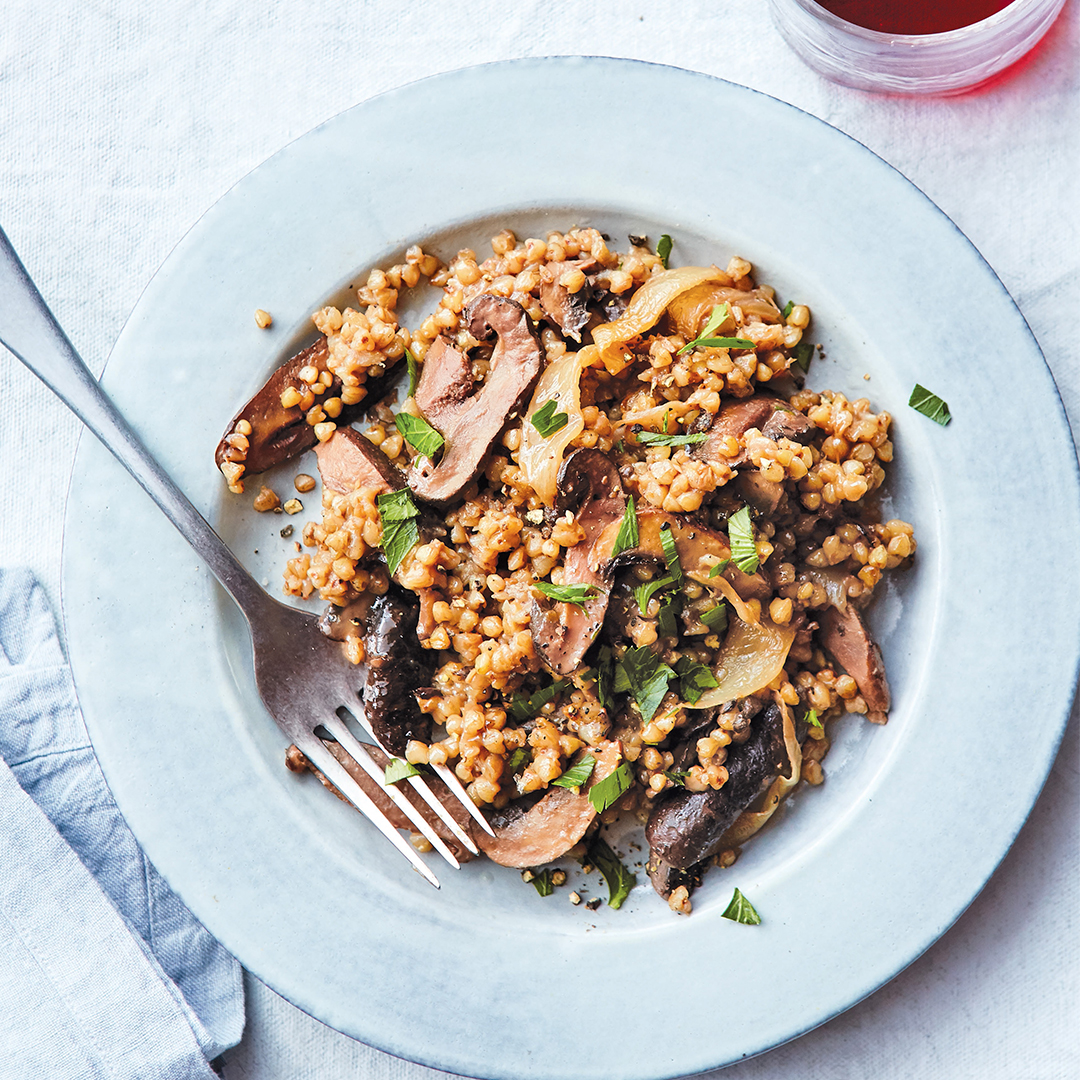
Photo Credit:- Cosori Air Fryers
I think of buckwheat as the most savory of all grains. Get the whole-grain, roasted variety for this recipe–it’s called kasha and it comes already roasted to bring out its deep nutty flavor. Mushrooms bump up the umami even further in this easy pilaf, and caramelized onions add depth and richness.  Caramelized Onions  Makes 2 1/2 cups The salt is important in this recipe, so don’t omit it. It helps the onions give up their liquid so they cook down properly and caramelize.  Low-sodium vegetable broth  Makes about 2 Quarts This broth contains a fairly low level of sodium. It is comparable to store-bought low-sodium vegetable broth, low-sodium bouillon, and reduced-sodium Better Than Bouillon. If you use a full-sodium, store-bought broth in the recipes in this book, you may need to reduce the amount of salt and/or other salty ingredients.

INGREDIENTS

Caramelized Onions
  • 1/4  cup  avocado oil  or other neutral oil
  • 2  lbs  yellow onions  4 large,  halved and sliced  1⁄4 inch  thick,
  • 1  tsp  fine sea salt
Low-sodium vegetable broth
  • 1  tablespoon  extra-virgin olive oil
  • 1  large yellow onion  diced
  • 4  cloves  garlic  smashed
  • 2  large carrots  diced
  • 4  celery stalks  diced
  • 2  tsp  fine sea salt
  • 2  tbsp  tomato paste
  • 2  tbsp  nutritional yeast
  • 8  cups  Water
  • 1  tsp  black peppercorns
  • 2  bay leaves
  • 3  oz  flat-leaf parsley  1 bunch
Buckwheat Pilaf with Mushrooms and Caramelized Onions
  • 2  tbsp  extra-virgin olive oil
  • 2  cloves  garlic  minced
  • 8  oz  cremini  and/or fresh shiitake mushroom caps, thinly sliced
  • 1/2  tsp  fine sea salt
  • 1 3/4  cups  low sodium vegetable broth  recipe above
  • 1 1/2  cups  whole roasted buckwheat groats  kasha
  • 1/2  cup  caramelized onions  recipe above
  • 1/2  tsp  freshly ground black pepper
  • 1  tbsp  chopped parsley

INSTRUCTIONS

Caramelized Onions
  1. Select the  High Sauté  setting on the Instant Pot (the timer will default to 30 minutes), add the oil, and heat for  1 minute.  Add the onions and salt and stir with a wooden spoon, separating the onion layers and coating the slices with the oil. Cover the pot with the glass lid and let the onions sweat, without stirring, for  10 minutes.
  2. Uncover the pot and, wearing a heat-resistant mitt, hold the rim of the inner pot in place while you stir the onions vigorously, using the spoon to nudge loose any browned bits from the bottom of the pot. Leave the pot uncovered and set a timer for  4  minutes. Stir the onions vigorously again, making sure to nudge loose any browned bits. Set the timer for  3 minutes,  then stir the onions vigorously again and continue to stir them at  2-minute  intervals until the  30-minute  Sauté cooking program has ended. Wearing heat-resistant mitts, lift out the inner pot.
  3. The onions can be used right away, stored in an airtight container in the refrigerator for up to 4 days, or frozen for up to 3 months.
Low-sodium vegetable broth
  1. Select the  Sauté  setting on the Instant Pot, add the oil, and heat for  1 minute.  Add the onion, garlic, carrots, celery, and salt.  Sauté  for about  10 minutes,  until the vegetables give up some of their liquid and begin to brown just a bit. Stir in the tomato paste and nutritional yeast, then add  1 cup  of the water and use a wooden spoon to nudge loose any browned bits from the bottom of the pot. Add the peppercorns, bay leaves, parsley, and remaining  7 cups  water, making sure not to fill the pot more than two-thirds full.
  2. Secure the lid and set the Pressure Release to  Sealing.  Press the  Cancelbutton to reset the cooking program. Then select the  Soup/Broth  setting and set the cooking time for  10 minutes  at  High  pressure. (The pot will take about 20 minutes to come up to pressure before the cooking program begins.)
  3. Place a wire-mesh strainer over a large stainless-steel bowl. For a clearer broth, line the strainer with a double layer of cheesecloth.
  4. When the cooking program ends, let the pressure release naturally for  30 minutes,  then move the Pressure Release to  Venting  to release any remaining steam. Open the pot and, wearing heat-resistant mitts, lift out the inner pot and pour the broth through the prepared strainer into the bowl. Discard the vegetables. Let the broth cool to room temperature. (To speed the cooling process, set the bowl in a larger bowl containing an ice bath.)
  5. The broth can be used right away, stored in an airtight container in the refrigerator for up to 3 days, or frozen for up to 6 months.
Buckwheat Pilaf with Mushrooms and Caramelized Onions
  1. Select the  Sauté  setting on the Instant Pot, add the oil and garlic, and heat for  2 minutes,  until the garlic is bubbling. Add the mushrooms and salt and sautéfor 3 minutes, until the mushrooms are wilted. Stir in the broth, using a wooden spoon to nudge any browned bits from the bottom of the pot. Stir in the buckwheat, onions, and pepper, making sure all of the buckwheat is fully submerged in the broth.
  2. Secure the lid and set the Pressure Release to  Sealing.  Press the  Cancel  button to reset the cooking program. Then select the  Manual or Pressure Cook  setting and set the cooking time for  15 minutes  at  High pressure.  (The pot will take about 10 minutes to come up to pressure before the cooking program begins.)
  3. When the cooking program ends, let the pressure release naturally for  10 minutes,  then move the Pressure Release to  Venting  to release any remaining steam. Open the pot and use a fork to fluff the buckwheat. Spoon onto plates, garnish with parsley, and serve warm.

RECIPE NOTES

If you can only find raw buckwheat oats, toast them in a dry skillet for a few minutes over medium heat to bring out their aroma.

If you have not already caramelized a batch of onions (start this recipe by sautéing 1 onion, thinly sliced, in the olive oil for 8 minutes before adding the garlic and mushrooms and continuing with the recipe. The onions will not be fully caramelized, but the pilaf will still come out delicious.

Source:- Cosorithis

Bulgur-Stuffed Bell Peppers with Garlic Sauce

0
Photo Credit:- Cosori Air Fryers
The herb-studded filling is cooked in the Instant Pot, and the peppers bake for just 35 minutes, so they stay firm and juicy. Serve each person a half pepper as a side dish or first course, or two halves for a main-dish portion.  Low-sodium vegetable broth  Makes 2 Quarts This broth contains a fairly low level of sodium. It is comparable to store-bought low-sodium vegetable broth, low-sodium bouillon, and reduced-sodium Better Than Bouillon. If you use a full-sodium, store-bought broth in the recipes in this book, you may need to reduce the amount of salt and/or other salty ingredients.

INGREDIENTS

Low-sodium vegetable broth
  • 1  tbsp  extra-virgin olive oil
  • 1  large yellow onion  diced
  • 4  cloves  garlic  smashed
  • 2  large carrots  diced
  • 4  celery stalks  diced
  • 2  tsp  fine sea salt
  • 2  tbsp  tomato paste
  • 2  tbsp  nutritional yeast
  • 8  cups  Water
  • 1  tsp  black peppercorns
  • 2  bay leaves
  • 3  oz  flat-leaf parsley  1 bunch
Peppers
  • 2  tablespoons  extra-virgin olive oil
  • 2  cloves  garlic  minced
  • 1  small yellow onion  diced
  • 1 1/2  cups  low sodium vegetable broth  recipe above
  • 1  cup  bulgur wheat
  • 1/4  cup  pine nuts
  • 1/4  cup  currants
  • 3  tbsp  fresh flat-leaf parsley  chopped
  • 2  tbsp  fresh mint  chopped
  • 3  in  large bell peppers  cuthalf lengthwise and seeded (stems left on)
Sauce
  • 1/2  cup  raw cashews  soaked in water for  2 hours  at room temperature, or up to overnight in the refrigerator, and drained
  • 1/4  cup  avocado oil  or grapeseed oil
  • 1/4  cup  Water
  • 3  tbsp  fresh lemon juice
  • 3  cloves  garlic  minced
  • 3/4  tsp  fine sea salt

INSTRUCTIONS

Low-sodium vegetable broth
  1. Select the  Sauté  setting on the Instant Pot, add the oil, and heat for  1 minute.  Add the onion, garlic, carrots, celery, and salt. Sauté for about 10 minutes, until the vegetables give up some of their liquid and begin to brown just a bit. Stir in the tomato paste and nutritional yeast, then add  1 cup  of the water and use a wooden spoon to nudge loose any browned bits from the bottom of the pot. Add the peppercorns, bay leaves, parsley, and remaining  7 cups  water, making sure not to fill the pot more than two-thirds full.
  2. Secure the lid and set the Pressure Release to  Sealing.  Press the  Cancel  button to reset the cooking program. Then select the  Soup/Broth  setting and set the cooking time for  10 minutes  at  High  pressure. (The pot will take about 20 minutes to come up to pressure before the cooking program begins.)
  3. Place a wire-mesh strainer over a large stainless-steel bowl. For a clearer broth, line the strainer with a double layer of cheesecloth.
  4. When the cooking program ends, let the pressure release naturally for  30 minutes,  then move the Pressure Release to  Venting  to release any remaining steam. Open the pot and, wearing heat-resistant mitts, lift out the inner pot and pour the broth through the prepared strainer into the bowl. Discard the vegetables. Let the broth cool to room temperature. (To speed the cooling process, set the bowl in a larger bowl containing an ice bath.)
  5. The broth can be used right away, stored in an airtight container in the refrigerator for up to 3 days, or frozen for up to 6 months.
Bulgur-Stuffed Bell Peppers with Garlic Sauce
  1. To make the peppers: Select the  Sauté  setting on the Instant Pot, add the oil and garlic, and heat for  2 minutes,  until the garlic is bubbling. Add the onion and sautéfor  4 minutes,  until softened. Stir in the broth, using a wooden spoon to nudge loose any browned bits from the bottom of the pot. Stir in the bulgur, scraping down the sides of the pot to make sure all of the grains are submerged in the liquid.
  2. Secure the lid and set the Pressure Release to  Sealing.  Press the  Cancel  button to reset the cooking program. Then select the  Manual or Pressure Cook  setting and set the cooking time for  10 minutes  at  Low  pressure. (The pot will take about 5 minutes to come up to pressure before the cooking program begins.)
  3. Preheat the oven to 375 °F.
  4. When the cooking program ends, let the pressure release naturally for 10 minutes, then move the Pressure Release to  Venting  to release any remaining steam. Open the pot and, wearing heat-resistant mitts, lift the inner pot out of the housing. Stir in the pine nuts, currants,  2 tablespoons  of the parsley, and  1 tablespoon  of the mint.
  5. Place the pepper halves in a  9 inch  by  13 inch  baking dish. Spoon the bulgur mixture into the pepper halves, dividing it evenly among them (about 1/2 cup each). Cover the dish with aluminum foil. Bake for  35 minutes,  until the peppers are cooked through.
  6. While the peppers are baking, make the sauce: In a wide-mouthed pint jar, combine the cashews, oil, water, lemon juice, garlic, and salt. Use an immersion blender to blend the sauce until it is very smooth, about  2 minutes.
  7. Use a serving spoon to transfer the peppers to plates. Serve warm, with the sauce spooned on top and sprinkled with the remaining parsley and mint.
Source:- Cosorithis

Chili Chicken Fingers

0

Chili Chicken Fingers-easy, delicious fun food! Try this for dinner tonight!

Ingredients

3/4 Cup Plain Bread Crumbs
1/4 Cup Flour
1 Tsp. Garlic Powder
1/2 Tsp. Red Pepper
1/2 Tsp. Cumin
2 Tsp. Chili Powder
2 Tablespoons Dried Oregano
2 Tablespoons Dried Parsley
1/2 Cup Olive Oil

Preparation

1. Heat oven to 400 degrees.   Coat bottom of large pan with olive oil.
2. Trim fat from chicken breasts and cut into 1/2″ slices.
3. Mix together bread crumbs, flour,  garlic powder, red pepper, cumin, chili powder, oregano, and parsley.
4. Whisk eggs with water.
5. Coat chicken pieces with  egg wash and bread crumb mixture.
6. Place in oiled pan and bake in preheated oven for 20 minutes.   Remove from oven and turn chicken.   Return to oven and bake for an additional 15 to 20 minutes or until chicken is nicely browned.
7. Place chicken fingers on paper towels to absorb excess oil. Serve with mild barbecue or dipping sauce.
8. Serves 4
Credit: Foodista

Mac ‘n’ Trees

0
Photo Credit:- Cosori Air Fryers

INGREDIENTS

Macaroni
  • 1  lbs  elbow macaroni
  • 4  cups  Water
  • 1  tsp  fine sea salt
Sauce
  • 1  cup  raw cashews  soaked in water for  2 hours  at room temperature, or up to overnight in the refrigerator, and drained
  • 1/3  cup  Water  plus more if needed
  • 2  tbsp  nutritional yeast
  • 1 1/2  tbsp  fresh lemon juice
  • 1  clove  garlic  peeled
  • 1  tsp  prepared yellow mustard
  • 1  tsp  Tabasco sauce
  • 1/2  tsp  fine sea salt  plus more as needed
  • 1/4  tsp  cayenne pepper  plus more as needed

INSTRUCTIONS

  1. Secure the lid and set the Pressure Release to  Sealing.  Select the  Manual or Pressure Cook  setting and set the cooking time for  6 minutes  at  High pressure.  (The pot will take about 15 minutes to come up to pressure before the cooking program begins.)
  2. To make the sauce: While the pasta is cooking, combine the cashews, water, nutritional yeast, lemon juice, garlic, mustard, Tabasco, salt, and cayenne in a blender. Blend at high speed for about  1 minute,  until smooth, scraping down the sides of the blender halfway through, if necessary. Taste for seasoning, adding more salt and/or cayenne, if needed. You can also add an extra splash of water, if you prefer a thinner sauce.
  3. When the cooking program ends, let the pressure release naturally for  5 minutes,  then move the Pressure Release to  Venting  to release any remaining steam. Open the pot and stir in the sauce.
  4. Spoon the macaroni into bowls and serve immediately.
Source:- Cosorithis

Massaman Curry with Tofu and Kabocha Squash

0
Photo Credit:- Cosori Air Fryers
If you’re a chili head, you’ll appreciate the generous amount of Massaman curry paste used in this Thai-style dish–it’s not shy on spice. When buying your curry paste, do check the ingredients to make sure it is vegan. Aroy-D brand is a great choice. Their coconut milk is excellent and consistent in quality, too.

INGREDIENTS

  • 14  oz  tofu  1 block firm, drained
  • 1  tbsp  coconut oil
  • 1  large yellow onion  cut into  1-inch  pieces
  • 1/2  cup  coconut cream
  • 1/4  cup  Massaman curry paste
  • 1  cup  low sodium vegetable broth
  • 1  Kabocha squash  seeded and cut into  1-inch  cubes, 11⁄2-pound
  • 1  cup  coconut milk
  • 1  cup  fresh Thai basil leaves  loosely packed
  • Hot steamed rice  for serving

INSTRUCTIONS

  1. Cut the tofu into  1/2-inch  slices. Sandwich the slices in a single layer between double layers of paper towels or a folded kitchen towel and press firmly to wick away as much moisture as possible. Cut the slices into  1/2-inch  cubes. Set aside.
  2. Select the  High Sauté  setting on the Instant Pot, add the coconut oil, and melt. Add the onion and sauté for  4 minutes,  until the onion starts to brown. Add the coconut cream and curry paste and sauté for  2 minutes  more, until bubbling and fragrant. Stir in the broth, using a wooden spoon to nudge loose any browned bits from the pot bottom, then add the squash in a single layer.
  3. Secure the lid and set the Pressure Release to  Sealing.  Press the  Cancel  button to reset the cooking program. Then select the  Manual or Pressure Cook  setting and set the cooking time for  1 minute  at  Low  pressure. (The pot will take about 10 minutes to come up to pressure before the cooking program begins.)
  4. When the cooking program ends, perform a quick pressure release by moving the Pressure Release to  Venting.  Open the pot and stir in the coconut milk, then add the tofu. Press the  Cancel  button to reset the cooking program. Then select the  Sauté  setting. Let the curry come up to a simmer and cook for  2 minutes,  stirring occasionally and gently, being careful not to break up the tofu. Press the  Cancel  button to turn off the pot. Gently stir in the basil.
  5. Ladle the curry into bowls. Serve piping hot with the rice on the side.
Source:- Cosorithis

Chiles Rellenos – My Style

0

do love trying new flavors.   However, when it comes to preparing them, well we do not live on the same time zone. As I do enjoy a little challenge, I decided to take the plunge and work outside the box.   Baby steps is where I am at the moment.

I live in the Southwest part of the country.   We are graced by sunshine 364 days a year with the occasional freeze, once or twice a year. Fantastic dry summers and warm pool water, we occasionally have to fill it with water to cool down the temperature   Beautiful array of vegetation — all sorts of cactuses, Palo Verdes, Mesquite trees, acacias, citrus trees, bougainvillea and vegetables growing challenges with lovely bunnies that wait for the first salad peaking thru to have their own feast.   Southwest cooking has a strong presence with all degrees of heat. And yes, we are very fortunate to have wonderful restaurants all around us that serve the best food. Shopping to our grocery stores is a delightful trip with your imagination and inspiration at the highest.   For me, shopping for new ingredients has been not only challenging, but exhilarating.

Ingredients

6 poblanos peppers
Vegetables oil for frying (not canola)
3 large eggs, separated
Salt to taste
1/3 cup all-purpose unbleached flour
Equal amount of the following cheeses sliced in thin strips: Queso fresco, Shredded Oaxacan Cheese, Oaxaca Cheese Pancho (Cheese must be at room temperature)

Preparation

1. Roast the poblanos by placing it over the open flame and turning them from time to time until the outer skin is brown charred and bubbles. Place in a plastic bag and let them sweat, 10 minutes. When cool remove the outer skin by running your fingers down. Do not wash. Make small incision and remove the inside seeds by paying attention to keep the flesh as intact as possible.
2. Fill the inside of the poblanos with cheese.
3. Meanwhile heat oil to the depth of 1 inch.
4. In a large bowl, beat the egg white until they form soft to medium peaks, but not too still and dry. Gradually add the salt and yolks. When they are well incorporated, light dust one of the chile with flour.
5. With a perforated spoon, or two forks, dip the chile into the beaten eggs and turn it around until it is well covered — not too thin a coating and not too thick. It is useful to have two spatulas or forks to turn the chile around.
6. Test the oil, should be hot but not smoking, by placing a small amount of batter in the oil. When it sizzles and froth up, the oil is ready. Lower the chile in the hot oil and turn the chile around. When the batter is deep golden color, turn and golden the other side.
7. Once golden remove from the hot oil and place on a plate with double paper towel to absorb the excess oil.
Credit: Foodista

Miso Soup with Shiitakes and Snap Peas

0
Photo Credit:- Cosori Air Fryers
Miso soup doesn’t require cooking under pressure–this version cooks entirely on the Instant Pot’s Sauté setting and comes together in about 15 minutes. Freshly grated garlic and ginger give the soup depth of flavor, so you won’t miss the traditional bonito flakes. Serve as a first course for a Japanese-inspired meal, or sip as a mid-day snack.

INGREDIENTS

  • 1  tsp  avocado oil  or other neutral oil
  • 2  cloves  garlic  finely grated
  • 1/2  inch  knob ginger  peeled and finely grated
  • 4  oz  fresh shiitake mushrooms  stems removed, thinly sliced
  • 4  cups  Water
  • 2  cups  sugar snap peas  8 ounces, cut into  1/2-inch  pieces
  • 1/4  cup  white miso paste
  • 2  green onions  white and tender green parts, thinly sliced

INSTRUCTIONS

  1. Select the  Sauté  setting on the Instant Pot, add the oil, garlic, and ginger, and heat for  2 minutes,  until bubbling. Add the mushrooms and sauté for  1 minute,  until they begin to wilt and the ginger and garlic begin to brown on the bottom of the pot. Stir in the water and peas, using a wooden spoon to nudge loose any browned bits from the bottom of the pot. Cover with the glass lid and let come up to a simmer (this will take about 8 minutes).
  2. Remove the lid and press the  Cancel  button to turn off the pot.
  3. Put the miso paste in a small bowl. Ladle  1/4 cup  of the liquid from the pot into the bowl, then mash the miso against the side of the bowl and stir until it is fully dissolved. Add the miso mixture and the green onions to the pot and stir to combine.
  4. Ladle the soup into bowls and serve piping hot.

Source:- Cosorithis