Post a Free Blog

Submit A Press Release

At CWEB, we are always looking to expand our network of strategic investors and partners. If you're interested in exploring investment opportunities or discussing potential partnerships and serious inquiries. Contact: jacque@cweb.com

Generic selectors
Exact matches only
Search in title
Search in content
Post Type Selectors
Filter by Categories
Action
Animation
Anime
ATP Tour (ATP)
Auto Racing
Baseball
Basketball
Boxing
Breaking News
Business
Business
Business Newsletter
Call of Duty (CALLOFDUTY)
Canadian Football League (CFL)
Car
Celebrity
Champions Tour (CHAMP)
Comedy
CONCACAF
Counter Strike Global Offensive (CSGO)
Crime
Dark Comedy
Defense of the Ancients (DOTA)
Documentary and Foreign
Drama
eSports
European Tour (EPGA)
Fashion
FIFA
FIFA Women’s World Cup (WWC)
FIFA World Cup (FIFA)
Fighting
Football
Formula 1 (F1)
Fortnite
Golf
Health
Hockey
Horror
IndyCar Series (INDY)
International Friendly (FRIENDLY)
Kids & Family
League of Legends (LOL)
LPGA
Madden
Major League Baseball (MLB)
Mixed Martial Arts (MMA)
MLS
Movie and Music
Movie Trailers
Music
Mystery
NASCAR Cup Series (NAS)
National Basketball Association (NBA)
National Football League (NFL)
National Hockey League (NHL)
National Women's Soccer (NWSL)
NBA Development League (NBAGL)
NBA2K
NCAA Baseball (NCAABBL)
NCAA Basketball (NCAAB)
NCAA Football (NCAAF)
NCAA Hockey (NCAAH)
Olympic Mens (OLYHKYM)
Other
Other Sports
Overwatch
PGA
Politics
Premier League (PREM)
Romance
Sci-Fi
Science
Soccer
Sports
Sports
Technology
Tennis
Thriller
Truck Series (TRUCK)
True Crime
Ultimate Fighting Championship (UFC)
US
Valorant
Western
Women’s National Basketball Association (WNBA)
Women’s NCAA Basketball (WNCAAB)
World
World Cup Qualifier (WORLDCUP)
WTA Tour (WTA)
Xfinity (XFT)
XFL
0
Home Blog Page 73

Coca Cola Chicken Curry

0

I made this for the first time last night and it was delicious. No left overs!

Ingredients

1  kg diced  chicken
2 large  onions,  finely chopped
4 tablespoons  cumin  powder
2 tablespoons  coriander powder
2 tablespoons  tamarind  paste
4 tablespoons  ginger  paste
2 tablespoons  garlic  paste
1  cinnamon stick
4 cloves
2 teaspoons  smoked paprika
200 ml coca cola ®
6 tablespoons  vegetable oil
300  ml  single cream
1 kg natural  yoghurt  (large tub)
pinch of salt
fresh coriander

Preparation

1. Heat  the oil in a large pan, then  fry  the cinnamon stick and cloves.
2. Next add the onion, together with the ginger, garlic and tamarind paste, and  fry  until the onion is golden  brown.
3. Then add the cumin,  smoked  paprika and coriander powder, and  reduce  the  heat.
4. Add the chicken and keep  stirring  until all the chicken has  browned.
5. Add the coca cola ® and a pinch of  salt.  Simmer  on a low  heat  till the chicken becomes tender.
6. When all the ingredients are cooked,  turn  off the  heat;  add the yoghurt and the  cream  and finally the chopped coriander.  Serve  with cardamom rice and other Indian condiments such as mango chutney.
Credit: Foodista

Arroz con Pollo (Chicken with Rice)

0
Photo Credit:- Cosori Air Fryers
Arroz con Pollo is a classic Latin American dish, with each country–and each family, for that matter–having its own unique recipe. For mine, I like to use whole pieces of chicken (legs or thighs) that I season with chile powder, cumin, and oregano before adding the rice. This flavorful dish is filling all on its own, but it also goes well with frijoles charros (cowboy beans). Just don’t forget the warm corn or flour tortillas.

INGREDIENTS

  • 1  tbsp  California chile powder
  • 1  tsp  ground cumin
  • 1  tsp  crushed dried Mexican oregano
  • 1  tsp  coarse salt  plus more for seasoning
  • 1/2  tsp  freshly ground black pepper
  • 1/2  tsp  onion powder
  • 1/2  tsp  garlic powder
  • 6  boneless chicken thighs
  • 3  tbsp  vegetable oil  divided
  • 1  cup  long-grain or jasmine rice
  • 1/2  medium white onion  finely chopped
  • 2  garlic cloves  minced
  • 4  roma tomatoes  finely chopped
  • 1  cup  chicken broth
  • 8  oz  tomato sauce  1 can
  • 4  cilantro sprigs
  • Pico de Gallo Verde for garnish  optional
  • Pimiento-stuffed olives  sliced, for garnish (optional)
  • Pimiento-stuffed olives  sliced, for garnish (optional)

INSTRUCTIONS

  1. In a small bowl, combine the chile powder, cumin, oregano,salt, pepper, onion powder, and garlic powder. Sprinkle thespice mixture over the chicken thighs.
  2. Set the Instant Pot to Sauté and adjust to  More or high.
  3. Heat  2 tablespoons  of vegetable oil in the pot, add the chicken thighs, and fry for 5 to 7 minutes, or until golden brown. Transfer the chicken to a heat-proof plate.
  4. In the Instant Pot, heat the remaining 1 tablespoon of vegetable oil. Sauté the rice until light golden brown. Add the onion and garlic; sauté for 2 to 3 minutes, or just until the onion is translucent. Stir in the tomatoes.
  5. Pour in the chicken broth and tomato sauce; season lightly with salt. Return the chicken to the Instant Pot. Top withthe cilantro.
  6. Lock the lid into place and set the steam release valve to sealed. Select  Manual or PRESSURE COOK and set the timer for 12 minutes on high.
  7. When cooking is complete, allow the pressure to release naturally. Unlock and remove the lid.
  8. Discard the cilantro. Serve immediately, garnished with Pico de Gallo Verde and pimiento-stuffed olive slices (if using).

RECIPE NOTES

Ingredient tip: For this recipe, I like to use skin-on chicken
thighs, because my abuelito used to say that the skin is what
adds the flavor

Source:- Cosorithis

Cilantro-Coconut Shrimp and Broccoli

0
Photo Credit:- Cosori Air Fryers
I got the idea for this dish from a Food & Wine magazine recipe, though the original recipe felt confusing and unnecessarily complicated. I kept the flavors, but streamlined the cooking process, and added noodles to make it a complete meal. It’s important to use the right size shrimp and keep them cold right until they are cooked so they don’t overcook.

INGREDIENTS

  • 14  oz  coconut milk  1 can
  • 2  cups  loosely packed cilantro
  • 1  jalapeno  seeded and cut into chunks
  • 1  scallion  green part only, cut into chunks
  • 1  garlic clove
  • 1 1/2  tsp  kosher salt
  • 3/4  cup  Water
  • 4  ounces  Chinese wheat noodles  I use KA-ME brand, or  4 oz  (1 package) ramen noodles
  • 10  ounces  peeled shrimp  refrigerated (about  21-25 shrimp)
  • 6 – 8  oz  broccoli florets

INSTRUCTIONS

  1. In a blender jar, add the coconut milk, cilantro, jalapeño, scallion, garlic, and salt. Blend until smooth. (Or place these ingredients in a deep, narrow container and use an immersion blender to purée.)
  2. Pour the sauce into the inner pot and add the water. Select  Sauté  and adjust to  High  heat. Bring just to a simmer, then turn the Instant Pot off.
  3. Break up the noodles into 3 or 4 pieces and place them in the pot in a single layer as much as possible. Layer the shrimp and broccoli over the noodles.
  4. Lock the lid into place. Select  Pressure Cook or Manual, and adjust the pressure to  Low  and the time to  0 minutes. After cooking, quick release the pressure.Unlock the lid. Gently stir the mixture until the broccoli and shrimp are coated with sauce. Ladle into bowls and serve immediately.
  5. Unlock the lid. Gently stir the mixture until the broccoli and shrimp are coated with sauce. Ladle into bowls and serve immediately.

RECIPE NOTES

Make It Gluten-Free: Leave the noodles out and reduce the water to 1/4 cup. Serve over Basic White or Brown Rice (page 163).

Lux Modification: In Step 2, bring the sauce to a full boil and then follow the rest of the directions as written

Per Serving
Calories: 864;
Fat: 51 g;
Carbohydrates: 59 g;
Fiber: 8 g;
Protein: 46 g;
Sodium: 852 m

Source:- Cosorithis

CNY Crispy Yuan Yang Wasabi Prawns

0

Hello guys, fans of Deep-Fried Food or Prawns will fall in love with this  CNY Crispy Yuan Yang Wasabi Prawns ( 嘻哈鸳鸯芥末虾球 )! Do you know that besides keeping your prawn heads for making soup, you can also deep-fry them, turning these crunchy heads into a delicious treat?

Ingredients

700g Medium Tiger Prawns
1 tsp Salt
½ tsp Pepper
2 tbsp Mayonnaise
1 tsp Wasabi
1 Lemon ( optional )
Corn flour for coating
Oil for deep frying

Preparation

1. Cut off whiskers, and remove prawn head. Gently dispose the outer shell as shown in the image above.
2. Remove shell from body and devein. Butterfly the prawns. Rinse and pat dry using paper towels.
3. Rinse lemon and cut into slices. Place them neatly on serving plate.
4. Simply mix the corn flour with pepper and salt. Coat prawns and dust off excess flour.
5. Heat oil and deep fry prawns till they turn pink. Drain and set aside.
6. Next, deep fry the prawn heads till crispy. Drain.
7. Mix wasabi with mayonnaise.
8. Toss your prawns and place them neatly onto serving plate. Serve your CNY Crispy Yuan Yang Wasabi Prawns ( 嘻哈鸳鸯芥末虾球 ) with lemon slices.
Credit: Foodista

Breakfast with CWEB Steel-Cut Oatmeal with Cranberries and Almonds

0
Photo Credit:- Cosori Air Fryers
Nutty, creamy steel-cut oats get an extra kick from tangy cranberries and toasted nuts in this easy recipe. If you’re rushed in the morning, make this the night before and refrigerate it, then reheat and top with the nuts for a warm, filling breakfast.

INGREDIENTS

  • 1  tbsp  unsalted butter
  • 1/2  cup  steel cut oats
  • Pinch kosher salt
  • 2  tsp  sugar
  • 1  cup  Water
  • 1/2  cup  whole milk
  • 1/4  tsp  vanilla extract
  • 1/4  cup  dried cranberries
  • 1/4  cup  toasted chopped almonds

INSTRUCTIONS

  1. Select  Sauté  and adjust to Medium heat. Add the butter to the inner pot. When the butter has melted and stopped foaming, add the oats and stir to coat with the butter. Continue cooking for 2 to 3 minutes, or until the oats have a nutty aroma.
  2. Add the salt, sugar, water, milk, vanilla, and cranberries. Stir to combine.
  3. Lock the lid into place. Select  Pressure Cook or Manual, and adjust the pressure to  High  and the time to  10 minutes. After cooking, let the pressure release naturally for 10 minutes, then quick release any remaining pressure.
  4. Unlock the lid. Spoon the oatmeal into two bowls and top with the almonds. Adjust to your taste, adding extra milk or sugar if you like.Double It: Oatmeal is a great recipe for doubling, since the leftovers keep well for a couple of days in the refrigerator. Double all the ingredients and increase the salt to ¼ teaspoon. Cook time remains the same.

RECIPE NOTES

Make It Dairy-Free: Use a neutral vegetable oil or coconut oil to toast the oats, and replace the whole milk with a plant-based milk or more water.

Source:- Cosorithis

Thai Red Curry Beef

0
Photo Credit:- Cosori Air Fryers
I have friends who make their own Thai curry pastes. I admire them, but it’s just too much work for me. I use Mae Ploy brand paste, and am pleased with the results. This curry cooks while the rice steams, giving you a complete dinner in one pot. Blade roast is a cut of shoulder (a flat-iron steak is half a blade roast) that’s more tender than chuck roast, but if you can’t find it, just use regular chuck, sliced thin.

INGREDIENTS

  • 14  oz  coconut milk  1 can
  • 1  ounce  Thai red curry paste  about  2 tablespoons
  • 12  oz  blade roast or flat-iron steak  cut into  1/4 inch  thick slices
  • 1/2  small onion  sliced
  • 1/2  cup  long grain white rice  rinsed
  • 1/2  cup  plus 1 tablespoon water
  • 1/4  tsp  kosher salt
  • 1/2  medium zucchini  cut into  1/4 inch  rounds then cut into half moons
  • 1/2  medium red bell pepper  seeded and cut into  1 inch  pieces
  • 1/2  pint  cherry tomatoes  halved
  • 2  tbsp  coarsely chopped fresh basil or cilantro
  • 1/2  tsp  freshly squeezed lime juice  optional
  • 1/2  tsp  sugar  optional
  • 1/4  tsp  fish sauce or soy sauce  optional

INSTRUCTIONS

  1. Pour the coconut milk into the inner pot. Add the curry paste and stir to combine. Add the beef and onion.
  2. Place a trivet in the pot that’s tall enough to clear the meat.
  3. Place the rice in a heat-proof bowl that holds at least  3 cups. Add the water and salt, and stir to dissolve the salt. Place the bowl on top of the trivet.
  4. Lock the lid into place. Select  Pressure Cook or Manual, and adjust the pressure to  High  and the time to  7 minutes.
  5. While the beef and rice cook, chop the vegetables.
  6. After cooking, let the pressure release naturally for 10 minutes, then quick release any remaining pressure.
  7. Unlock the lid. Carefully remove the rice bowl and trivet. Fluff the rice with a fork and cover with aluminum foil. Set aside.
  8. Select Sauté and adjust to Medium heat. Add the zucchini, bell pepper, and tomatoes and bring to a simmer. Cook, stirring occa-sionally, for 5 to 6 minutes, or until the vegetables are tender. Stir in the basil. Taste and adjust the seasoning as needed with lime juice, sugar, or fish sauce (if using).
  9. To serve, divide the rice between two bowls and top with the curry. You may not need all the sauce.

RECIPE NOTES

Use It Up: Use the other half of the zucchini in Minestrone (page 74). Use the remaining tomatoes in Farfalle with Salmon, Fennel, and Tomatoes (page 92). Use the rest of the bell pepper in Spicy Chicken Lettuce Cups (page 108) or the Southwestern Black Bean Salad (page 60)

Source:- Cosorithis

Claypot Fish

0

Claypot cooking is one of my favourites. Years ago when I was still a student in KL, I often frequented hawkers stalls for lunch and dinner. One of the dishes like claypot chicken rice by never failed to catch my attention. I always like my food to be warm when served, and claypot is the best in keeping the heat. Claypot cooking is not only a famous method used in SE Asia, it is also commonly used in several cuisines in Europe.

I bought a claypot not too long ago and have been wanting to use it. I thought of one dish that I used to eat quite a lot when my family and I went to a famous Chinese Seafood restaurant near to my uncle’s place in Kuala Perlis. This uncle of mine was in fishery business. When the catch was good, he would ask us to join him and his family at this particular restaurant, which he knew the proprietor really well. He would bring the best and biggest fish to the restaurant and asked them to prepare the fresh catch! It couldn’t have been fresher than this!

I love fish. One of my favourites is Grouper. Grouper has got really firm meat and it is suitable for stir-frying or braising. I got 2 Groupers when I went to Billingsgate Market not long ago. First thing that came to my mind when I saw grouper was claypot fish.

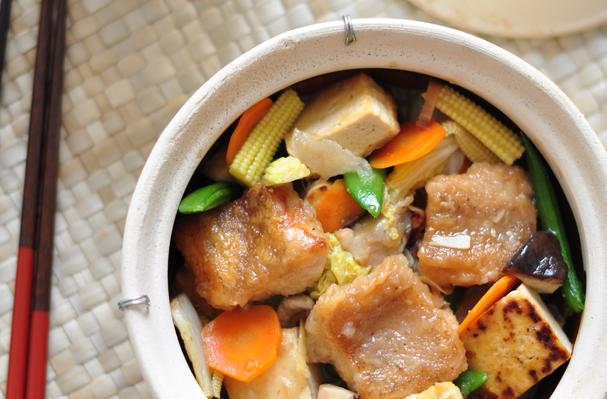
Claypot fish may sound really simple, I added some shiitake mushrooms, tofu, snow peas, baby corn, chinese cabbage and carrots. A wholesome meal was ready in less than 20 minutes! I think best dishes are always those that have been kept in my memory since I was a kid that never failed to put a smile on my face. I reminisced a lot about all the food that I tasted since childhood! Do you?

Ingredients

450 grams  Grouper  or  red snapper,  cut into squares
100 grams  Tofu,  cut into squares
4  Shiitake mushrooms
12  Snow peas
8  Baby corn,  halved
Chinese cabbage,  roughly cut into 4cm pieces, 4-5 leaves
1/4 of a  carrot,  thinly sliced
1  Clove garlic,  chopped
1 centimeter  Ginger,  chopped
2 tablespoons  Oil
1 tablespoon Chinese  rice wine
1 tablespoon  Corn flour
Salt,  a pinch
80 mls  Water
Seasoning:
1 tablespoon  Oyster sauce
1/8 teaspoon  White pepper
1 teaspoon  Cornflour,  for thickening
1 tablespoon  Water

Preparation

1. Marinate  the fish with a pinch of  salt.
2. Cut  the tofu into squares.  Pan fry  the tofu with a little bit of oil until golden  brown  and crispy. Set aside.
3. Coat  the fish with cornflour,  pan fry  each piece until slightly golden  brown.  Set aside.
4. Heat  up a pan with some oil. Put in garlic and ginger,  fry  until fragrance and but  brown.  Pour in Chinese rice wine. Add in  carrots,  Chinese cabbage, snow peas, baby corn, and Shiitake mushroom.  Stir-fry  under low  heat  for about 4 minutes.
5. Add in water and slowly bring to a  boil.  Add in fish and tofu. Give it a good  stir.  Add in  seasoning  then  thicken  the sauce with cornflour mixture.
6. Heat  a claypot in the oven for about 4-5 minutes until hot.
7. Pour in the cook  dish  into the claypot,  serve  immediately.
Credit: Foodista

Thanksgiving Turkey and Gravy

0
Photo Credit:- Cosori Air Fryers
If you can’t go home for Thanksgiving, you can still prepare a delicious dinner for your friends, starting with a perfectly cooked turkey breast and irresistible gravy. Get your friends to make a few side dishes, and finish the feast with Pumpkin Pie. Who knows? Maybe a new tradition will be born.

INGREDIENTS

  • 1  bone-in turkey breast  4 1/2- to 5 pound
  • 4  teaspoons  poultry seasoning
  • 3/4  teaspoon  fine sea salt
  • 1  cup  low-sodium chicken broth
  • 2  tablespoons  unsalted butter  melted
  • 2  tablespoons  all-purpose flour
  • 2  tablespoons  heavy cream  optional

INSTRUCTIONS

PREPARE THE TURKEY.
  1. Pat the turkey breast dry. Mix together the poultry seasoning and salt. Rub about half of the mixture on the skin and in the cavity on the underside of the breast; reserve the rest.
PRESSURE COOK.
  1. Pour the chicken broth into the inner cooking pot. Place a trivet in the pot. Place the turkey breast, skin-side up if possible, on the trivet. Lock the lid into place and turn the valve to “sealing.” Select  Pressure Cook or Manual  and adjust the pressure to  High. Set the time to  15 minutes. When cooking ends, let the pressure release naturally for 8 minutes, then turn the valve to “venting” to quick release the remaining pressure. Unlock and remove the lid.
ROAST THE TURKEY.
  1. While the turkey pressure cooks, preheat the oven to  400 °F. Mix the remaining seasoning mixture with the butter. When the turkey is ready, remove it from the pot and place it, skin-side up, on a rack set over a rimmed baking sheet. Brush the turkey skin with the seasoned butter. Roast the turkey for 10 to 15 minutes, until the skin is browned and the interior temperature reaches at least  155 °F.
MAKE THE GRAVY.
  1. While the turkey roasts, remove the trivet from the inner cooking pot. Remove about  1/2 cup  of the looking liquid and leave the rest in the pot. Select Sauté and adjust the heat to Medium. In a small bowl, stir together the flour and the  1/2 cup  cooking liquid. When the liquid in the pot is simmering, gradually stir in the flour mixture. Cook for 3 to 5 minutes, until the gravy comes to a boil and is thickened. For a creamier gravy, stir in the optional cream.
FINISH THE TURKEY.
  1. When the turkey is done, remove it from the oven and let it rest for about 10 minutes before slicing.
Source:- Cosorithis

Pork Fried Rice

0
Photo Credit:- Cosori Air Fryers
We live in a town without good Chinese food, and yet it’s something we crave often. This fried rice recipe is incredibly easy and satisfies the cravings. It’s also extremely budget friendly, so even if you have good takeout options, save some dough and make this fried rice in your Instant Pot ® instead.

INGREDIENTS

  • 3  tbsp  vegetable oil  divided
  • 1  small onion  finely chopped
  • 2  inch  pork chops  cut into  1/2 pieces,  6 oz
  • 1  tsp  fine sea salt
  • 1/2  tsp  ground black pepper
  • 3  cups  Water
  • 2  cups  long-grain rice
  • 1  large egg  beaten
  • 3  tbsp  soy sauce
  • 1/2  cup  frozen peas and carrots
  • 2  scallions  finely chopped (optional)

INSTRUCTIONS

SAUTÉ THE VEGETABLES AND PORK.
  1. Select  Sauté  and adjust the heat to  Medium or Normal. Add  1 tablespoon  of oil to the inner cooking pot. When it’s hot, add the onion and cook, stirring occasionally, for 2 minutes. Season the pork with the salt and pepper. Add the pork to the pot and cook, stirring occasionally, for about  5 minutes. Transfer the pork and onion to a small bowl.
PRESSURE COOK THE RICE.
  1. Add the water to the pot and scrape the bottom of the pan to remove any browned pieces. Add the rice. Lock the lid into place and turn the valve to “sealing.” Select  Rice, which will automatically set the cooking time based on the amount of rice and water in the pot. When cooking ends, let the pressure release naturally for 10 minutes, then turn the valve to “venting” to quick release the remaining pressure.
FINISH THE RICE.
  1. Unlock and remove the lid. Stir the rice and create a well in the center so you can see the bottom of the pot. Add the remaining  2 tablespoons  of oil into the center. Pour the beaten egg into the hole and stir quickly. Stir in the soy sauce and the pork and onions. Add the peas and carrots to the rice and allow to rest for  5 minutes  to heat through. Garnish with the scallions (if using).

Source:- Cosorithis

Classic Spaghetti and Meatballs

0

The fall months call for hearty meals and cozy, comfort fare. No need to spend hours in the kitchen preparing – using quality ingredients in even the simplest recipes can help to produce a dish that delivers on both flavour and satisfaction. Whip up this classic spaghetti recipe to bring hearty, rustic flavours to tonight’s dinner.

Ingredients

Meatballs
– 1/2 lb (225 g) lean ground beef
– 1/2 lb (225 g) lean ground pork
– 1/2 cup (125 mL) finely grated Parmesan cheese
– 1/4 cup (50 mL) each dry bread crumbs and chopped parsley
– 1 egg
– 4 tsp (20 mL) Club House Seasoning for Spaghetti Sauce, Spicy
– 1/2 tsp (2 mL) Club House Ground Black Pepper
– 1 tbsp (15 mL) extra-virgin olive oil
Sauce
– 2 tbsp (30 mL) extra-virgin olive oil
– 3 cloves garlic, minced
– 1 tbsp (15 mL) Club House Seasoning for Spaghetti Sauce, Spicy
– 1 Club House Bay Leaf
– 1 can (796 mL) plum tomatoes, chopped
– 1 tsp (5 mL) granulated sugar

Preparation

1. Combine beef, pork, cheese, bread crumbs, parsley, egg, garlic, seasoning and pepper in large bowl. Mix with hands until just combined. Shape by heaping 1 tbsp (15 mL) portions into 24 meatballs and place on plate.
2. Heat oil in large frying pan over medium heat. Cook meatballs in batches, turning, until browned all over, about 5 minutes. Transfer to plate.
3. For the sauce, in the same pan, heat oil over medium heat. Add garlic, seasoning, bay leaf and cook, stirring for 30 seconds. Stir in tomatoes and sugar. Add meatballs and juices and bring to boil. Reduce heat and simmer, until sauce is slightly thickened and meatballs are no longer pink inside (internal temperature of 165 °F/74 °C), 10-15 minutes.
4. Meanwhile, in large pot of boiling salted water, cook pasta according to package directions; drain. Serve topped with meatballs and sauce. Garnish with additional parmesan if desired.
5. Tips
6. Use kitchen shears to cut up tomatoes in can to avoid a mess.
7. Use a vegetable peeler for elegant Parmesan shavings as garnish.
8. Prep Time: 20 minutes
9. Cook Time: 20 minutes
10. More recipes are available online at flavour.ca.
Credit: Foodista