Post a Free Blog

Submit A Press Release

At CWEB, we are always looking to expand our network of strategic investors and partners. If you're interested in exploring investment opportunities or discussing potential partnerships and serious inquiries. Contact: jacque@cweb.com

Generic selectors
Exact matches only
Search in title
Search in content
Post Type Selectors
Filter by Categories
Action
Animation
Anime
ATP Tour (ATP)
Auto Racing
Baseball
Basketball
Boxing
Breaking News
Business
Business
Business Newsletter
Call of Duty (CALLOFDUTY)
Canadian Football League (CFL)
Car
Celebrity
Champions Tour (CHAMP)
Comedy
CONCACAF
Counter Strike Global Offensive (CSGO)
Crime
Dark Comedy
Defense of the Ancients (DOTA)
Documentary and Foreign
Drama
eSports
European Tour (EPGA)
Fashion
FIFA
FIFA Women’s World Cup (WWC)
FIFA World Cup (FIFA)
Fighting
Football
Formula 1 (F1)
Fortnite
Golf
Health
Hockey
Horror
IndyCar Series (INDY)
International Friendly (FRIENDLY)
Kids & Family
League of Legends (LOL)
LPGA
Madden
Major League Baseball (MLB)
Mixed Martial Arts (MMA)
MLS
Movie and Music
Movie Trailers
Music
Mystery
NASCAR Cup Series (NAS)
National Basketball Association (NBA)
National Football League (NFL)
National Hockey League (NHL)
National Women's Soccer (NWSL)
NBA Development League (NBAGL)
NBA2K
NCAA Baseball (NCAABBL)
NCAA Basketball (NCAAB)
NCAA Football (NCAAF)
NCAA Hockey (NCAAH)
Olympic Mens (OLYHKYM)
Other
Other Sports
Overwatch
PGA
Politics
Premier League (PREM)
Romance
Sci-Fi
Science
Soccer
Sports
Sports
Technology
Tennis
Thriller
Truck Series (TRUCK)
True Crime
Ultimate Fighting Championship (UFC)
US
Valorant
Western
Women’s National Basketball Association (WNBA)
Women’s NCAA Basketball (WNCAAB)
World
World Cup Qualifier (WORLDCUP)
WTA Tour (WTA)
Xfinity (XFT)
XFL
0
Home Blog Page 104

Everything Bagel BBQ Chicken Wings

0

Years ago I tested recipes for two of Susie Fishbein’s cookbooks and learned that the best way to make chicken wings was to boil them first and then bake them. The IPR makes the process faster.

INGREDIENTS

  • 1  cup  Water  236ml
  • 3—4  lbs  chicken wings  1.3—1.8kg
  • 1  cup  Barbeque Sauce  236ml
  • 1/2  tsp  black pepper
  • 3—3 1/2  tsp  Everything Bagel spice  divided

INSTRUCTIONS

  1. Place the water into the inner pot and add the steam rack. Pile the wings on top.
  2. Secure the lid, ensuring that the steam release handle is in the  Sealing  position. Press the  Pressure Cook  button and set the cooking time for  5 minutes. When the cooking time is complete, turn the steam release handle to the  Venting  position to quickly release the pressure. Preheat the oven to broil. Press  Cancel  and open the lid.
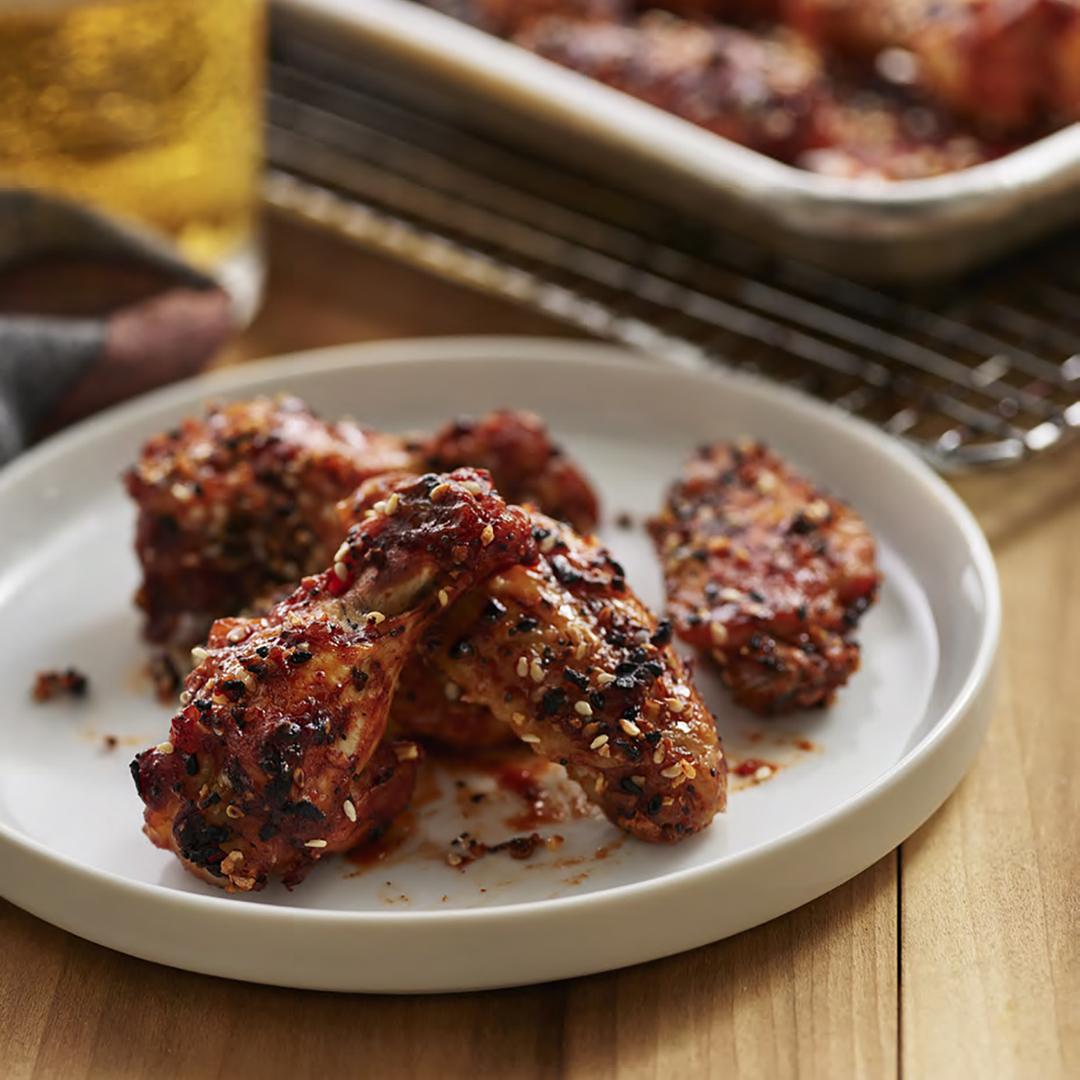
  3. Remove the wings to a baking pan. Pour the barbeque sauce and pepper on top and toss to coat. Sprinkle half of the Everything Bagel spice on top. Place the pan into the oven on a rack in the top third of the oven, but not on the oven rack closest to the heat. Broil for 5 minutes. Turn the wings over, and add the remaining Everything Bagel spice and broil for another 5 minutes, or longer until desired browning.

    Photo Credit:- Cosori Air Fryers

          Source:- Cosorithis

Chicken & Preserved Lemon Tagine

0

Tagine is a North African dish and traditionally cooked in a tagine pot made of pottery. If you’ve ever been to Morocco, you will notice souks or markets selling tagine pots of different sizes. The smallest pots can serve up to two people while the larger ones can serve around five people. Some are glazed and are hand painted with different colors. They make great souvenirs but make sure to bring a large suitcase if you ever plan to make a trip! I used a regular pot for my recipe and cooked the tagine on the stove top, however I personally prefer to cook it over open fire and in a cast-iron pot like Le Creuset (if only I had one here in college!). Cooking it over open fire can really help the onions caramelise and the juices come together to make an incredible reduced sauce. Alternatively, you can transfer your pot into the oven and let the stew cook that way.

Ingredients

Olive oil
Two small white onions, diced
Two garlic cloves, finely chopped
A small piece of ginger, grated
Four chicken legs (I removed the skin, but if you prefer, leaving the skin and searing it can help create a nice golden brown on the chicken)
Chicken broth
Handful of coriander, coarsely chopped
Pitted green olives
One whole preserved lemon, sliced (and more for garnish)
Two tsps Harissa (Tunisian chilli paste) / chilli powder for heat
One tsp cumin powder
One tsp ginger powder
One tsp turmeric or 1/2 tsp saffron powder
Dried whole chilis to garnish

Preparation

1. Sauté the diced onions and garlic in the pot on low heat just to sweat the onions. While doing so, pan fry the chicken legs in a separate pan just to get a golden brown on both sides.
2. Add the cumin, ginger and turmeric to the onions and garlic.
3. Place the chicken legs side by side into the pot with the onions and add a light chicken broth (unsalted) just enough but not covering the chicken. Add the sliced preserved lemon and green olives. The lemon is sour and salty so there is no need to add any salt to this dish.
4. Let the broth reduce, add the harissa and stir. Turn the chicken over and spoon the sauce over the meat.
5. When the chicken is cooked, garnish with chopped coriander, dried whole chilis and sliced preserved lemon.
6. Serve this dish along with fluffy cous cous 🙂
Credit: Foodista

Chicken & Andouille Jambalaya :: Mardi Gras

0

Nothing says NOLA or Mardi Gras more then Jambalaya! I’m going to tell you right now, this dish is amazing!!!! I invited my brothers over last night to share this giant pot of Jambalaya with us. A “funny” little story about when I invite my brothers over… Dominick always responds not with a yes or no but instead with a “What are you making?”. So I told him what I was making and I told him it would be even better then Ragin Cajun {a small local cajun restaurant} and his response was something along the lines of “don’t push it”. I am very happy to say, I WIN! This pot was devoured and compliments kept coming! My little brother Mike said “You’ve made a lot of really great dishes but this may the best”!!

This dish is very simple to make but the flavors are absolutely fantastic!!! Boneless skinless chicken thighs are perfectly fork tender, spicy andouille sausage, traditional bell peppers, onions and celery. Fresh garlic, crushed tomatoes a bay leaf and cajun seasoning add incredible flavor to this one pot dish; yes the rice is cooked right in there too! Seriously, you all have got to make this it is so good!!!

Ingredients

2 lbs boneless skinless chicken thighs
4 links andouille sausage, 1/2 inch slices
2 celery stalks, small dice
1 yellow onion, small dice
2 green bell peppers, small dice
6 garlic cloves, rough chopped
1 bay leaf
2-3 tsp cajun seasoning {depends on your heat preference}
1 cup canned crushed tomatoes
1 1/2 cups water
1 1/4 cups long grain white rice
olive oil

Preparation

1. Heat up a large heavy duty pot {I use my Le Crueset Dutch Oven} over medium heat.
2. Add in a few Tbsp of olive oil and the sliced andouille sausage. Cook for about 5 minutes until the sausage is lightly golden and the flavors have infused into the oil.
3. Add in the celery, peppers, onion, garlic, chicken, bay leaf, cajun seasoning, water and the crushed tomatoes. Season lightly with salt. Stir everything around, lower the heat to low, cover the pot and simmer for 1 hour.
4. Stir in the rice. Cover the pot and cook on low for 25 minutes, stirring a few times to prevent sticking.
5. Shut the heat, keep the lid on and allow to continue to cook for 10 minutes. The rice should be perfectly cooked. If its still a little under cooked simply add a little bit of water and cook a few extra minutes. Season with salt to taste.
Credit: Foodista

Vegan Zucchini Rolls With Cashew Cheese

0

In 2018, Keren Brown, Israeli food writer and expert on all things food in Tel Aviv, took me on a tour of vegan restaurants in Tel Aviv, the vegan capital of the world. During our tour, we ate these wonderful rolls made with vegan cheese. I make the cheese with cashews, and the texture is like ricotta. I use jarred tomato sauce in this recipe, but you can also use 1 1/2 cups (354ml) of your own homemade sauce. This is a great main dish for a vegan guest or even a cute appetizer on a small plate. You can always make these dairy by spreading ricotta cheese mixed with the lemon juice, finely chopped basil, salt, and pepper.

INGREDIENTS

Cashew Cheese
  • 1  cup  raw cashews  soaked in 1 (236ml) of cold water for 5 hours, 138g
  • 2  tsp  lemon juice  from  1  lemon
  • 1/4  cup  Water  59ml
  • 4  large basil leaves
  • 1/2  tsp  salt
  • pinch  black pepper
Zucchini Rolls
  • 2  large zucchinis  about  1 lb 3 oz  (590g) ounces total
  • 1 1/2  tsp  salt
  • 1 1/2  cups  marinara sauce  354ml

INSTRUCTIONS

  1. About 20 minutes prior to processing the cheese, slice the zucchinis vertically (the long way) into 1/4-inch (6mm) pieces. You can use the mandolin if you are very brave, but as I have injured myself too many times using it, I use a knife to cut the slices by turning the zucchini on its side and then carefully cutting the long slices. Any rejects or end pieces can be saved in the fridge or freezer for soup or the vegetable stock. You will need  8  slices for this dish, but I always slice  9  or  10  pieces so I can use the most pliable ones for the recipe, reserving the rejects for soup.
  2. Line a cookie sheet with two layers of paper towels. Place the zucchini slices on top. Sprinkle the salt over the slices and let them sit for 15 minutes. Rinse the slices with cold water and dry them. Line the cookie sheet with a fresh layer of paper towels and place the zucchini slices on top to dry further.
  3. To make the cheese, drain the cashews and place them into a food processor. Add the lemon juice, water, basil, salt. And pepper and process into a paste, scraping down the sides of the bowl multiple times.
  4. Place the steam rack into the inner pot and add  1 cup  of water. You will need a 6- or 7-inch (15cm or 18cm) pan to make this recipe; I prefer the 7-inch (18cm) one. Add the marinara sauce to the pan.
  5. To make the rolls, take one of the zucchini slices and spread about  1 1/2 tablespoons  of the cheese over the entire slice to the edges. Roll up from the smaller end. One side of the roll may be prettier so that part should face up. Place the roll into the sauce, leaning the end of the roll into the side of the pan to keep it from unrolling. Repeat for the other rolls and place one or two into the center.
  6. Create an aluminum foil sling. Place the pan on the foil and lift up the sides to insert the pan on top of the steam rack.
  7. Secure the lid, ensuring that the steam release handle is in the  Sealing  position. Press the  Pressure Cook  button and set the cooking time for  6 minutes. When the cooking time is complete, press  Cancel  and turn the steam release handle to the  Venting  position to quickly release the pressure. To serve, scoop up a roll and place it on a plate, adding more sauce around it.

    Photo Credit:- Cosori Air Fryers

          Source:- Cosorithis

Grandma’s Stuffed Cabbage

0

The credit for this recipe goes to my grandma Sylvia Altman, z”l, even though I have made some changes to it over the years. Her original recipe used every saucepan in my kitchen, and I have shifted to Napa rather than green cabbage, as it is easier to roll. She would never have believed that you could have melt-in-your-mouth stuffed cabbage cooked without watching the rolls for hours.

INGREDIENTS

Sauce
  • 1  tbsp  oil
  • 2  medium onions  chopped into small dice
  • 1  can  crushed tomatoes  28-ounce [828ml]
  • 1  cup  Water  236ml
  • 1/4  cup  fresh lemon juice  from  1—2  lemons, 59ml
  • 5  tbsp  light brown sugar  60g
  • 1  tbsp  honey
  • 1/2  tsp  salt
  • 1/4  tsp  black pepper
  • 1/3  cup  golden raisins  50g
  • 1  large green apple  peeled and cut into 3/4-inch (2cm) cubes
Cabbage Rolls
  • 1  head Napa cabbage
  • 1  onion
  • 1  lb  ground beef
  • 1/3  cup  white rice  65g
  • 1  large egg
  • 1/4  cup  Water  59ml
  • 1/2  tsp  salt
  • 1/4  tsp  black pepper

INSTRUCTIONS

  1. Cut off the end of the cabbage and separate  17  leaves. Bring a medium or large saucepan of water to a boil on the stovetop. Place a colander over a bowl near the saucepan. Cook the leaves, about 6 at a time, for 4 minutes per batch, leaving the water boiling the entire time. Use tongs to lift the cooked leaves and place into the colander to drain. Try not to tear the leaves. Place on paper towels or a clean dishtowel to dry.
  2. To make the sauce, press  Sauté  and when the display reads “Hot,” add the oil, chopped onions, and apples. Cook for about 5 minutes, until they start to soften but not brown, stirring often.
  3. Meanwhile, prepare the cabbage filling. Finely chop the onion by hand or in a food processor. Place into a large bowl. Add the beef, rice, egg, water, salt, and pepper, and mix well with your hands. Fan out a cabbage leaf in front of you with the stem facing you. Scoop up a handful of the meat and rice mixture, about  1/4 cup  for each roll, and place at the bottom of a cabbage leaf, at the stem.
  4. Fold the bottom over the mixture and roll over again, and then fold the sides of the leaf toward the middle to cover the meat, and then roll up.
  5. When the onions and apple are cooked, add the crushed tomatoes, water, lemon juice, brown sugar, and honey and bring to a boil. Add salt and black pepper.
  6. Remove sauce to a large bowl. Add 1/2 cup (118ml) hot water to the inner pot and boil, and use a wooden spoon to scrape the bottom of the pot clean. Place the steam rack on top. Place one layer of rolls on the rack, one ladle of sauce, another layer of rolls and so on, pouring any remaining sauce on top. Sprinkle the golden raisins on top.
  7. Secure the lid, ensuring that the steam release handle is in the  Sealing  position. Press the  Pressure Cook  button and set the cooking time for  18 minutes. When the cooking time is complete, let the pot sit for 15 minutes to naturally release the pressure. Turn the valve to the  Venting  position to release any remaining pressure. Press  Cancel  and remove the lid.

    Photo Credit:- Cosori Air Fryers

    Source:- Cosorithis

Beef Teriyaki and Rice

0

Too often, store-bought or restaurant teriyaki sauces are nothing but sugar with a little soy sauce thrown in for funsies. This version is a lot less sweet than what you’re probably used to, but the other savory flavors shine through. For a lower-carb option, use frozen riced cauliflower in the pan rather than rice, and use xanthan gum for thickening rather than the cornstarch.

INGREDIENTS

For the Beef
  • 1  lb  flank steak  cut into strips
  • 1  cup  sliced onion
  • 2  tbsp  reduced-sodium soy sauce
  • 2  tbsp  mirin
  • 2  tbsp  Water
  • 1  tbsp  sugar  or 1 teaspoon Splenda
  • 1  tbsp  grated fresh ginger
  • 1/2  tsp  kosher salt
  • 1  tsp  black pepper
For the Rice
  • 1  cup  jasmine rice  rinsed and drained
  • 1  tbsp  vegetable oil
  • 1  cup  Water
  • 1/2  tsp  kosher salt
For Finishing
  • 1  cup  thinly sliced white or yellow onion
  • 1  cup  stemmed  seeded, and sliced green bell pepper
  • 1  tbsp  cornstarch  or  1/4 tsp  xanthan gum (see Note)
  • 1/4  cup  Water
  • 1/2  cup  sliced green onions
  • 1/4  cup  sesame seeds

INSTRUCTIONS

  1. For the Beef:  In the Instant Pot, combine the steak, onion, soy sauce, mirin, water, sugar, ginger, salt, and pepper. Stir well.
  2. For the Rice:  In a  6 × 3-inch  round heatproof pan, combine the rice, water, oil, and salt. Stir well.
  3. Place a trivet in the pot. Set the pan on the trivet.
  4. Secure the lid on the pot. Close the pressure-release valve. Select  MANUAL or PRESSURE COOK  and set the pot at  HIGH  pressure for  5 minutes. At the end of the cooking time, allow the pot to sit undisturbed for 10 minutes, then release any remaining pressure.
  5. Open the lid, and remove the rice.
  6. For Finishing:  Select  SAUTÉ/Normal  on the pot. Add the onion and bell pepper. In a small bowl, mix the water and cornstarch to make a slurry. Stir the slurry into the pot and allow to bubble. Cook, stirring frequently, until thickened, 1 to 2 minutes.
  7. Serve over rice. Sprinkle servings with green onions and sesame seeds.

RECIPE NOTES

Note: If using xanthan gum, sprinkle the gum into the mixture and stir until the sauce thickens.

Per Serving
Calories: 480
Total Fat: 15g
Saturated Fat: 4g
Sodium: 770mg
Carbohydrates: 53g
Fiber: 2g
Sugars: 10g
Protein: 31g

Photo Credit:- Cosori Air Fryers

Source:- Cosorithis

Chicken Pot Pie Soup

0

All of the taste of a pot pie filling without the crust. If you would like to use this as filling, however, you can make the recipe with only 1 cup of water and top with a pastry crust. I like to eat most of the broth the first day and then use the thicker leftovers for filling.

INGREDIENTS

  • 3  cups  diced rotisserie chicken
  • 1  cup  trimmed green beans
  • 1  cup  frozen green peas  optional
  • 1  cup  diced onion
  • 1  cup  diced celery
  • 1  cup  sliced carrots
  • 2  tbsp  butter
  • 3  garlic cloves  minced
  • 1  tsp  black pepper
  • 1  tsp  dried thyme
  • 1/4 to 1/2  tsp  kosher salt
  • 3  cups  low-sodium chicken broth
  • 1  can evaporated milk  5-ounce

INSTRUCTIONS

  1. In the Instant Pot, combine the chicken, green beans, peas (if using), onion, celery, carrots, butter, garlic, pepper, thyme, salt, and broth.
  2. Secure the lid on the pot. Close the pressure-release valve. Select  PRESSURE COOK OR MANUAL  and set the pot at  HIGH pressure for 2 minutes. At the end of the cooking time, allow the pot to sit undisturbed for 5 minutes, then release any remaining pressure.
  3. Open the lid, stir in the evaporated milk, and serve.

RECIPE NOTES

Note: If you would like to use this as a filling for a pot pie, reduce the broth to 1[1⁄2] cups. You may also want to thicken with a cornstarch slurry. To make the slurry, in a small bowl, mix 1 tablespoon cornstarch and 1⁄4 cup water. Stir the slurry into the pot after the pressure has been released. Select SAUTÉ/Normal. Cook and stir 3 to 5 minutes or until thickened.

Per Serving
Calories: 230
Total Fat: 11g
Saturated Fat: 5g
Sodium: 430mg
Carbohydrates: 10g
Fiber: 2g
Sugars: 5g
Protein: 24g

Photo Credit:- Cosori Air Fryers

Source:- Cosorithis


Chicago Italian Beef

0

Recipe: Chicago Italian Beef Sandwiches

Ingredients

Ingredients
The beef
1 boneless beef sirloin butt roast, about 3 pounds with most of the fat trimmed off
The rub
1 tablespoon ground black pepper
2 teaspoons garlic powder
1 teaspoon onion powder
1 teaspoon dried oregano
1 teaspoon dried basil
1/2 teaspoon crushed red pepper
The juice
6 cups of hot water
4 cubes of beef bouillon (see discussion below) *
The sandwich
10 soft, fluffy, high gluten rolls, sliced lengthwise but hinged on one side or Italian bread loaves cut widthwise into 10 portions (Gonnella, Turano, and D’Amato are the bakers of choice in Chicago)
3 medium sized green bell peppers
1 tablespoon olive oil, approximately
1 cup hot giardiniera

Preparation

1. Preparation time: 20 minutes.
2. Cooking time: Allow about 2 hours to cook and another 3 hours to firm the meat for slicing in the refrigerator if you don’t have a meat slicer. You need 90 minutes to cook a 3 pound roast, or about 30 minutes per pound. You can cook this well in advance and refrigerate the meat and juice and heat it up as needed. You can even freeze it. This is a great Sunday dish because the smell of the roasting beef and herbs fills the house. After you cook it, you need another 30 minutes to chill it before slicing.
3. About the beef. Top sirloin, top round, or bottom round are preferred in that order. For tenderness, especially if you cannot cut paper thin slices. David Rosengarten, the famous cookbook author and TV chef, uses chuck, a fattier cut, so the meat will be more tender and flavorful. “Luxurious” is the word he used. Problem is that you’ll have to chill the pan drippings after cooking in order to skim off the fat.
4. About the garlic. If you wish, omit the garlic powder and stud the roast with fresh garlic.
5. Note: This beef is especially good the second day. Refrigerate the beef once you are done with it, then warm it up the next day. The flavors will be even better!
Credit: Foodista

New England Boiled Dinner

0

Two tips to make this perfect and fast: Cut up that corned beef so that all of it cooks evenly and fast. And don’t try to make the vegetables and beef in one go unless you want total mush. Other than that, it’s a super-simple recipe that makes tasty leftovers.

INGREDIENTS

  • 1 1/2  cups  Water
  • 4  pounds  corned beef  trimmed, with spice packet
  • 16  baby potatoes
  • 3  cups  baby carrots
  • 2  onions  quartered
  • 1  head cabbage  quartered
  • black pepper

INSTRUCTIONS

  1. Pour the water into the Instant Pot. Cut the corned beef in half at its thickest part and place in the pot. Sprinkle the contents of the spice packet over the meat.
  2. Secure the lid on the pot. Close the pressure-release valve. Select  PRESSURE COOK or MANUAL  and set the pot at  HIGH pressure for 60 minutes. At the end of the cooking time, allow the pot to sit undisturbed for 10 minutes, then release any remaining pressure.
  3. Place the potatoes, carrots, and onions on top of the corned beef. Arrange the cabbage on top. Do not stir. Secure the lid on the pot. Close the pressure-release valve. Select  PRESSURE COOK or MANUAL  and set the pot at  HIGH pressure for 5 minutes. At the end of the cooking time, allow the pot to sit undisturbed for 10 minutes, then release any remaining pressure.
  4. Transfer the vegetables to half of a large serving dish. Remove the corned beef and slice. Arrange the slices on the other half of the dish. Season everything to taste with pepper and serve.

RECIPE NOTES

Per Serving
Calories: 320
Total Fat: 16g
Saturated Fat: 5g
Sodium: 890mg
Carbohydrates: 27g
Fiber: 5g
Sugars: 6g
Protein: 19 g

Photo Credit:- Cosori Air Fryers

Source:- Cosorithis

Honey-Mustard Salmon with Rice And Vegetables

0

Three things to know about this recipe: First, the sauce will look weird after cooking. But it blends together beautifully with a stir. Second, the rice may brown a little at the bottom, but it won’t burn if you follow the directions exactly as written. Third, all of this is super-tasty!

INGREDIENTS

  • 1  cup  long-grain basmati rice  rinsed and drained
  • 1  cup  diced onion
  • 1  tbsp  vegetable oil
  • 1  tsp  kosher salt
  • 1 1/4  cups  Water
  • 1 1/2  cups  frozen peas and carrots
  • 2  tbsp  Dijon mustard
  • 1  tbsp  reduced-sodium soy sauce
  • 1  tbsp  honey
  • 2  garlic cloves  minced
  • 1/2  tsp  kosher salt
  • 1  lb  frozen skinless salmon fillets

INSTRUCTIONS

  1. 1. In the Instant Pot, combine the rice, onion, oil, salt, and water. Scatter the peas and carrots on the top. Do not stir.
  2. 2. In a small bowl, whisk together the mustard, soy sauce, honey, garlic, and salt. Place the fillets in a  6 × 3- or 7 × 2-inch  round heatproof pan. Pour the sauce over the fillets.
  3. 3. Place a trivet in the pot. Set the pan on the trivet.
  4. 4. Secure the lid on the pot. Close the pressure-release valve. Select  MANUAL/PRESSURE COOK  and set the pot at  HIGH pressure for 4 minutes. At the end of the cooking time, allow the pot to sit undisturbed for 10 minutes, then release any remaining pressure.
  5. 5. Open the lid and remove the pan. Using a fork or whisk, blend the sauce until smooth. Stir the rice mixture, divide among the four plates, and place the salmon on top.
  6. 6. Drizzle the salmon and rice with the sauce and serve.

RECIPE NOTES

Per Serving Calories: 410
Total Fat: 11g
Saturated Fat: 2g
Sodium: 1,100mg
Carbohydrates: 49g
Fiber: 4g
Sugars: 6g
Protein: 28g

Photo Credit:- Cosori Air Fryers

Source:- Cosorithis