Post a Free Blog

Submit A Press Release

At CWEB, we are always looking to expand our network of strategic investors and partners. If you're interested in exploring investment opportunities or discussing potential partnerships and serious inquiries. Contact: jacque@cweb.com

Generic selectors
Exact matches only
Search in title
Search in content
Post Type Selectors
Filter by Categories
Action
Animation
Anime
ATP Tour (ATP)
Auto Racing
Baseball
Basketball
Boxing
Breaking News
Business
Business
Business Newsletter
Call of Duty (CALLOFDUTY)
Canadian Football League (CFL)
Car
Celebrity
Champions Tour (CHAMP)
Comedy
CONCACAF
Counter Strike Global Offensive (CSGO)
Crime
Dark Comedy
Defense of the Ancients (DOTA)
Documentary and Foreign
Drama
eSports
European Tour (EPGA)
Fashion
FIFA
FIFA Women’s World Cup (WWC)
FIFA World Cup (FIFA)
Fighting
Football
Formula 1 (F1)
Fortnite
Golf
Health
Hockey
Horror
IndyCar Series (INDY)
International Friendly (FRIENDLY)
Kids & Family
League of Legends (LOL)
LPGA
Madden
Major League Baseball (MLB)
Mixed Martial Arts (MMA)
MLS
Movie and Music
Movie Trailers
Music
Mystery
NASCAR Cup Series (NAS)
National Basketball Association (NBA)
National Football League (NFL)
National Hockey League (NHL)
National Women's Soccer (NWSL)
NBA Development League (NBAGL)
NBA2K
NCAA Baseball (NCAABBL)
NCAA Basketball (NCAAB)
NCAA Football (NCAAF)
NCAA Hockey (NCAAH)
Olympic Mens (OLYHKYM)
Other
Other Sports
Overwatch
PGA
Politics
Premier League (PREM)
Romance
Sci-Fi
Science
Soccer
Sports
Sports
Technology
Tennis
Thriller
Truck Series (TRUCK)
True Crime
Ultimate Fighting Championship (UFC)
US
Valorant
Western
Women’s National Basketball Association (WNBA)
Women’s NCAA Basketball (WNCAAB)
World
World Cup Qualifier (WORLDCUP)
WTA Tour (WTA)
Xfinity (XFT)
XFL
0
Home Blog Page 98

Chicken Breast With Macaroni and Veggies

0

This dish is quick, easy and so good. You will think you went to a gourmet Italian restaurant without the expensive bill at the end of the meal that will cause you to need Tums.

Ingredients

Sprigs of Fresh Rosemary
Sprigs of Fresh Oregano
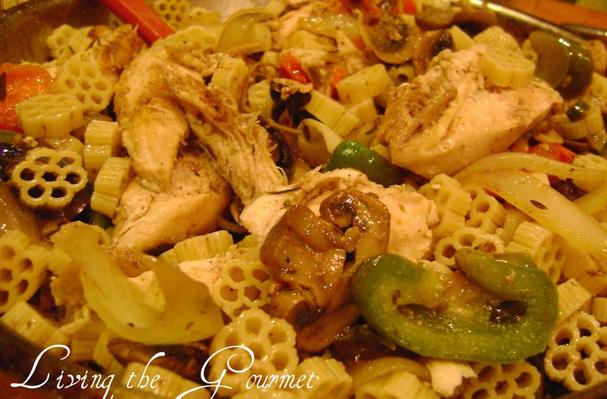
4 Chicken Breasts
4 cloves of garlic — crushed& chopped
1 Sweet Onion — sliced
1 Bell Pepper — sliced
1 handful of cherry tomatoes — halved
1 hot pepper- sliced
1/4 cup of red wine
1 quart of mushrooms- sliced
Olive oil
Box of your favorite macaroni

Preparation

1. In a large frying pan heat a few drizzles of olive oil and place the chicken breasts. Place the sprigs of rosemary and oregano on top of the chicken and loosely cover the chicken. When the chicken is halfway through the cooking process flip it and finish cooking.
2. Heat the griddle and place the mushrooms, onions, garlic and peppers on the griddle. When the veggies look golden and healthy, remove them and place them in a bowl.
3. When the chicken has finished cooking set it aside. In the pan that the chicken was cooked in place the grilled veggies and the tomatoes. Add the wine and simmer for a few minutes. Set aside and prepare the macaroni.
4. Add the macaroni to the veggies and serve with the chicken. Garnish with some grated Romano cheese and a few drizzles of olive oil.
Credit: Foodista

Instant Cheesy Bean Bake for the Instant Pot Duo Crisp or Air Fryer Lid | Official

0
Photo Credit:- Cosori Air Fryers
It’s no secret that the Instant Pot is the best thing for beans, but with the addition of an air fryer lid the bar has been raised. Pressure cooking makes quick work of cooking the beans, but topping the works with cheese and broiling takes this appetizer to the next level. Enjoy this Official recipe created by the Instant Pot Culinary Team.

INGREDIENTS

  • 2  Tbsp  extra-virgin olive oil
  • 1 1/2  tsp  garlic  minced or thinly sliced
  • 3  Tbsp  tomato paste
  • 1 1/3  cups  Dried beans (such as cannellini or Great Northern) or chickpeas  or 1 lb (454 g) cooked beans
  • kosher salt
  • black pepper
  • 1 1/3  cups  mozzarella  coarsely grated
  • 1 1/3  cups  mozzarella  coarsely grated
  1. Start by washing the beans, and then place them in an inner pot with  4 cups  of cold water.
  2. Close the lid and make sure the pressure release handle is in the sealed position. Select  Pressure Cook/Manual  and set the cook time to  25 minutes  on  High  pressure.
  3. Once the beans are cooked,  Quick Release  the pressure, take out the beans, then drain the water and set aside. Rinse the inner pot and then place it back into the Instant Pot.
  4. Select  Sauté/strong> and toggle to  High. Add the olive oil.
  5. After 20-25 seconds, add the minced garlic and fry the garlic until it is lightly golden (about 1 minute).
  6. Add the tomato paste, cook for 30 seconds, and give it a quick stir.
  7. Add the beans, water, pinch of salt and pepper and stir to combine them all together.
  8. Press the  Cancel  button.
  9. Sprinkle the cheese evenly over the top, and then close the pot with the air fry lid.
  10. Press  Broil  and set the time to  7 minutes.
  11. When it is done, serve it with toasted bread or nacho chips. (Optional: Sprinkle some chopped parsley or chives over the top)

RECIPE NOTES

You can finish the beans in the oven under the broiler if you don’t have an Instant Pot Duo Crisp or an Air Fryer Lid.

Did you make these beans? Rate the recipe and leave a comment!

Source:- Cosorithis

Crispy Parmesan Roast Chicken with Lemon for the Instant Pot Duo Crisp or Air Fryer Lid | Official

0
Photo Credit:- Cosori Air Fryers
Combine the best to two cooking techniques with your combo of Instant Pot pressure cooking and air frying under the Air Fryer Lid, and get the crispiest, tastiest, lemonyest parmesan chicken ever. Your guests never need to know how easy it is to make. Another fantastic Official recipe created by the Instant Pot Culinary Team.

INGREDIENTS

  • 2  lemons  small
  • 3  tsp  kosher salt  plus more to taste
  • 3  tsp  black pepper
  • 2  tsp  rosemary  chopped
  • 6  rosemary sprigs
  • 2  tsp  red pepper flakes  plus more for serving, optional
  • 1  whole chicken  about  3 pounds
  • extra-virgin olive oil  for drizzling
  • 1/3  cup  parmesan  finely grated
  • 4  cups  chicken stock

INSTRUCTIONS

  1. Finely grate  2 teaspoons  of zest from the lemons and place into a small bowl. (Save the zested lemon for the drippings.)
  2. Stir in  3 teaspoons  salt, pepper, chopped rosemary and red-pepper flakes (if using). Season the chicken inside and out with salt mixture and set aside. Stuff cavity of chicken with 2 rosemary springs.
  3. Place the chicken breast-side down, add the chicken, the stock, and 2 of the rosemary springs into the inner pot. Place the inner pot into your Instant Pot and select  Pressure Cook, and set to  High  pressure for  20 minutes.
  4. When pressure cooking is complete,  Quick Release  the pressure.
  5. Remove the lid, using tongs take the chicken out of the inner pot and drain the water.
  6. Making sure that your inner pot is dry, place the air fryer basket (or trivet) into the pot, drizzle the chicken with the olive oil and place it into the basket.
  7. Using the Air fryer Lid select  Roast  at  400 °F  for  25 minutes. In the middle of the cooking process sprinkle the chicken with the parmesan cheese. Continue roasting.
  8. When cooking is complete the internal temperature should reach  165 °F. Let the chicken rest for  5 to 10 minutes  then squeeze juice from one of the zested lemons over the chicken.
  9. Carve and serve drippings spooned over the meat.

RECIPE NOTES

Did you make this crispy parmesan roast chicken with lemon? Give it a rating and comment!

Source:- Cosorithis

Best Beef Taquitos for the Instant Pot Duo Crisp or Air Fryer Lid | Official

0
 Photo Credit:- Cosori Air Fryers
One pot, three cooking methods, and 20 crispy Mexican taquitos. With this recipe, the Instant Pot shows off its versatility by combining sautéing, pressure cooking, and air frying to create a scrumptious appetizer that could also double as dinner. Minimal prep, even less to clean, plus it comes from the Official Instant Pot Culinary Team! It doesn’t get any better than this.

INGREDIENTS

  • 2  lbs  beef chuck  or brisket
  • 1  tbsp  garlic  minced
  • 1  cup  white onion  chopped
  • 1  cup  Canned tomatoes  chopped
  • sea salt  to taste
  • black pepper  to taste
  • 1  tbsp  lime juice
  • 2  tbsp  orange juice
  • 2  tbsp  olive oil
  • 2  tsp  chipotle
  • 1  tbsp  smoked paprika
  • 1  tbsp  garlic powder
  • 1  tbsp  ground cumin
  • 1  tbsp  chili powder
  • 4  cups  beef broth
  • 20  Mini tortillas
  • 1/2  cup  cilantro  chopped
  • 2  cups  Mozzarella and cheddar cheese  shredded

INSTRUCTIONS

  1. Turn on your instant pot and set it to  Sauté  on  High, drizzle with olive oil.
  2. While you wait for the oil to heat up, season your meat with salt, black pepper and smoked paprika.
  3. Place the meat inside the inner pot. Do not move it for a couple of minutes until well-seared and browned (if the meat sticks to the inner pot, let it sit for a while longer — the meat will naturally release from the surface of the pot when ready). Sear beef on all sides.
  4. Using tongs take the meat out of the pot and set aside. Add in the chopped onions, minced garlic and sauté until translucent.
  5. Add the tomatoes and the rest of the spices with the lime and orange juices. Stir to combine them all.
  6. Select  Cancel.
  7. Place the beef on top of the mixture and add the beef broth, making sure that the liquid covers at least half of the meat. Use the pressure cook lid and close the pot. Ensure the steam release handle is in the “sealed” position.
  8. Select  Pressure Cook  on  High  and set for  35 minutes.
  9. When the cooking time is complete,  Quick Release  the pressure.
  10. Carefully take the meat out and shred with a fork. Let it cool.
  11. Empty the inner pot, rinse, and dry it.
  12. Put the inner pot back and place your Duo Crisp air fryer basket in with the dehydration rack, or a trivet if using an Air Fryer Lid.
  13. In a large bowl, mix the beef, cheese, and chopped cilantro.
  14. Place the filling in a corner of the tortilla and roll it.
  15. Place the taquitos in the dehydration rack and use the air fry lid. Select  Broil  for  5 minutes.
  16. Use the tongs to take the taquitos out of the basket and enjoy.

RECIPE NOTES

Serve with your favourite dip.

Did you make this recipe? Please rate and comment!

Source:- Cosorithis

Hoisin-Glazed Baby Back Ribs

0
Photo Credit:- Cosori Air Fryers
These addictive ribs balance sweet and heat. A thick, flavorful paste made with honey and a handful of basic Asian ingredients acts as both a wet rub and a glaze. Gochujang is a Korean fermented chili paste; look for it in the international aisle of the supermarket or in Asian grocery stores. Racks of baby back ribs, cut so they fit in the pot, are cooked until tender, then glazed and broiled until burnished before being separated into individual ribs. Serve them as a main course with rice and steamed or stir-fried vegetables or offer as an appetizer. Don’t use pork spareribs. They’re larger than baby backs and won’t fit in the pot; they also require a slightly longer cooking time. Don’t prep the cilantro and scallions at the same time as you prep the ribs; use the half hour or so that it takes the ribs to pressure cook to chop and slice them. This saves some up-front time and ensures the herbs are fresh and flavorful for serving.

INGREDIENTS

  • 1  cup  Hoisin Sauce
  • 1/2  cup  honey
  • 1  tbsp  Chinese five-spice powder
  • 5  tbsp  gochujang  divided
  • 2  tbsp  minced fresh ginger
  • 2  2 1/2- to 3-lb racks baby back pork ribs  each cut half if pressure cooking or cut into 3 or 4 rib sections if slow cooking
  • 2  tbsp  ï¬nely chopped fresh cilantro
  • 2  tbsp  sesame seeds  toasted
  • 3  scallions  thinly sliced

INSTRUCTIONS

  1. START: In a large bowl, whisk together the hoisin, honey, five-spice powder and  2 tbsp  gochujang. Measure  3/4 cup  of the mixture into a small bowl and stir in the remaining  3 tbsp  gochujang and the ginger; set aside at room temperature if pressure cooking or cover and refrigerate if slow cooking. Add the rib sections to the remaining hoisin mixture in the large bowl and turn to coat. Place the steam rack in a  6-quart  Instant Pot, then pour in  1 cup  water. Arrange the ribs upright in a circle, with the meaty sides facing the walls of the pot.
  2. Fast  (Pressure Cook): Lock the lid in place and move the pressure valve to  Sealing. Select  Pressure Cook or Manual; make sure the pressure level is set to High. Set the cooking time for  25 minutes. When pressure cooking is complete, allow the pressure to reduce naturally for  15 minutes, then release the remaining steam by moving the pressure valve to  Venting. Press  Cancel, then carefully open the pot. Let cool for 5 minutes.

    -OR-

    Slow  (Slow cooking) : Select  More/High Sauté  and bring the water to a boil. Press  Cancel, lock the lid in place and move the pressure valve to Venting. Select  Slow Cook  and set the temperature to More/High. Set the cooking time for  8 to 9 hours; the ribs are done when a skewer inserted into the meat between the bones meets no resistance. Press  Cancel, then carefully open the pot. Let cool for 5 minutes.

  3. FINISH: While the ribs cool, heat the broiler with a rack about  6 inches  from the element. Line a rimmed baking sheet with foil. Using tongs, carefully transfer the ribs meat side up to the prepared baking sheet. Generously brush with half of the reserved hoisin mixture and broil until the glaze begins to bubble, 2 to 3 minutes. Remove from the broiler, brush with the remaining mixture and continue to broil until bubbling, another 2 to 3 minutes. Cool for 5 minutes, then cut between the bones to separate into individual ribs. Transfer to a platter, then sprinkle with the cilantro, sesame seeds and scallions.

RECIPE NOTES

Don’t use pork spareribs. They’re larger than baby backs and won’t fit in the pot; they also require a slightly longer cooking time. Don’t prep the cilantro and scallions at the same time as you prep the ribs; use the half hour or so that it takes the ribs to pressure cook to chop and slice them. This saves some up-front time and ensures the herbs are fresh and flavorful for serving.

Source:- Cosorithis

Chicken Breast With Fresh Spinach

0

This chicken has a great flavor and is so easy. Enjoy with Love,Catherine

Ingredients

2 1/2 pounds  boneless  chicken breast
1  bunch fresh baby  spinach
Marinade:
4 cloves  garlic  — crushed & chopped
2 tablespoons  Worcestershire sauce
2 tablespoons  Teriyaki sauce
2 tablespoons  Soy sauce
Juice of 1/2 lemon
2 tablespoons  olive oil
2 tablespoons  ketchup
Dash of  garlic  powder
Dash of Paprika

Preparation

1. In a bowl combine all of the ingredients for the marinade and place the chicken breast in it. This  can  be used immediately or  refrigerated  for a few hours.
2. In a large  heated  frying  pan place the chicken breast and let cook on one side for about 12 minutes and then  flip  and complete the cooking process on the other side.
3. Remove the chicken breast and add the spinach and toss just until wilted. Add the chicken back in and let the spinach cook another minute.
Credit: Foodista

Chicken Biryani with Hard Boiled Eggs

0

Biryani comes in many flavors, which include chicken, beef, lamb, vegetarian, and shrimp. It’s a traditional Indian dish made using Basmati rice, meat (or only veggies) and various other exotic spices.

Ingredients

1 1/2 pounds chicken
4 cups basmati rice
2 chopped onions
1/2 tablespoon lime juice
1 small cup plain yogurt
6 tablespoons ginger-garlic paste
6 green chillies
2 cloves
2 cinnamon
4 cardamons
a few corriander leaves
10 mint leaves
1/2 teaspoon salt
1/4 tablespoon saffron
2 cups cooking oil
1/2 teaspoon red chilli powder
1/2 teaspoon green chilli paste
2-4 hard boiled eggs, halved

Preparation

1. Wash the chicken and cut it into small pieces. Marinate the chicken with ginger garlic paste and keep it aside for an hour. Some prefer a light touch of yogurt along with the ginger paste to be included while marinating the chicken. Some prefer to refrigerate the marinated chicken for 30 minutes.
2. Cut the onion into thin long pieces and fry it in 1 1/2 cups vegetable oil till they are golden brown.
3. Mix curd, ¾ part of fried onion, red chillier powder, green chillier paste, cinnamon, cardamom, clove, coriander leaves, mint leaves saffron water, salt and remaining part of oil. Add this mixture to the marinated meat and keep it aside for one hour.
4. Cook the basmati rice. When the rice is half cooked, stop cooking. Drain out the water completely. Spread the half cooked rice over marinated meat. The basic idea is to have layers of rice and marinated chicken.
5. Upon the rice layer spread lime juice, saffron color, and remaining part of onion.
6. Cover the cooker with lid tightly and cook on a very low flame for about an 45-60 minutes. Some prefer to cook it in an oven, but an even cooker does just fine.
Credit: Foodista

Chicken Marsala

0
Photo Credit:- Cosori Air Fryers
I can never pass up this classic Italian dish. Maybe it’s the melty mushrooms. Maybe it’s the dark, rich, wine-based sauce. Whatever the case, it’s extra delicious when made in the Instant Pot.

INGREDIENTS

  • 2  lb  boneless, skinless chicken breasts  each breast sliced crosswise into fillets about  1/4 inch  thick
  • 1/2  cup  all-purpose flour  (with a few pinches of garlic powder, black pepper, and kosher salt mixed in) for dredging
  • 1/4  cup  extra-virgin olive oil
  • 4  tbsp  salted butter  divided,  1/2 stick
  • 1  shallot  minced
  • 3  garlic cloves  minced or pressed
  • 1  lb  baby bella mushrooms  sliced
  • 3/4  cup  marsala wine  (dry)
  • 1/2  cup  chicken broth
  • 1 1/2  tbsp  cornstarch

INSTRUCTIONS

  1. Coat the chicken in the flour mixture and set aside.
  2. Place the olive oil and  1 tbsp  of the butter in the Instant Pot. Hit  Sauté  and Adjust to the  More  or  High  setting and heat until the butter is melted.
  3. Working in batches, sear the chicken for  1 minute  on each side until very lightly browned, remove the chicken with tongs, and set aside on a plate. Leave any excess oil in the pot for more flavor.
  4. Melt the remaining  3 tbsp  of butter in the pot–no need to wipe out any oil or flour left behind. Add the shallot and garlic and sauté, scraping up any browned bits from the bottom of the pot, for  2 minutes, then add the mushrooms and sauté for another  2 minutes.
  5. Add the wine and give a final scrape to be sure the bottom of the pot is cleared. Add the chicken broth, then put the chicken back in the pot.
  6. Secure the lid, move the valve to the sealing position, hit  Keep Warm/Cancel, and then hit  Manual  or  Pressure Cook  on  High Pressure  for  8 minutes.  Quick release  when done.
  7. Meanwhile, combine the cornstarch with  1 1/2 tbsp  cold water to make a slurry. Set aside.
  8. Remove the chicken to a serving platter and set aside, but leave the sauce in the pot. Hit  Keep Warm/Cancel  and then hit  Sauté  again and Adjust to  More  or  High.
  9. Once bubbling, immediately stir the cornstarch slurry into the sauce. Hit  Keep Warm/Cancel  to turn the pot off immediately.
  10. Pour the sauce over the chicken and serve.

RECIPE NOTES

Jeff’s Tip: Any leftover sauce goes great over rice or pasta and will keep in the fridge in an airtight container for up to 5 days.

Source:- Cosorithis

Chicken Noodle Soup

0
Photo Credit:- Cosori Air Fryers
When a Jewish mother lowers her ladle in defeat and bows down to her child’s version of this healthy comfort-food classic, you know that things just got real. This is the only chicken noodle soup recipe you’ll ever need in your life. If you don’t want to buy a whole chicken and cut it up yourself, you can ask the butcher in the supermarket to do it for you–just make sure you get a nice mix of parts, from the breast to the leg.

INGREDIENTS

  • 1  whole chicken  chopped into quarters (leg, breast, thigh, and wing),  4 lbs—5 lbs
  • 8  cups  Water
  • 1  Spanish onion  peeled and cut into large chunks (you’ll be removing it with a slotted spoon after the stock is made so make sure it’s easy to fish out), or yellow
  • 3  garlic cloves  minced or pressed
  • 1  tbsp  Chicken Better Than Bouillon  (heaping) or  4  chicken bouillon cubes
  • 1  tsp  Italian seasoning
  • 1  tsp  lemon pepper seasoning
  • 3  bay leaves
  • kosher salt
  • black pepper
  • 1  cups  noodles  to  2 cups. I prefer the wide ones
  • 2  cups  carrots  peeled and sliced into  1/4 inch  disks
  • 2  cups  celery  sliced into  1/4 inch  pieces with leafy green tops reserved
  • 1/2  cup  fresh dill leaves
  • 3  tbsp  tbsp fresh parsley  chopped (or  1 tbspdried parsley)
  • 2  tbsp  cooking sherry
  • 1 1/2  tsp  seasoned salt  more to taste

INSTRUCTIONS

  1. Place the chicken in the Instant Pot and pour in water so the chicken is totally covered. Add the onion, garlic, bouillon, Italian seasoning, lemon pepper seasoning, bay leaves, and a pinch of salt and pepper. Stir, then secure the lid and move the valve to the sealing position. Hit  Manual or Pressure Cook  on  High Pressure  for  10 minutes.  Quick Release  when done.
  2. While the pot’s cooking, cook the egg noodles according to package directions and set aside.
  3. When the lid comes off the pot, remove the chicken with tongs and set aside to cool. Remove and discard the bay leaves and onion (if you wish) using a slotted spoon.
  4. Add all remaining ingredients to the Instant Pot except for the chicken and egg noodles, and stir. Secure the lid and move the valve to the  Sealing  position. Hit  Keep Warm/Cancel  followed by  Manual or Pressure Cook  on  High Pressure  for  5 minutes.  Quick Release  when done.
  5. While the pot is cooking the soup, pick the slightly cooled chicken meat from the bones and discard the bones, skin, and cartilage. Shred the meat by hand and set aside.
  6. Stir in the shredded chicken and serve in bowls topped with egg noodles.

RECIPE NOTES

Jeff’s Tip: Boiling the egg noodles separately keeps them firm. Cooking them under pressure makes them absorb too much of the broth and become mushy.

Source:- Cosorithis

Chicken and Zucchini with Garlicky Tomato Sauce and Polenta

0

Simple, lightly breaded chicken strips and pan-seared zucchini are dressed up with a flavorful tomato sauce loaded with garlic. Serve it over cakes of baked polenta for a warm, homey, and inviting dinner.

For extra photos and info on this recipe, visit The Briny Lemon blog at thebrinylemon.wordpress.com.

Ingredients

For the Polenta
2 cups water
1/2 cup instant polenta (pre-cooked cornmeal)
1/3 cup shredded provolone or mozzarella cheese
sea salt
For the Sauce, Chicken, and Zucchini
4 garlic cloves, smashed and peeled
1/2 tsp sea salt, plus more, as desired
1/4 tsp red pepper flakes
5 tbsp olive oil, divided
3 tbsp tomato paste
3/4 cup vegetable broth
flour, for dredging
1/2 tsp paprika
freshly ground black pepper
2 boneless, skinless chicken breast halves, each cut lengthwise into 4 strips (about 1 1/4 lbs total)
2 medium zucchini, cut into 1/4-inch rounds

Preparation

1. Preheat the oven to 450 ° F.
2. Bring the water to a slight boil in a medium saucepan. Slowly stir in the polenta in a steady stream to prevent clumping. Continue stirring until the cornmeal thickens slightly, 1-2 minutes.
3. Reduce the heat to a simmer, stir in the cheese, and season with salt. Stir until the mixture is thick but still pourable, about 2 minutes.
4. Pour the polenta into a lightly oiled 8 X 8 baking pan and tilt it back and forth to create a smooth, even layer. Bake uncovered until barely golden on the outside and still creamy on the inside, 30 minutes. Remove and let cool 5 minutes before slicing.
5. To make the sauce, place the garlic, 1/2 teaspoon of salt, and red pepper flakes in a shallow bowl. With the back of a fork, mash the ingredients together until the garlic is pasty. Add 1 tablespoon of oil and continue mashing until well blended.
6. Heat a medium skillet or saucepan over medium-low heat and add the garlic mixture. Cook 1 minute, stirring frequently, until very aromatic. Add the tomato paste and 2 tablespoons of oil to the skillet and stir 1 minute.
7. Add the vegetable broth and bring to a simmer. Reduce the heat and simmer slowly 5 minutes. Cover and keep warm while the chicken cooks.
8. To prepare the chicken, combine the flour, paprika, salt, and pepper in a large, zip-top bag. Add the chicken and shake to coat well.
9. Heat a large, nonstick skillet over medium-high heat and add 2 tablespoons of oil. Shake any excess flour from the chicken strips and add to the skillet. (Season with additional salt and pepper, if desired.)
10. Fry 4 minutes on 1 side, then turn and fry 3 minutes on the other side, until golden and just cooked through. Remove to a plate and let rest while the zucchini cooks.
11. Add the zucchini rounds to the drippings in the skillet and sear, stirring frequently, until crisp-tender, 3-4 minutes.
12. To serve, cut the polenta into 4 large squares (or 6 slices and save 2 for leftovers) and divide among plates. Lay 2 chicken strips over each and divide the zucchini among them. Spoon the tomato sauce over the chicken and polenta and serve right away.
Credit: Foodista