Post a Free Blog

Submit A Press Release

At CWEB, we are always looking to expand our network of strategic investors and partners. If you're interested in exploring investment opportunities or discussing potential partnerships and serious inquiries. Contact: jacque@cweb.com

Generic selectors
Exact matches only
Search in title
Search in content
Post Type Selectors
Filter by Categories
Action
Animation
Anime
ATP Tour (ATP)
Auto Racing
Baseball
Basketball
Boxing
Breaking News
Business
Business
Business Newsletter
Call of Duty (CALLOFDUTY)
Canadian Football League (CFL)
Car
Celebrity
Champions Tour (CHAMP)
Comedy
CONCACAF
Counter Strike Global Offensive (CSGO)
Crime
Dark Comedy
Defense of the Ancients (DOTA)
Documentary and Foreign
Drama
eSports
European Tour (EPGA)
Fashion
FIFA
FIFA Women’s World Cup (WWC)
FIFA World Cup (FIFA)
Fighting
Football
Formula 1 (F1)
Fortnite
Golf
Health
Hockey
Horror
IndyCar Series (INDY)
International Friendly (FRIENDLY)
Kids & Family
League of Legends (LOL)
LPGA
Madden
Major League Baseball (MLB)
Mixed Martial Arts (MMA)
MLS
Movie and Music
Movie Trailers
Music
Mystery
NASCAR Cup Series (NAS)
National Basketball Association (NBA)
National Football League (NFL)
National Hockey League (NHL)
National Women's Soccer (NWSL)
NBA Development League (NBAGL)
NBA2K
NCAA Baseball (NCAABBL)
NCAA Basketball (NCAAB)
NCAA Football (NCAAF)
NCAA Hockey (NCAAH)
Olympic Mens (OLYHKYM)
Other
Other Sports
Overwatch
PGA
Politics
Premier League (PREM)
Romance
Sci-Fi
Science
Soccer
Sports
Sports
Technology
Tennis
Thriller
Truck Series (TRUCK)
True Crime
Ultimate Fighting Championship (UFC)
US
Valorant
Western
Women’s National Basketball Association (WNBA)
Women’s NCAA Basketball (WNCAAB)
World
World Cup Qualifier (WORLDCUP)
WTA Tour (WTA)
Xfinity (XFT)
XFL
0
Home Blog Page 24

Roasted Turkey with Lemon Parsley & Garlic | Gordon Ramsay recipe

0

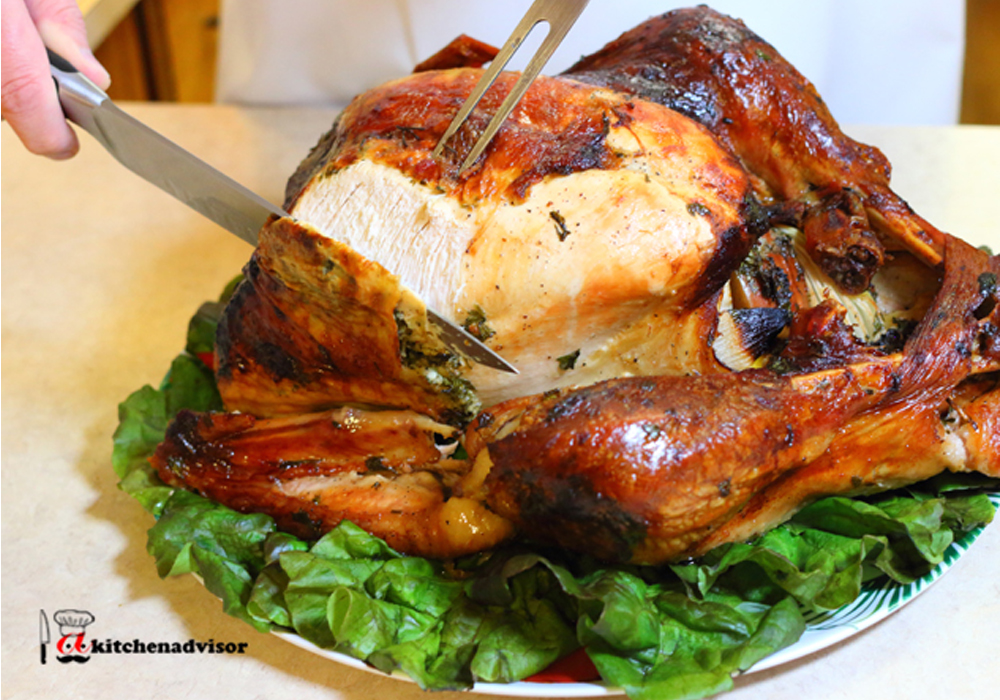
Most importantly, Thanksgiving and Christmas come shortly. Are you getting more and more disappointed with the dry bird year over year? Try Roasted Turkey With Lemon Parsley & Garlic recipe by Gordon Ramsay will help you enjoy your holiday time. To clarify, based on this easy roasted turkey recipe, the bird comes out crispy, moist and succulent. In addition, there are a few secrets how to make turkey moist. Above all, the main tips are: 1) after the first 10 minutes in the oven, take the turkey out and place the bacon on top of the breasts, so the fat will protect, and naturally grease the bird. For example, the bacon could be used in the gravy later on. 2) put the batter underneath the skin of the turkey. However, you have to loose the skin beforehand   3) keep pouring olive oil on top of the turkey as frequently as needed during the oven time.

Ingredients

15.5 lb turkey
8 oz bacon
Batter:
1 lb butter
zest and juice from 1 lemon
2 tbsp olive oil
bunch of parsley
4-5 cloves of garlic
salt & black pepper taste
Stuffing:
1 of each onion, apple, lemon

Preparation

1. Let’s make a flavored batter. Put a room temperature butter, season it with salt and ground black pepper, add zest and juice from 1 lemon. Add olive oil and mix it well, then add parsley and garlic and mix it thoroughly again. Form a few rolls and set them aside.
2. Now it’s bird’s turn. Gently loose the skin with your fingers, so the batter could be stuck underneath it. Be cautious, don’t completely break it. Season with salt and pepper. Massage well. Now start placing the batter under the skin and then just batter over the breasts, legs and wings.
3. Place turkey, breast side up, in roasting pan.
4. Stuff the turkey with onion, apple and lemon.
5. Cross the turkey legs and tie with skin or rope.
6. Use the last roll of batter to go over the breasts, legs and wings one more time. Generously paint with olive oil.
7. Here is a tip how to avoid burned wings. Either protect them with the foil or just hide them underneath the turkey by folding them.
8. Pre-heat the oven to 325F.   Roast turkey uncovered for time indicated in chart of the package or until juices run clear.
9. The turkey is a lean meat, so keep it moist by pouring juices over it.
10. When turkey is golden brown (it takes after approximately 40 minutes in the oven), take the bird out and place the bacon on the breasts to naturally grease the bird and prevent it from burning.
11. When turkey is done, remove from the oven. Cover it loosely with aluminum foil. Let stand 30 minutes before carving.
Credit: Foodista

Roasted Pork Tenderloin with Caramelized Apples, Pears and Onions

0

Living in Phoenix, we really do not have or feel the full-blown of the four seasons as the rest of the country does. Our Summers are quite hot, and our Winters are moderately cold but not too cold. Spring and Fall are so short that we can blink and miss them. I do miss the four seasons. As soon as the month of September is here, or the temperature hit the 85 degree mark, I consider we have reached Fall.

I do love fall. I love the crisp morning air and the cooler evenings. We are so fortunate to live in a place where we can have an evening backyard fire and yet, still wear a t-shirt and shorts.

I also do love fall cooking. The below dinner was made Thursday night. The mood was set on creating a sauce for this wonderful piece of pork tenderloin I had. A couple of days prior I was reading this wonderful recipe for caramelized onions. Easy to made and my taste buds started to work and I definitely wanted to try it. I also had some wonderful Fuji apples that I just purchased from www.boxedgreens.com, as well as some pears. The idea of playing with all three ingredients sounded fun. Adding a good amount of brown sugar to it, and do not get scared by the generous amount, trust me… The result was great if I may say so myself. Love it and I am looking forward to make again this week-end for my son Cub Scout den meeting potluck.

As a side dish, the staple roasted vegetables of zucchini and carrots, as well as a very quick version of potatoes gratin. A homemade Ghirardelli chocolate chip cookie just made it a perfect ending.

Bon Appetit!!!

TIP: Pay close attention to the onions mixture. As soon as it starts to turn a nice golden color, constantly stir or it will burn rapidly.

Roasted Pork Tenderloin with Caramelized Apples-Pears and Onion

Quick Potatoes Gratin

Ingredients

1 Pound pork tenderloin, all fat and skin removed
2 Fuji apples, peeled, cored, halved and sliced
1 pear, peeled, cored, halved and sliced
1 yellow onion, thinly sliced
2 tablespoon unsalted butter
1 cup brown sugar
Salt and pepper

Preparation

1. Divide the pork tenderloin in 4 equal parts and season with salt and pepper. Roast in a skillet with a shadow of olive oil until cooked all the way thru, turning it on all sided to give it a nice golden color.
2. Meanwhile caramelize the onion, pear and apples. Melt the butter in a sauté pan. Cook the onion, pears and apples on low heat until they are brown, stirring often and being careful not to burn them. Taste the onions and they should be slightly sweet. Add the sugar and stir until the sugar dissolves.
3. To serve, spoon the warm onion mixture over the pork.
Credit: Foodista

Roasted Pork Ribs

0

Don’t you have all the ingredients for the marinade in your kitchen already? Go mix them and let your ribs sit in it over night. Your house is going to smell like a heaven when you roast them the next day. Seriously, these are great for a family for two (like us), a family for four, or even for a crowd.

Ingredients

1 6-ounce can tomato paste
1/3 cup soy sauce
1/4 cup honey
1/2 teaspoon ground mustard
2 large cloves of garlic, minced or pressed
3 tablespoons olive oil
3 pounds pork back ribs, cut

Preparation

1. In a large container (big enough to hold all the ribs), mix tomato paste, soy sauce, honey, ground mustard, garlic, and olive oil. Stir until smooth and even to form a marinade.
2. Rinse ribs and pat the surface of the ribs dry with paper towels before marinating. Use tongs to roll one rib at a time in the marinade and continue with the rest of the ribs until each of them is well coated. Set the ribs in fridge to marinate over night.
3. When ready to cook, preheat oven to 350 °F. Take out the ribs from your fridge and let them sit in room temperature for 15 minutes. In the meanwhile, add 1/4 cup water in a large baking dish (use a roasting pan if you have one) and transfer the ribs over.
4. When oven is fully preheated, bake uncovered for 2 to 2.5 hours. (Depends on how strong your oven is).
5. Half way through roasting, flip the ribs by using tongs and add the other 1/4 cup water from each corner of your baking dish.
6. When done roasting, let the ribs rest for 10 minutes to allow the juices to redistribute throughout the meat.
7. Next step, grab one immediately and ENJOY!
Credit: Foodista

Roasted Garlic, Jalapeno and Tomato Salsa

0

One of the best and easiest ways to eat the salsa in on crusty bread with cheese. The fresh flavours of coriander and lime are instantly uplifting, and so is the kick of jalapeno and chilli. Having Mexican flavour to it means its delicious slathered on meats, seafood, corn on the cob, tacos, tortillas, beans, even as a side to salads.

Ingredients

2 whole bulbs of garlic
Olive oil
1 red onion
1 tin chopped tomatoes
1/4 cup water
1/2 cup pickled jalapeno
Handful coriander, including stems
1 tsp black treacle
1 fresh red chill
Juice of 1/2 lime
Salt and pepper
1 small onion
Salt and pepper

Preparation

 METHOD:-
1. Preheat oven to 200C – 400F — Gas Mark 6.
2. Remove any unnecessary flakey white skin from the garlic bulbs. There should be just a few clean layers remaining on the bulbs. With a sharp knife, gently cut the top off the head of garlic, exposing a little of each garlic clove. Using this method means once the garlic is soft and roasted perfectly you can just squeeze each clove easily out of its skin.
3. Rub bulbs in olive oil and wrap in foil or baking paper. Roast in the oven anywhere from 25 — 35 minutes depending on the size of the bulbs. (You can check during the cooking process — cloves should be soft and caramelised and have lost the pungent sharp garlic taste)
4. Remove leaves from coriander, chop and set aside. Chop the stems finely.
5. Fry chopped onion in a saucepan for 5 minutes. Add coriander stems and chilli, cook a further minute. Now add tomatoes and water, bring to the boil then simmer with a lid on for 10 minutes.
6. Remove garlic from oven and squeeze cloves out from the bulb. Rough chop the garlic along with the jalapeno.
7. Add chopped garlic, jalapeno, treacle, half the coriander leaves, lime juice, salt and pepper to the tomato sauce and cook on a low heat for a further 5 minutes.
8. Remove from heat and stir in the remaining coriander leaves, Set aside to cool and then refrigerate. Salsa is best eaten cold. Will keep in the fridge for up to a week.
Credit: Foodista

Roasted Game Hens with Lemon-and-Orange-Marmalade Sauce

0

Tender, juicy game hens make an inviting dish for your guests, and they’re ready in about an hour. The sweet and tangy sauce in this recipe is used for both rubbing the flesh of the hens and basting the skin during roasting.

Ingredients

1 tbsp unsalted butter
4 tbsp orange marmalade
1 tsp grated lemon peel
1 tsp fresh lemon juice
1 tbsp honey
2 tbsp olive oil
sea salt
freshly ground black pepper
2 game hens (giblets removed), rinsed and patted dry

Preparation

1. Preheat the oven to 400 degrees F.
2. In a small saucepan, melt the butter over low heat and stir in the marmalade. Continue to stir until the marmalade is partially melted, about 2 minutes.
3. Add the lemon peel, lemon juice, and honey and stir well to combine. Remove from the heat and whisk in the olive oil. Season with salt and pepper and set aside until cool enough to handle.
4. Using kitchen shears, remove any excess skin and the wing tips from the hens.
5. Lay the hens breast-side down on a work surface and cut along each side of the backbones to remove them. Cut through the center of the breastbones to divide each hen in half. Loosen the skin on all halves and place side by side in a large, shallow roasting pan lined with parchment paper (or nonstick foil).
6. Reserve half of the lemon-and-orange-marmalade sauce in a small bowl. Gently lift the skin from the hens and rub with the remaining sauce. Sprinkle the skin with salt and pepper and roast until juicy and just cooked through, 50-55 minutes.
7. About 5 minutes before the hens are finished, baste with the reserved sauce. Remove from the oven and let rest 5 minutes before serving.
Credit: Foodista

Roasted Chicken with Potatoes and Leeks

0

Sunday night has always been a family dinner night at our house. Yesterday was no different. Last night dish was a creation of mine. I just wanted to see how I can prepare the potatoes and chicken all in one dish and make it come out tasty and the chicken nice and juicy. We all love it and had very little left over.

A green salad was all it needed as a side dish. Fresh strawberries with sugar and a cookie for the sweet tooth in the family.

Ingredients

1 large roasting chicken
2 large russet potatoes, peeled and sliced 1/8 inch thick
1 medium leek, white-light green part only, cleaned and sliced very thin
1 small leek, white part only, cleaned and bottom core removed, left whole
3 sliced of thick bacon
2 small shallots, cleaned and thinly sliced
2 tablespoon minced parsley
Fresh thyme, chopped fine
2 garlic cloves, shell and end core removed
2 tablespoon of butter
Olive oil
Salt and pepper
1 cup of chicken stock

Preparation

1. Preheat oven at 375 â—¦.
2. In a large, oven ready, 12” frying pan sauté the leeks, 1 tablespoon parsley, bacon and shallots with 1 tablespoon butter and a small amount of olive oil. When the leeks are translucent, remove the pan from the heat and set the leek bacon mixture aside. Do not clean the frying pan.
3. Divide the sliced potatoes in 2 batches.
4. Arrange on the bottom of the frying pan one layer of the potatoes slices slightly overlapping them. Salt and pepper them. Spread evenly over the potatoes the leek-bacon mixture. Cover with the remaining potatoes.
5. Clean the chicken and salt, pepper the inside. In the chicken cavity place the garlic and the remaining leek, half of the remaining parsley and half of the thyme.
6. Truss the wings under the breast area, and tie the legs together.
7. Place the chicken on top of the potatoes layers. Spread the remaining butter over the breast skin and sprinkle the remaining parsley and thyme over it. Add the chicken stock over the potatoes.
8. Place the frying pan in the hot oven and cook for 1 to 1 hour and half. Turn and poke the breast, legs area a couple of times during the cooking to let all juices run out.
9. When done, remove from the oven and let stand for 5 minutes before carving.
Credit: Foodista

Roast leg of lamb with garlic and anchovies

0

An old fashioned roast leg of lamb — especially whole — is what you’re missing if your family isn’t too big. Half a leg will feed four. There are two of us. We don’t get to have it very often unless we have people round for dinner.
The roast lamb leg is gorgeous, you might want to ask your butcher to butterfly it and remove the bone (it might mean the same thing, I’m not that clued up on butchery lingo). But I like meat on the bone even if it makes carving a minor nightmare. Flavour improves and it makes it more difficult to overcook.
Let me just mention here a digital probe — it is so useful, going with the timing is reliable but if you just want to make sure it’s not completely raw inside (like, you’ve forgotten to take it out of the fridge and bring to room temperature, cardinal sin but it happens) sticking the probe in to see about 65C/149F will let you relax.

Ingredients

½ leg of lamb (serves 4) on the bone
salt and pepper
7-10 garlic cloves, depending on the size of the lamb leg, peeled and cut into slivers
4-5 anchovy fillets, drained, cut into 1cm pieces
a few sprigs of rosemary

Preparation

1. Score the lamb skin on the diagonal.
2. Make some incisions with a sharp knife on the corners of the scored squares and push in slivers of garlic, anchovy pieces and clumps of rosemary leaves, as much as you can.
3. Turn the joint over and make incisions on the other side, stuffing the garlic etc. into those as well.
4. Season all over with salt and pepper.
5. Preheat the oven to 240C/475F/gas 9.
6. Place the lamb leg, skin side up, on a roasting tray and roast for 10 minutes.
7. Turn the oven to 180C/350F/gas 4 and roast for further 25-30 minutes, again depending on the size of the leg. It needs 15 minutes per pound on top of the initial 10 minutes’ blast.
8. When ready (the internal temperature should read 65C/149F, if you have a digital probe), let it rest for at least 15 minutes before carving.
Credit: Foodista

Roast Chicken with Chardonnay Sauce, Trumpet Mushroom Duxelle and Fingerling Potatoes

0

In Chef Tim Ma’s interview for Adesina’s Kitchen, he talks about the importance of organization in the kitchen. As home cooks, although we don’t go all out with a true mise en place and prep kitchen work, there is something to be said for taking time to lay out all of your ingredients before you launch into the assembly of the dish. This recipe is a great example of this fact — chopping all of your ingredients first and setting up your kitchen before turning on the stove will allow you the luxury of breezing through this one. When you are all finished, you take a bite and marvel at the genius your tucking into without feeling as if you slaved at all.

Ingredients

2 trumpet mushrooms, cleaned and sliced
2 tablespoons of butter
1/2 of a lemon, juiced
1 shallot, minced
1 ounce of slab bacon or salt pork
1/4 cup of caramelized onions
2 chicken legs and thighs, deboned
2 tablespoons dry chardonnay
4 tablespoons vegetable or chicken stock
2 tablespoons butter
parsley, chopped
1 pound of fingerling potatoes
duck fat (or vegetable oil if you don’t have any)
salt and pepper

Preparation

1. Melt 2 tbs. of butter in a large pan over low heat.
2. Add bacon or salt pork and sweat for a few minutes without giving it color.
3. Add shallots and sweat without giving color for a few minutes.
4. Add mushrooms and continue to cook over low heat, adding a pinch of salt, pepper and the lemon juice. The mushrooms will begin to release water — once the water is completely absorbed, stop cooking.
5. Add caramelized onions and toss to heat. Set aside.
6. Preheat the oven to 400 °.
7. Heat a new pan that can go into the oven over high heat with a little blended oil.
8. Season chicken with salt and pepper.
9. Once pan is hot, add chicken legs skin side down and cook over high heat for a minute.
10. Place entire pan in oven and cook until chicken registers 165 °, about 10 minutes.
11. Take pan out, remove chicken, drain oil.
12. Deglaze pan with chardonnay, scraping up the brown bits. Reduce wine by half, add stock and reduce by half again.
13. Turn fire off, add 2 tbs. of butter and whisk until incorporated. Place mushroom mix in center of plate, top with chicken, add sauce around, garnish with parsley.
14. To cook the fingerlings, bring a large pot of water to a boil.
15. Add potatoes and blanch for 3-4 minutes. Drain and dry well.
16. Add about 2 inches of oil (or equivalent amount of duck fat) to a heavy bottomed sauce pan and heat until a piece of bread, when dropped into the oil, browns in 3 seconds.
17. Add the potatoes to the pan, being careful to stand back if the skins sputter a bit. Allow to cook for a minute, remove and drain on paper towels and salt and pepper immediately while still hot.
18. If you’d like to time this all so that the potatoes are finished at the same time as the chicken, cook the potatoes as soon as the chicken goes into the oven.
Credit: Foodista

Ricotta Meatballs

0

I love when first thing in the morning I open my computer, go the news and there sits a fantastic recipe. Read the title, admire and droll over the stunning picture. Get side tracked by something and promise myself to get back to the page as soon as I can. And, of course, you cannot find the recipe again because the page updated. Doing a search is near impossible at this point.   This is how this recipe came about. Reading the first two lines of it and then the abyss of the unknown..

Seeing that I am a bit familiar with meatballs, I had fun combining the first two ingredients that I read with my staple recipe.   However, instead of frying the meatballs on the stove, I decided to baked them. The result was fantastic, less greasy and lot faster. Worth mentioning: they did not fall apart in the oven.

We are hooked and decided to enjoy them over a bed of Mezzi Rigatoni pasta. We also had them warm up with a salad for lunch and they were delicious.

TIP: Be careful with the salt when you are seasoning. Not all Parmiggiano cheese is the same and you do not want to over salt your meat.

Ingredients

FOR THE TOMATO SAUCE:
2 tablespoons olive oil
2 garlic cloves, peeled and end removed
1 28-ounces San Marzano Tomatoes (crushed or pureed)
Salt
Pepper
FOR THE MEATBALLS
1 pound ground pork
3/4 cup whole milk ricotta
1/2 cup fine grated Parmiggiano Cheese
1/2 cup bread crumbs
1 large egg
2 heaping tablespoons finely chopped parsley
Dash of Worcestershire Sauce (optional)
Salt
1 teaspoon pepper

Preparation

1. PREPARING THE TOMATO SAUCE
2. In a saucepan over medium high heat, add the olive oil and the garlic. As soon as the garlic is golden, remove and discard.
3. Add the tomatoes, salt and pepper and cook over medium low heat for about 25-30 minutes.
4. PREPARING THE MEATBALLS
5. Preheat the oven at 375ï‚°
6. Mix all the ingredients by hand or in the KitchenAid mixer with the paddle. Roll out 12 meatballs.
7. Place them on greased baking sheet and bake for about 20 minutes or golden brown.
8. Can be served alongside any pasta of choice. Cook pasta according to manufacturer directions. Mix the meatballs with the tomato sauce and pasta. Serve hot with freshly grated Parmiggiano cheese over it.
Credit: Foodista

Rice with Fried Egg and Sausage

0

This simple, yet hearty, breakfast has evolved and changed with us over the years, but it has always been there in some form or another; a comfort breakfast for those mornings when you really need it. We began making this breakfast in the Japanese tradition taught to me by my parents, a raw egg cracked over freshly cooked rice and mixed with Japanese furikake seasoning. These days, we prefer a hybrid Japanese-Hawaiian version, using a fried egg instead of raw egg, adding meat, and keeping the ingredients separate until each bite. Using thick soy sauce drizzled on lightly allows the umami flavor to stand out as distinct from the creamy yolk and savory meat, and offers a light alternative to the Hawaiian gravy. Keeping ingredients separated in a more concentrated form in the bowl allows the flavors to really play off of one another in each bite.

Ingredients

½ cup Calrose rice
1 egg
¼ tablespoon butter
1 teaspoon thick soy sauce
splash of Sesame oil
sprinkle of Nori Goma Furikake
1 turkey breakfast sausage link

Preparation

1. Cook rice fully in rice cooker or pot according to package directions.
2. Cook turkey sausage according to package directions; we generally just use a skillet.
3. For the egg, melt butter in skillet on medium heat.
4. Crack egg into skillet and fry just until egg white is cooked, or sunny-side up, roughly 1 minute.
5. Using a spatula to lightly break up the egg white around the yolk as it cooks will help ensure a fully cooked white, while keeping the yolk runny.
6. Put rice in a bowl, and lightly drizzle on sesame oil, thick soy sauce, and furikake seasoning.
7. Place the fried egg on top of the rice. Chop up sausage and toss it in the bowl.
8. Just before eating, use a fork and knife to cut the egg up into small pieces and let the yolk run over the rice.
Credit: Foodista