Post a Free Blog

Submit A Press Release

At CWEB, we are always looking to expand our network of strategic investors and partners. If you're interested in exploring investment opportunities or discussing potential partnerships and serious inquiries. Contact: jacque@cweb.com

Generic selectors
Exact matches only
Search in title
Search in content
Post Type Selectors
Filter by Categories
Action
Animation
Anime
ATP Tour (ATP)
Auto Racing
Baseball
Basketball
Boxing
Breaking News
Business
Business
Business Newsletter
Call of Duty (CALLOFDUTY)
Canadian Football League (CFL)
Car
Celebrity
Champions Tour (CHAMP)
Comedy
CONCACAF
Counter Strike Global Offensive (CSGO)
Crime
Dark Comedy
Defense of the Ancients (DOTA)
Documentary and Foreign
Drama
eSports
European Tour (EPGA)
Fashion
FIFA
FIFA Women’s World Cup (WWC)
FIFA World Cup (FIFA)
Fighting
Football
Formula 1 (F1)
Fortnite
Golf
Health
Hockey
Horror
IndyCar Series (INDY)
International Friendly (FRIENDLY)
Kids & Family
League of Legends (LOL)
LPGA
Madden
Major League Baseball (MLB)
Mixed Martial Arts (MMA)
MLS
Movie and Music
Movie Trailers
Music
Mystery
NASCAR Cup Series (NAS)
National Basketball Association (NBA)
National Football League (NFL)
National Hockey League (NHL)
National Women's Soccer (NWSL)
NBA Development League (NBAGL)
NBA2K
NCAA Baseball (NCAABBL)
NCAA Basketball (NCAAB)
NCAA Football (NCAAF)
NCAA Hockey (NCAAH)
Olympic Mens (OLYHKYM)
Other
Other Sports
Overwatch
PGA
Politics
Premier League (PREM)
Romance
Sci-Fi
Science
Soccer
Sports
Sports
Technology
Tennis
Thriller
Truck Series (TRUCK)
True Crime
Ultimate Fighting Championship (UFC)
US
Valorant
Western
Women’s National Basketball Association (WNBA)
Women’s NCAA Basketball (WNCAAB)
World
World Cup Qualifier (WORLDCUP)
WTA Tour (WTA)
Xfinity (XFT)
XFL
0
Home Blog Page 21

Shrimps and Grits

0

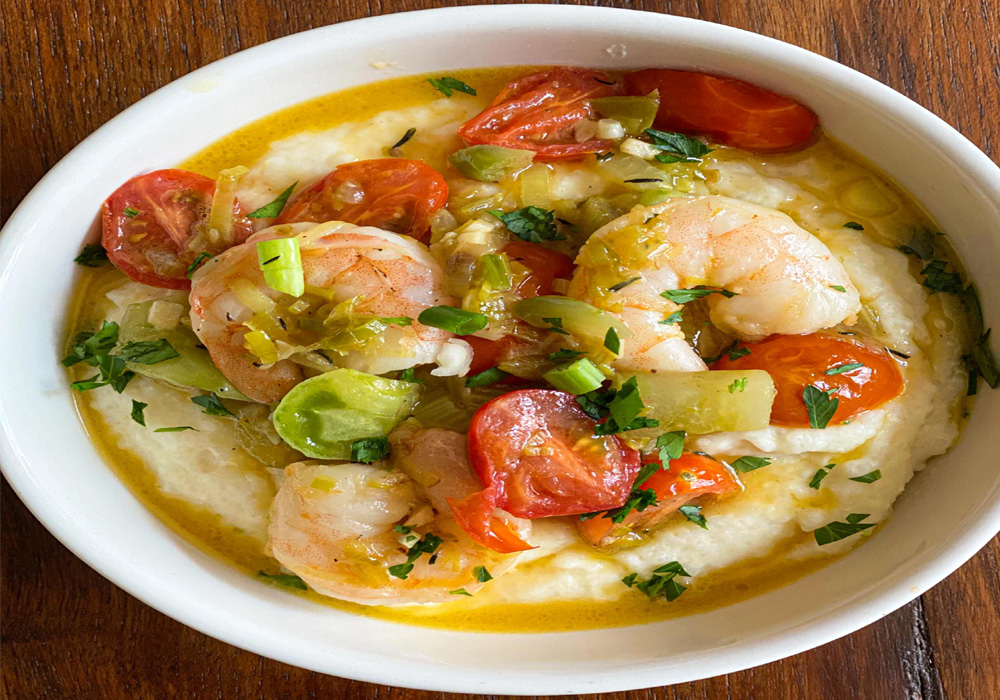
Comfort food is all I want lately. Shrimps and Grits  are just that for me. Creamy soft grits with a medley of soft vegetables over it.   Tender shrimps with a perfect sauce to go along.   Here is my creation.

I had some vegetables in my crisper, and I wanted to enjoy them before it would be too late.

A couple of personal notes about this recipe: I did not use salt with the grits because the Parmesan cheese is a bit salty in itself, and adding salt would make it too saltier.   Make sure you let the butter melt with the  grits  before adding the parmesan cheese. If the grits become too thick and lose the velvety, creamy feeling, add a bit of more milk.

Ingredients

FOR THE GRITS
1 cup water
1 cup whole milk
1/2 cup Albers quick grits
1/2 cup Parmesan cheese finely grated
2 tablespoons butter
FOR THE SHRIMPS
16 large shrimps
1 tablespoon olive oil
1/2 cup celery diced small
1 cup finely chopped leeks
1 tablespoon garlic clove, finely chopped
1 teaspoon fresh thyme
1 1/2 cup sodium-free chicken stock
1 cup green tomato, diced small
1/2 cup cherry tomatoes halved
1 tablespoon finely chopped green onion
3 tablespoons butter
1 tablespoon chopped parsley
Dash or tabasco
Worcestershire sauce

Preparation

1. Heat 1 tablespoons olive oil in a large skillet. Add the leeks, celery, and garlic over medium to low heat, cover and let them sweat until tender and translucent, about 10 minutes. Add the chicken stock and reduce to 1/3 or until the sauce is thick, about 8 to 10 minutes.
2. Meanwhile, start the grits by adding water and the milk in a saucepan. Bring to a boil and add the grits in a steady slow stream while whisking. Cover and lower the heat and cook for 5 minutes stirring occasionally to make sure no lumps are formed. Once the grits are done, they should be creamy and velvety add the butter and whisk until it is all melted. Add the parmesan cheese, whisk well. Cover and keep warm.
3. Add the shrimps, tomatoes -green and cherry, butter, a dash of tabasco and a dash to Worcestershire and half of the green onions to the skillet with the leeks and celery sauce. Gently mix until the shrimps turn pink and are done.
4. Divide the grits evenly among 4 bowls. Spoon over the vegetables first then the shrimps. Lastly, ladle the sauce around the shrimps over the grits. Garnish with scallions and parsley.
Credit: Foodista

Shrimp in Gravy with Homemade Shrimp Stock

0

Is going to the seafood restaurants for pleasing your taste buds becoming expensive and time consuming ?Here is an easy and tantalizing Shrimp in gravy recipe prepared with Homemade shrimp stock.

Ingredients

10 to 15 medium sized shrimp
2 cups of Homemade shrimp stock
1 cup chopped celery
1 cup chopped onion
1 cup chopped green pepper
1/4 tsp white pepper
3/4 tsp paprika
1/4 tsp thyme
Crumbled Bay leaf, 1
1/3 cup Browned flour
1/8 tsp Cayenne pepper
1 tsp minced garlic
1/4 tsp Black pepper
1 tbsp File powder
1/4 tsp Oregano
1 tsp Salt
1/4 cup butter

Preparation

1. Prepare a Shrimp stock with shrimp shells and heads::
2. Rinse the shrimp shells and heads properly and keep it in stockpot with 4 big cups of water , 1/2 cup of coarsely chopped celery and onion . Now, bring it to a boil on high heat. After sometime, reduce the heat, let simmer for 10 minutes. Again turn the heat to medium and let simmer for another 25 to 30 minutes. Allow to cool, and strain. The stock would reduce to approx 2 cups.
3. Prepare seasoning::
4. Mix 1/4 tsp White pepper, 3/4 tsp Paprika, 1/4 tsp Thyme, Crumbled Bay leaf 1, 1/8 tsp Cayenne pepper , 1/4 tsp Black pepper ,1 tbsp File powder, 1/4 tsp Oregano, 1tsp salt in a small bowl.
5. Prepare main dish::
6. In a preheated, cast iron skillet, add 1/4 cup of butter with the chopped onion, green pepper and celery, stir fry for a minute or so.Next add the seasoning and over medium heat stir it frequently. When it is cooked for 2 to 3 minutes, add the minced garlic, cook for another 2 to 3 minutes. When all the vegetables start forming a greasy crust , add the browned flour. Over medium heat cook it for a minute by continuous stirring. Now, add half of the stock , keep stirring, let all the flavors blend together. Next, add rest of the stock, and let simmer on low flame for 20 to 25 minutes or until you get a semi-gravy like consistency. Lastly, add the shrimps to the gravy, cook for another 5 minutes. Serve it hot over rice. This shrimp gravy will definitely add up new essence to your meal.
Credit: Foodista

Shrimp Étouffée :: Mardi Gras Eats

0

Shrimp Étouffée is a classic in creole and cajun cooking. It has such a wonderful aroma and a really great spicy kick to it! The sauce starts with making a roux {flour and butter} but the trick is allowing the butter to slowly brown to get that wonderful deep color. We’ve of course got the Holy Trinity {bell pepper, onion and celery} in there to start flavoring the sauce, then fresh garlic, thyme, tomato paste, worcestershire sauce and creole seasoning to kick things up!

This incredible sauce simmers away to allow all the flavors to meld, it allows the sauce to thicken up and then at the very last minute the shrimp go in and cooked until just curled up and cooked. The Shrimp Étouffée is served over rice and garnished with diced fresh tomato and sliced scallions. This one is classic NOLA!

Ingredients

5 Tbsp butter
5 Tbsp flour
2 green bell peppers, small dice
2 celery stalks, small dice
1 yellow onion, small dice
4 garlic cloves, minced
1 Tbsp dried thyme
2 heaping Tbsp tomato paste
1 1/2 Tbsp Worcestershire sauce
1 Tbsp creole seasoning
4 cups chicken broth
1 1/2 lbs peeled and deveined shrimp
1 Tbsp butter
scallions and diced fresh tomato for garnish

Preparation

1. Heat up a heavy pot over low heat. Add in the butter and cook for about 10-12 minutes until a light golden brown. Be sure to stir around a few times to prevent burning.
2. Whisk in the flour until smooth and cook again for about 8 minutes on low. It should look like a slightly loose peanut butter when its ready.
3. Add in the bell peppers, celery and onion. Stir and coat the veggies with the roux. Cook for another 10-15 minutes, until the veggies are softened.
4. Stir in the garlic and thyme and cook for a minute, until the garlic is fragrant.
5. Add in the tomato paste, Worcestershire sauce, creole seasoning and broth. Simmer on low for 30-40 minutes until slightly thickened. Stir occasionally.
6. Stir in the shrimp, shut the heat and put the lid on. Allow to cook for about 5-8 minutes or until cooked through. Stir in a Tbsp of butter right at the end.
7. Serve over rice and garnish with sliced scallion and fresh diced tomato.
Credit: Foodista

Shredded Ginger Chicken Curry

0

Shredded Ginger Chicken Curry is simple, healthy and super tasty. Make this the next time you crave a curry instead of reaching for the delivery menu, I promise you won’t be disappointed.

Ingredients

Large thumb of ginger, peeled and finely grated
2 Fat cloves of garlic, peeled and minced
1 tsp Chilli powder
1/4 tsp Cayenne pepper
2 tbsp Fresh coriander, finely chopped
1 tsp Ground coriander
Juice of one lime
1 tbsp Ground nut oil
Pinch of Salt and pepper
3 Chicken breasts, prepared as above
1 Large white onion, sliced finely
1 Yellow pepper, deseeded and roughly chopped into 1cm cubes
50g Sachet creamed coconut
300 ml Low sodium veg stock
1 tsp Turmeric
1tbsp Ground nut oil
1 tbsp Fresh coriander, roughly chopped
200g Brown rice
Salt and pepper to season

Preparation

1. Mix the ginger, garlic, chilli, cayenne, 2 tbsp fresh coriander, ground coriander, lime juice, 1 tbsp ground nut oil and season to create a paste.
2. Cut three deep slashes in each chicken breast and smother in the paste.
3. Set to one side and allow to marinade for 15 minutes.
4. Cook the rice as per instructions.
5. Heat the remaining oil in a large sauté pan. Add the onions and peppers to the pan and season. Sweat over a medium-low heat for 5 minutes until the onions are soft and translucent.
6. Turn up the heat, sprinkle in the Turmeric and toast for one minute. Add the chicken (including the paste) and fry each side for 1-2 minutes.
7. Pour in the stock and creamed coconut and bring to the boil. Lower the heat and simmer for 10 minutes.
8. Use two forks to shred the chicken into chunks and continue to simmer for a couple more minutes until the chicken is fully cooked.
9. Stir in the cooked, drained rice until fully combined with curry and is piping hot.
10. Serve with a scattering of fresh coriander.
Credit: Foodista

Shichimi Togarashi Grilled Pork Tenderloin

0

Seven spice powder, or what is commonly known as shichimi togarashi in Japan, pairs perfectly with grilled meats, noodles and soups. Freshly ground orange peel provides a citrusy aroma, while seaweed adds an oceanic flavor. Freshly ground ginger, black peppercorns, and toasted black & white sesame seeds add layers of flavor to make a complex marinade in this grilled pork tenderloin dish.

Pork is by far the most popular type of meat in Japan- consumed nearly as much as chicken and beef combined. But it wasn’t always this way. The ban on meat began in the mid sixteenth century and is thought to be due to the rise of Buddhism at the time. This ban lasted over 1,200 years and was lifted in the late 1800’s, with the rise of foreign trade among countries.

Ingredients

RawSpiceBar’s Shichimi Togarashi
2 whole pork tenderloins, 1 lb each
1/3 cup mirin
1/4 cup soy sauce
1/4 cup sesame oil
2 garlic cloves, crushed
1 lime, juiced
Salt to season

Preparation

1. Marinate:
2. Trim pork tenderloin of any excess skin and fat.
3. Combine shichimi togarashi spices, 2 tsp salt, sesame oil, garlic, soy sauce and mirin in a bowl. Pour 3/4 of the marinade in bowl with pork tenderloin and marinate for 6-12 hours, turning halfway through.
4. Place remaining marinade in a covered container and refrigerate until ready to use.
5. Grill:
6. Remove tenderloin from bag, let sit at room temperature. Turn grill over medium-high heat, brush with vegetable oil.
7. Add tenderloin to grill and place in center of grate. Discard bag with marinade. Cover and cook 12-15 minutes, turning every 1-2 minutes until tenderloin reaches an internal temperature of 140 F degrees.
8. Serve:
9. Remove tenderloin from grill and place on a large piece of heavy aluminum foil, folded at the edges. Pour on reserved marinade. Wrap tightly and let rest for 10 minutes. Move to a cutting board and slice.
10. Serve alongside spicy gomasio soba noodles and enjoy!
Credit: Foodista

Shark Ambotik/Authentic Goan spicy and sour seafood cuisine

0

“Ambot” meaning TANGY and “tik” meaning SPICY is a Popular Goan cuisine which goes extremely well with SHARK meat because of it’s strong flavor. There are a lot of variations to prepare a Ambotik curry with fish like Pomfret, Mackerel, Sardines , but I felt this version to be the best as the strong flavors of Shark meat compliments the tangy and spicy taste of the gravy. I have improvised the recipe adding a little sugar to enhance the flavors of the dish, also used kokum petals instead of tamarind.

Ingredients

a little more than a lb. of Shark meat, cut into 2″ cubes
7 to 8 shallots, chopped lengthwise
8 to 10 kokum petals
A handful of grated coconut and 1tsp of coriander seeds , dry roasted to a golden brown color and made into a fine paste.
Salt, to taste
Oil, as required
Ingredients for the masala:
1/2 of a medium sized onion, coarsely chopped
6 to 7 whole Kashmiri Red chilies or 1 and 1/2 tbsp of Kashmiri chili powder( increase or decrease the spice level according to your taste)
5 to 6 whole peppercorns
1 tsp cumin seeds
4 to 5 cloves of garlic
1, 1″ piece of ginger
1/2 tsp turmeric powder
1/2 tsp sugar
4 tbsp of vinegar

Preparation

1. Marinade the Shark meat with a pinch of salt, keep aside for 5 to 10 minutes.
2. In the mean time, make a paste of all the ingredients for the masala.
3. Heat a tbsp of oil in a wide bottomed skillet, add the shallots , fry till translucent, next add the ground masala along with the paste of roasted coconut and coriander seeds. Fry for 3 to 4 minutes on a medium heat by constant stirring or until the raw smell of the spices vanish.
4. Next, add 2 cups of water, salt and the kokum petals, cover and cook on medium heat until it comes to a boil.
5. Lastly add the shark meat, cover and cook for 8 to 10 minutes on medium low.
6. Serve hot with Rice.
Credit: Foodista

Shakshuka Recipe with Red Enchilada Sauce

0

Easy 7-ingredient shakshuka recipe simmered in a tangy, aromatic red chili sauce with rich notes of cocoa, smoked paprika, and ancho chili.

Ingredients

1 pound lean ground beef
1 cup onion, diced
1 green bell pepper, diced
1 pouch Simply Organic Red Enchilada Simmer Sauce
1 (14.5-oz) can fire roasted diced tomatoes
6 eggs
Fresh cilantro and avocado for serving

Preparation

1. Preheat oven to 350 °F.
2. Heat up a 9-inch cast iron skillet over medium-high heat. Add beef, onion, and bell peppers. Use a wooden spatula to quickly break the beef into small pieces. Stir and cook until the beef is no longer pink, about 5 minutes.
3. Pour Simply Organic Red Enchilada Simmer Sauce into the beef mixture, followed by diced tomatoes. Stir and mix well.
4. Make a “well” using your spatula, crack an egg into the “well.” Repeat this step with the rest of the eggs. Turn heat down to medium. Let it cook for about 2 minutes.
5. Transfer the shakshuka to oven and bake for 7 minutes, or until the egg white is set.
6. Garnish with fresh cilantro. Serve with avocados. Enjoy!
Credit: Foodista

Seared Wild Sea Scallops With Garbanzo Beans and Barley

0

This is one of those dishes that is outrageously easy to make – but is sure to please to the very last bite. Plus, it’s incredibly hearty but light enough to indulge in often. Just be sure to select the freshest scallops you can possibly get your hands on. The brightness of the lemon zest, white wine and fresh parsley adds a welcome flavor combination on a cold night.

Wine pairing suggestion: A nice, crisp white will work well here. Try a medium-bodied Sauvignon Blanc or Pinot Gris.

Ingredients

2 1/2 tablespoons olive oil
16 large wild sea scallops
3 1/2 cups garbanzo beans, rinsed
2 1/2 cups cooked barley
1 cup roughly chopped green beans
1 cup dry white wine
1 tablespoon organic unsalted butter
2 tablespoons chopped parsley, plus extra for garnish
1 tablespoon lemon zest, plus extra for garnish
sea salt and freshly cracked black pepper

Preparation

1. Cook barley, if you haven’t already done so. Pat scallops dry and season with sea salt and pepper. In a large, heavy, hot sauté pan add 1 tablespoon olive and add scallops in batches so they’re not crowded. Cook over medium-high heat for about 2 minutes per side, or until somewhat firm to the touch and well-caramelized on the outside. Remove from the pan and cover with foil. Repeat with remaining scallops. Set aside and keep warm.
2. To the pan, add 1 tablespoon olive oil, garbanzo beans, barley and greens beans and cook for 2-3 minutes. Add wine and scrape up any brown bits from the bottom and sides of the pan. Cook for 3-5 minutes. Turn off heat, add butter, parsley, lemon zest and salt and freshly cracked pepper, to taste. Stir to combine until butter is melted.
3. Serve scallops on top of beans and barley. Drizzle remaining 1/2 tablespoon olive oil over the top of the scallops and garnish with lemon zest and parsley.
Credit: Foodista

Seared Duck Breast

0

There is nothing that smells or tastes better than a simple duck breast. It may seem an intimidating dish to make, but it couldn’t be easier. Unlike chicken- duck should be served just a little pink.

Ingredients

For the Seasoning:
1/4 cup CHILI POWDER
1/2 teaspoon FENNEL POLLEN
1/2 teaspoon CINNAMON
1/2 teaspoon CORRIANDER
1/2 teaspoon GROUND BLACK PEPPER
1/2 teaspoon SALT
For the Duck:
4 DUCK BREASTS
SALT
PEPPER
1/2 cup APPLE JUICE

Preparation

1. MIX TOGETHER THE SEASONING -AND SET ASIDE. ANY EXTRA SEASONING CAN BE STORED IN AN AIRTIGHT CONTAINER.
2.TURN ON THE OVEN TO 400*
3. RINSE AND PAT DRY THE DUCK BREASTS.
4. TURN THEM FAT SIDE UP AND SCORE THE FAT, BOTH HORIZONTALLY AND VERTICALLY.
5. LIGHTLY SALT & PEPPER THE BREASTS AND RUB A PINCH OR TWO OF THE SEASONING INTO THE TOP-FAT SIDE AND THE BOTTOM FLESH SIDE .
6. PLACE THE DUCK BREASTS, FAT SIDE DOWN IN AN IRON SKILLET AND HEAT ON THE COOKTOP, OVER MEDIUM HEAT, FOR ABOUT 8 MINUTES UNTIL THE FAT IS CRISPY AND BROWN.
7. POUR OFF EXCESS FAT FROM THE PAN, TURN THE BREASTS OVER AND POUR IN 1/4 C OF THE APPLE JUICE.
8. PLACE THE PAN IN THE OVEN AND COOK FOR ABOUT 12 MINUTES. REMOVE THE PAN FROM THE OVEN AND ADD THE REMAINING 1/4 C OF APPLE JUICE.
9. REST THE DUCK FOR 5 MINUTES.
10. THINLY SLICE THE BREASTS AT AN ANGLE AND SPOON A LITTLE OF THE JUICE FROM THE PAN OVER THE DUCK.
11. PERFECT.
Credit: Foodista

Seafood Paella

0

Fresh seafood in a pan of paella rice, a traditional Spanish dish.

Ingredients

Heat 8 cups of fish stock with 1 tsp of saffron in a pot.
In a large paella pan or saucepan heat 1/2 cup of olive oil with 2 medium diced onions until translucent. Add 1 chopped bell pepper and cook for 3-4 minutes.
Add a 28 oz can of diced tomatoes and 6 cloves of diced garlic and simmer for another 5 minutes. Season with salt and pepper.
Pour in 4 cups of the rice and stir until it’s all been covered by the tomato mixture.
Slowly add the stock gently moving the pan so that the rice gets coated and sits in the stock. Once all of the stock has been put into the pan don’t stir after this point.
After about 10 minutes start to add the seafood starting with the larger pieces and just stuff them into the rice making sure they are mostly covered by the paella.
After about another 25-20 minutes all of the stock should be absorbed. Take the pan off the heat and cover with some foil for 7 minutes.
Serve with garlic bread and lemon wedges.

Preparation

1. Heat 8 cups of fish stock with 1 tsp of saffron in a pot.
2. In a large paella pan or saucepan heat 1/2 cup of olive oil with 2 medium diced onions until translucent. Add 1 chopped bell pepper and cook for 3-4 minutes.
3. Add a 28 oz can of diced tomatoes and 6 cloves of diced garlic and simmer for another 5 minutes. Season with salt and pepper.
4. Pour in 4 cups of the rice and stir until it’s all been covered by the tomato mixture.
5. Slowly add the stock gently moving the pan so that the rice gets coated and sits in the stock. Once all of the stock has been put into the pan don’t stir after this point.
6. After about 10 minutes start to add the seafood starting with the larger pieces and just stuff them into the rice making sure they are mostly covered by the paella.
7. After about another 25-20 minutes all of the stock should be absorbed. Take the pan off the heat and cover with some foil for 7 minutes.
8. Serve with garlic bread and lemon wedges.
Credit: Foodista