Post a Free Blog

Submit A Press Release

At CWEB, we are always looking to expand our network of strategic investors and partners. If you're interested in exploring investment opportunities or discussing potential partnerships and serious inquiries. Contact: jacque@cweb.com

Generic selectors
Exact matches only
Search in title
Search in content
Post Type Selectors
Filter by Categories
Action
Animation
Anime
ATP Tour (ATP)
Auto Racing
Baseball
Basketball
Boxing
Breaking News
Business
Business
Business Newsletter
Call of Duty (CALLOFDUTY)
Canadian Football League (CFL)
Car
Celebrity
Champions Tour (CHAMP)
Comedy
CONCACAF
Counter Strike Global Offensive (CSGO)
Crime
Dark Comedy
Defense of the Ancients (DOTA)
Documentary and Foreign
Drama
eSports
European Tour (EPGA)
Fashion
FIFA
FIFA Women’s World Cup (WWC)
FIFA World Cup (FIFA)
Fighting
Football
Formula 1 (F1)
Fortnite
Golf
Health
Hockey
Horror
IndyCar Series (INDY)
International Friendly (FRIENDLY)
Kids & Family
League of Legends (LOL)
LPGA
Madden
Major League Baseball (MLB)
Mixed Martial Arts (MMA)
MLS
Movie and Music
Movie Trailers
Music
Mystery
NASCAR Cup Series (NAS)
National Basketball Association (NBA)
National Football League (NFL)
National Hockey League (NHL)
National Women's Soccer (NWSL)
NBA Development League (NBAGL)
NBA2K
NCAA Baseball (NCAABBL)
NCAA Basketball (NCAAB)
NCAA Football (NCAAF)
NCAA Hockey (NCAAH)
Olympic Mens (OLYHKYM)
Other
Other Sports
Overwatch
PGA
Politics
Premier League (PREM)
Romance
Sci-Fi
Science
Soccer
Sports
Sports
Technology
Tennis
Thriller
Truck Series (TRUCK)
True Crime
Ultimate Fighting Championship (UFC)
US
Valorant
Western
Women’s National Basketball Association (WNBA)
Women’s NCAA Basketball (WNCAAB)
World
World Cup Qualifier (WORLDCUP)
WTA Tour (WTA)
Xfinity (XFT)
XFL
0
Home Blog Page 154

“Smoked Prime Rib” A Great Recipe For Stay at Home Comfort Food

0

Smoked Prime Rib

Ingredients

4 lb. boneless rib roast
2 tbsp kosher salt
1 tbsp paprika
1 tbsp garlic powder
1 tbsp Pilleteri’s Sweet Rub(or your favorite rub)
2 tsp black pepper
butter
minced garlic

Preparation

1 Preparing meat this size in a roast always needs to be prepped before so that flavors can penetrate the meat. I took the rib roast and coated with salt first. I then mixed the paprika, garlic powder, rub and black pepper and liberally coated the meat. I then placed back in fridge and let dry brine overnight. A dry brine is a process that allows all salt and spices penetrate the meat more than just on the surface. It is not a marinade which uses wet ingredients and is chalked full of sodium. The color of the meat the next day will even be different in a dry brine.
2 The next day I took the meat out of the fridge and let it rest on the counter for about 30 minutes. I then inserted the Meater meat probe and set it for 128 degrees doneness. This setting is rare/medium rare.
3 I placed the rib roast on a preheated 250 degree smoker(with hickory chips added) and cooked on the smoker for 2 hours and 20 minutes or until the internal temp reached about 118 degrees. I removed from the heat and placed it covered on the counter for about 25 minutes to get to target temp. Resting is a very important part of cooking; beef especially. A proper rest pulls the temp to the correct temp and also keeps the juices in the meat. If you had pulled the meat off at 128 degrees, it would rise another 10 degrees while resting and you would have an overcooked piece of meat. This is where I recommend a meat thermometer or the Meater probe for your roasts to get that proper time to remove your roast off the smoker or grill.
4 I fired up a charcoal grill to put a sear on the meat. I melted about 2 tablespoons of butter, added minced garlic and 2 tsp of sugar. I coated the roast with the butter mixture and added to hot coals. I turned about every minute or so, adding more butter mixture until I got the color I wanted.
5 In all, the cooking time for a 4 pound roast was 2 hours and 38 minutes, including resting time.
6 The verdict: It was a tender, juicy cut of meat with a nice smokey crust on the outside. It was amazing! If you have a special event or celebration, try this sometime!
Source:Foodista

Fast and Delicious Vegan Chai Tea Lattes

0

Vegan Chai Tea Lattes, ready in under 15 minutes!

Ingredients

Chai Spice Mix
1 tbsp Ground Cinnamon
2 tsp Ground Cardomom
1.5 tsp Ground Ginger
1 tsp All Spice
pinch of Nutmeg
Chai Lattes
1-2 tbsp Chai Spice Mix
2 Black Tea Bags
2 cups Water
1 cup Oat Milk can be replaced with any plant milk of your choice
2 tbsp Maple Syrup or other natural sweetener
Coconut Whip Cream optional

Preparation

1 Heat the water in a medium sized saucepan with 1-2 tablespoons of the chai spice mix*. Bring to a boil. once boiling, turn off the heat and let the mixture steep for 5 minutes. Add the teabags and maple syrup and return the mixture to a boil. Once boiling, again turn off the heat and allow to steep for a further 5 minutes.
2 Remove the teabags and pour the mixture evenly into two cups through a seive to remove any excess spices.
3 Heat up your oat milk and pour into the mugs to mix with the tea. Add some coconut whip on top with an extra sprinkle of cinnamon if desired.
Source Foodista:    

Delicious Quick Breakfast Quesadilla in a Waffle Maker

0

A breakfast treat with eggs and bacon, prepared in a waffle maker.


A quesadilla is a Mexican dish and type of taco, consisting of a tortilla that is filled primarily with cheese, and sometimes meats, beans, and spices, and then cooked on a griddle. Traditionally, a corn tortilla is used, but it can also be made with a flour tortilla, particularly in northern Mexico and the United

Ingredients

2 small flour tortillas2 eggs1/4 cup of onion1/3 cup of sharp cheddar cheese2 strips of bacon, cooked crispyCilantro, for garnish

Preparation

  1. Saute your onions until they begin to caramelize. Remove from heat and set aside.

2. Whisk your eggs and fry them in a pan like an omelet. Keep it flat like a pancake. It will fit well in your tortillas.

3. Place one tortilla on a Belgium round waffle maker and place fried eggs, onions, cheese, and bacon. Place other tortilla on top. Close your waffle maker and cook until cheese is thoroughly melted, which is about 5 to 7 minutes.

4. Remove and cut in quarters. Garnish with cilantro and serve with salsa and plain Greek yogurt ( or sour cream) and enjoy!

Credit Foodista Chris Hunnicutt

Super Delicious Fancy Chantilly Mascarpone

0

Combined here are my two favorite ingredients, mascarpone, and chantilly giving us a super easy, 5 minutes only, utterly delicious Chantilly Mascarpone that you can add any fruit to dessert.   A dessert for all the occasions and time of day. Perfect afternoon snack for you and the little one as it has no sugar. Or evening dessert for that special someone at the end of a very romantic dinner served with a glass of champagne.


Ingredients

1 1/4 cups heavy whipping cream, nicely chilled
1 cup mascarpone
1 1/2 tablespoons powder sugar
fresh fruits

Preparation

1 Combine heavy whipping cream and mascarpone in the bowl of a mixer and mix at slow speed for 2 minutes.
2 Increase the speed to medium for another 2 minutes while adding the powder sugar.
3 Continue on high speed until peaks formed and well blended.
4 Serve immediately with fresh fruits.

Double Strawberry Open Faced Pie Recipe

0

Adapted from  The Pie and Pastry Bible  by Rose Levy Beranbaum.

Ingredients

The Crust


    • 200g Cold unsalted Butter, cut into 1/4″ cubes


    • 320g All-Purpose Flour


    • 3/4 tsp Salt


    • 126g Heavy Cream


    • 1 Egg White, lightly beaten


The Base Layer


    • 85g Lindt White Chocolate (all but one column of a 3.5oz bar)


    • 4oz Cream Cheese


    • 2 Tbl sour cream


The Cooked Layer


    • 1 cup fresh strawberries (after rinsing, drying, hulling, and halving)


    • 2 Tbl Cornstarch


    • 118g Water


    • 67g Sugar


    • 1 Tsp Fresh Lemon Juice


    • 1 pinch Salt


The Fresh Layer


    • Enough whole strawberries, to cover a 9″ circle when stood point up, hulled, dried, and rinsed.


    • 72g Currant Jelly (1/4 cup)


    • 1 Tbl St. Germain Elderflower Liqueur


Directions

The Crust

Put 1/3 of the butter into the freezer in a medium-sized mixing bowl.

Whisk the flour and salt together. Mix in 2/3 of the butter with a pastry cutter until it looks like course meal. Once the butter is mixed with the flour, minimize exposure of the dough to your warm, warm hands, or you will melt the butter.

Place the butter/salt/flour mixture into a gallon-sized zip-top bag. Add in the last 1/3 of the butter and put the bowl back into the freezer. Get rid of all the air you can and seal the bag. Take your trustiest rolling pin and roll the contents of the bag until the butter turns into flatten flakes. Place the bag into the freezer for 10 minutes or thereabouts. The goal is to reverse any melting from the butter and make it reasonably solid again.

Take out the bag and the bowl, and transfer all of the dough to the bowl. You will need to scrape the sides of the bag, as the butter will have stuck to it during the rolling. Sprinkle the heavy cream into the mixture and mix. I use a silicone spatula to mix, as it won’t melt the butter and it’ll resist some of the sticking.

Put the mixture back into the bag and seal, removing most of the air as before. Knead the dough inside the bag with your fingertips until it sticks together. When you pull it, it should stretch a bit.

Divide the dough into two 6″ discs and refrigerate for anywhere from 1 to 24 hours. 8 hours is ideal. Although you’ll only need one of these discs for this pie, as it was a competition, I baked two in case something went horribly, horribly wrong.

Preheat the oven to 450 ° and let sit at that temperature for another 20-30 minutes.

Roll out the pie dough into a 13″ circle and place into the pie pan. Shape the top as you like. Freeze for at least 20 minutes.

Dock the sides and bottom of the dough. Crumple a piece of parchment paper, unroll it, and place over the pie, fitting it down close to the dough. Put in your dried beans, rice, or pie weights. Bake for 20 minutes. Carefully remove the weighted parchment paper, cover the top edge of the crust with aluminum foil, and bake for another 5-10 minutes, until the inside of the crust has a light golden tinge and feels more like crust than dough. Let cool for 3 minutes, then brush on the egg white to the sides and bottom. Let cool completely.

The Bottom Layer

Put the white chocolate into a microwave safe dish and microwave on high for 20 seconds at a time. At the end of each, stir. Repeat until there’s more melted bits than solid bits, then keep stirring until all of the solid bits turn into melted bits. Let cool to room temperature.

In a small mixing bowl, mix the cream cheese with an electric mixer until it’s somewhat fluffy and whipped. Add in the cooled white chocolate and mix. Add in the sour cream and mix until combined. Cover the bottom of the pie with this mixture.

The Cooked Layer

Lightly crush the strawberries with a fork in a small saucepan. Add the sugar, water, salt, lemon juice, and cornstarch. Bring to a boil. Simmer for 1 minute. Pour into a bowl and let cool to room temperature. Stir occasionally during the cooling process. Once cooled, pour over the bottom later of the pie.

The Fresh Layer

Your strawberries should have the tops cut off so that they could stand up on the a flat surface. Place these point side up on top of the pie.

In the small saucepan which has been washed and dried, melt the currant jelly until it is melted. It will bubble. Strain into a glass, which will involve a lot of pressing with a spatula. Stir in the St. Germain. Brush this mixture onto the fresh strawberries.

The Pie

Cool in a refrigerator for an hour or two or overnight. Slice and eat, or slice and serve to judges. If the latter, try to save yourself a slice.

Fast and Easy Delicious Chorizo Breakfast Burrito

0

Chorizo, egg, potato and avocado breakfast burritos with ranchero cheese and salsa verde.
Low-fat versions of the breakfast burrito often contain scrambled egg whites rather than whole eggs. Lower-fat cheeses as well as a variety of vegetables can further reduce fat and calories in the burritos. Sour cream or low-fat yogurt is often served with all types of burritos.

Ingredients
6 large eggs
10 ozs. Mexican chorizo spicy pork sausage
1 large white potato
1 medium white onion
1 small bunch spring onions
6 ounces ranchero cheese queso ranchero
2 medium avocados
4 large or 6 medium flour tortillas
Preparation
1 Prep the Chorizo
2 Cut the chorizo in half.
3 Remove the casing with your fingers and discard.
4 Break the chorizo into chunks and set aside.
5 Cooking the Burrito Filling
6 Chop the onions and potatoes into 1/4″ pieces. Over medium heat, cook the onions in 1 tsp. oil for 1 minute.
7 Add the potatoes and cook for 10 to 12 minutes until the potatoes start to brown.
8 Add the chorizo and cook for 12 minutes until the chorizo has given up most of it fat.
9 Beat the eggs with 1/2 tsp.. salt and pour them into the pan with the chorizo, potato and onion.
10 Let the eggs set for one minute. Then turn. Cook until the eggs have just set and break up the eggs with your spatula. Cook for couple more minutes until all of the egg has cooked through.
11 Rolling the Burrito
12 Cut the avocado into 1/4” pieces. Slice the spring onion into very thin rings including the 2” of the green stem.
13 Heat the tortillas in a dry pan until they start to puff up and become pliable. Heat them for about 30 seconds per side. Don’t let the tortilla become crispy which makes it difficult to roll.
14 On the warm tortillas, place the chorizo and eggs, then add about 1 oz. of crumbled cheese, a couple of tbsps. of diced avocado and 2 tbsps. of salsa.
15 Fold the bottom of the tortilla up about 1″ then fold the sides of the tortilla in about 1”.
16 Roll the burrito tightly tucking the sides of the tortilla in as you go. It should form a tight cylinder with even ends.

Source Foodista  

Grilled Tequila Shrimps with Prosciutto and Basil

0


They taste as delicious as they look. Jumbo shrimps, or prawns if you wish, marinated with tequila, olive oil, and basil. Then wrapped in a basil leave and thinly sliced prosciutto di Parma. Grilled to perfection in a few minutes.

Very easy recipe to prepare. It can be enjoyed as a single appetizer or a main course with salad.

Ingredients

1 cup tequila
1 cup olive oil
½ cup freshly squeezed lemon juice
2 tablespoons Dijon mustard
½ cup freshly chopped basil
a few rounds. of fresh cracked pepper
24 large shrimps, peeled, deveined and tails off
24 whole large basil leaves
24 thinly sliced prosciutto

Preparation

1 Combine tequila, olive oil, lemon juice, mustard, chopped basil, and pepper and pour over the shrimps in a shallow bowl to cover them. Marinade in the refrigerator for a couple of hours. If the marinated does not cover them fully, turn the shrimps once
2 On the stove heat up a grilling plate over high heat.
3 Remove the shrimps from the marinade and reserve the marinade. Wrap the middle of each shrimp first with a leave of basil and then with the prosciutto. Thread 4 shrimps lengthwise on each of 6 metal skewers. (if no metal is on hand, use bamboo skewers that you will have submerged in water for a couple of hours so they will not burn when grilling).
4 Grill the shrimps basting with the marinade for several minutes on each side. Serve immediately.

Delicious Chickpeas, Cauliflower, Curry Vinaigrette, and Spiced Yogurt

0

Reading the recipes it may feel as they are so many steps. Do not get concerned about all of them, they are quite simple to follow and easy to prepare. More for your convenience.

I used canned chickpeas however, you can use dried and soak them for   6 hours or overnight in the refrigerator. Uncovered bring to a boil over medium-high heat, reduce the heat and simmer, stirring occasionally until the beans are tender, around 2 hours. Proceed with the recipe for all the other steps.

A rich, healthy, and delicious dish that will work well by itself, or alongside fish, chicken, or lamb. The yogurt binds every flavor as well as enhances them giving the vegetables a great flavor.

Ingredients

FOR THE BEANS
1 8-ounces can chickpeas
1 ½ teaspoon sea salt
FOR THE SPICED YOGURT
1 cup nonfat Greek yogurt
½ cup sour cream
1 teaspoon ground coriander
½ teaspoon ground cumin
salt and pepper
FOR THE DRESSING
2 tablespoons lemon juice
1 ½ tablespoon honey
â…“ cup golden raisin
1 teaspoon curry powder
salt
¼ cup olive oil
FOR THE SALAD
1 small head of cauliflower trimmed and cut into bite-size pieces
2 tablespoons olive oil
¼ cup chopped almonds
½ cup fresh mint leaves
salt and pepper to taste

Preparation

1 MAKE THE BEANS
2 Rinse a can of chickpeas and place it in a small saucepan. Add water to cover and add the salt. Cook over medium-low heat for 10 to 15 minutes or until the chickpeas are tender and still retain their shape. Let them cool off to room temperature in their liquid.
3 MAKE THE SPICED YOGURT
4 In a medium bowl combine the yogurt, sour cream, coriander, cumin, ½ teaspoon salt and ¼ teaspoon pepper. Cover and refrigerate until ready to use.
5 MAKE THE DRESSING
6 In a small bowl, whisk the lemon juice and the honey. Add the raisins and let them soak for 15 minutes. Remove the raisins with a slotted spoon and reserve. To the remaining liquid, add the curry powder and ½ teaspoon salt. Whisking constantly, add the olive oil in a small steady stream.
7 MAKE THE SALAD
8 Position a rack in the center of the oven, and heat the oven to 425ï‚°F. On a large rimmed baking sheet, toss the cauliflower florets with the olive oil, ½ teaspoon salt and ½ teaspoon pepper. Roast stirring once, until golden-brown and tender, 15 to 20 minutes.
9 Transfer the cauliflower and any browned bits on the pan to a large bowl. Drain the chickpeas, then transfer to the bowl with the cauliflower. Add the dressing and toss to combine.
10 Spread the yogurt evenly on the bottom of a large serving platter. Spoon the cauliflower mixture on top of the yogurt, and top with the raisins, almonds, and mint leaves.
Source Foodista :

The Mysteries Of The GRILL 4th of July BBQ How To Make The Best Steaks, Hamburgers, Pork Chops and Roast

0

There are challenges with any style of cooking. The challenges of regular cooking, the pots-and-pans, pour-and-stir style of cooking, is mostly one of “volume of material.” There are so many methods, so many different ingredients, and such obscure terminology, that it’s difficult to get going. Trickier is leaning how to combine ingredients in a way that tastes good, and getting interesting combinations of textures and flavors, that it’s just a matter of getting through the material and remembering it, at least to reach a certain level.

Baking is a bit different. Baking has a lot more required knowledge of chemistry and biology in order to get things working at all. There are magical proportions of ingredients, certain order of adding things. If that were all, it wouldn’t be so bad, but because there are so many factors that have to be just right in order to work, and there’s enough variation in materials available to the home cook, that you can’t usually rely just upon the numbers; instead, you have to get a feel for when things are working and when they aren’t, so you can make adjustments to a recipe if, for example, your flour doesn’t have as high a protein-content as it did the last time you bought it.

And then there’s grilling. Grilling is, in many ways, the simplest of the three styles of cooking. It’s basically a single style of heat application, or maybe two styles, depending on how fancy you’re getting. However, as with anything simple, this means that there are fewer steps to get wrong, so if you do mess something up, it’ll be more noticeable. Add to that what would appear to be an impenetrable black box of whatever it is that you’re cooking, and you have what seems like some sort of voodoo.

It doesn’t help that much of the grilling knowledge is passed down, father-to-son, in family bonding rituals. The side effect of this is that, if there were something that the dad didn’t know, it’s likely that he wouldn’t ask anyone else, or look it up, he’d just make something up that sounded good and pass that information along to the next generation. Not a good scenario.

Fortunately, I’m here to help, with what will hopefully be simple and useful tips on grilling techniques. First, consider that the primary method of grilling involves high amounts of radiant heat hitting the item being grilled. Your hamburgers, your steaks, your rotisserie chickens, these are all applications involving that radiant heat. The secondary method is a lower energy heat, some radiant, some convection. If you close the lid, the air inside will get very hot, though not as hot as whatever is right over the coals. The tertiary method of cooking is conduction. While the conduction cooks very little of the food percentage-wise, it’s responsible for the ever-important grill marks, which are almost as vital to grilling as a pair of tongs, both in flavor and presentation.

The second thing to consider is how big the critter you’re grilling is. Oh, sure, you could be grilling vegetables or making some sort of crazy coal-fired bread oven, but the trick to grilling is learning to cook meat so that it’s flavorful and juicy. The other applications are interesting, but not the main focus; the meat, if you will. You won’t? Okay, fine: the main focus.

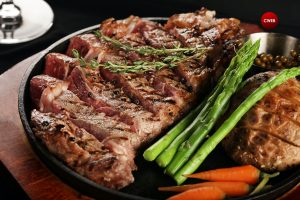
For our grilling purposes, there are two types of meats: thick and thin. Thin meats are your steaks, your hamburgers, your pork chops, and so on. The thick meats are your chuck roasts, your legs of lamb, and the like. The thick meats, in many ways, are relatively simple to cook and know when they’re ready. Generally you’ll cook over indirect heat, with a searing at the beginning or the end, and you’ll use a probe thermometer or an instant-read thermometer to determine their doneness. There are plenty of sources on the internet for the temperature at which any given meat is both safe to eat and tasty, so use those as necessary. Bear in mind that you’ll want to cook it under temperature by 5-10 degrees, then let the meat rest for 10 minutes covered in foil to let the residual heat finish cooking the rest of the way. This gives the meat a chance to reabsorb some of its juices, for a tastier meal.

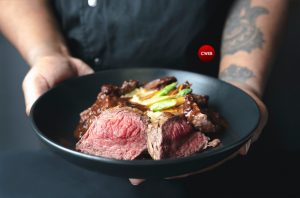
For the thinner meats, this is where the voodoo comes in. To be sure, you can still use a thermometer, but it’s a little trickier to hit the center of a thinner piece of meat, and besides, it’s far less satisfying. No, when grilling properly, you want to learn how to feel when the meat is cooked. At the early stages of your grilling career, that means literally feeling the meat, not making an emotional connection with it. As you increase your skills, well, the sky’s the limit.

Hold out your right hand, as if telling oncoming traffic to stop: fingers splayed in a relaxed manner, palm out. Using your thumb and forefinger of your left hand, feel on either side (front/palm) of your right hand until you locate where the bones meet for the thumb and index finger. The muscle that comes out from that part of your hand inside the angle formed by those two bones, that’s what we’ll call your Steak Zone. I know, it’s very appetizing, but stay with me.

Do you feel how tight the muscle is just away from the bones? That’s a well-done steak, or as steak lovers call it, an over-cooked steak. Don’t let your steak get this firm, for that means failure. Yes, I know, that’s harsh, but there are realities to grilling steaks, and one of those realities is that a well-done steak is not good to eat. Another reality is that steak sauce is not good to eat on a properly done steak either, but we’ll get to that later.

Back to the Steak Zone. Continue out from the over-cooked/well-done section towards the open air. Stop when you’ve reached the part that feels more or less like raw steak, but not as cold or wet (hopefully). That’s your range of feeling. Divide that into 4-6 distinct areas, and you have all you need to know to get started on your path to zen grilling. The closer it feels to the inside muscle, the more done it is. The closer it feels to the outside, the more rare it is. Combine that with lots and lots of practice, and you’ll be a grill master in no time. I know, it hurts, having to cook and eat a series of steaks just to increase your skills, but sacrifices must be made.

So, back to the steak sauce. A proper cut of meat, properly cooked, needs but salt, pepper, and, if you’re exceptionally decadent, a smidge of butter to reach perfection. If you feel the need to break out the steak sauce, chances are that you’ve just skimped on the salt, because steak sauce is generally pretty heavy with salt. Add some on, and you should be good. Try it out; if it doesn’t work for you, then enjoy your steak sauce, but I think you’ll be surprised by the difference.

Above is about 75% of what you need to know to successfully grill meats of various descriptions. Oh, sure, details will vary, recipes and spices will be thrown in, and we’ve completely avoided talk of what kind of grill to use, but the important thing is that you don’t have to be born to grilling; it can be learned, and you can do it.

Created by The Food Geek   Blog

Tasty Lentils, Black Beans, Goat Cheese & Baby Green Salad

0

Light, healthy and so easy to prepare. I used crimson lentils because I had them on hand, but black or green de Puy will be fine as well. No salt is used, by choice.

The recipe below is for 2. You can serve it in individual plates or on a large one. Or, of course augment the portions via the serving size   tab on the page

A playfulness between light sweet and pungent and brought together by a dash of olive oil.

Ingredients

1 cup crimson lentils
1/2 cup pinto black beans
4 ounces goat cheese
arugula and baby green mix salad
1 ounce purple radish sprouts
olive oil
red wine vinegar

Preparation

1 Rinse the lentils and soak them in water for 10 minutes. Rinse and place the lentils in a small pan. Add water, salt and bring to a boil. Boil for 3-5 minutes. Remove from heat and let them rest in the cooking water for 5 minutes. Drain and rinse with cold water to stop the cooking.
2 Rinse and pat dry the baby green salad and the purple radish sprouts.
3 On a large plate arrange the salad in the middle, add the lentils and black beans. Arrange the goat cheese and top with purple radish sprouts.
4 Drizzle some vinegar and olive oil.