Post a Free Blog

Submit A Press Release

At CWEB, we are always looking to expand our network of strategic investors and partners. If you're interested in exploring investment opportunities or discussing potential partnerships and serious inquiries. Contact: jacque@cweb.com

Generic selectors
Exact matches only
Search in title
Search in content
Post Type Selectors
Filter by Categories
Action
Animation
Anime
ATP Tour (ATP)
Auto Racing
Baseball
Basketball
Boxing
Breaking News
Business
Business
Business Newsletter
Call of Duty (CALLOFDUTY)
Canadian Football League (CFL)
Car
Celebrity
Champions Tour (CHAMP)
Comedy
CONCACAF
Counter Strike Global Offensive (CSGO)
Crime
Dark Comedy
Defense of the Ancients (DOTA)
Documentary and Foreign
Drama
eSports
European Tour (EPGA)
Fashion
FIFA
FIFA Women’s World Cup (WWC)
FIFA World Cup (FIFA)
Fighting
Football
Formula 1 (F1)
Fortnite
Golf
Health
Hockey
Horror
IndyCar Series (INDY)
International Friendly (FRIENDLY)
Kids & Family
League of Legends (LOL)
LPGA
Madden
Major League Baseball (MLB)
Mixed Martial Arts (MMA)
MLS
Movie and Music
Movie Trailers
Music
Mystery
NASCAR Cup Series (NAS)
National Basketball Association (NBA)
National Football League (NFL)
National Hockey League (NHL)
National Women's Soccer (NWSL)
NBA Development League (NBAGL)
NBA2K
NCAA Baseball (NCAABBL)
NCAA Basketball (NCAAB)
NCAA Football (NCAAF)
NCAA Hockey (NCAAH)
Olympic Mens (OLYHKYM)
Other
Other Sports
Overwatch
PGA
Politics
Premier League (PREM)
Romance
Sci-Fi
Science
Soccer
Sports
Sports
Technology
Tennis
Thriller
Truck Series (TRUCK)
True Crime
Ultimate Fighting Championship (UFC)
US
Valorant
Western
Women’s National Basketball Association (WNBA)
Women’s NCAA Basketball (WNCAAB)
World
World Cup Qualifier (WORLDCUP)
WTA Tour (WTA)
Xfinity (XFT)
XFL
0
Home Blog Page 108

Cheddar Polenta with Sun-dried Tomatoes & Shrimp

0

A gourmet meal on a weeknight with shrimp & sun-dried tomatoes on a bed of cheesy cheddar polenta.

Ingredients

about 1/3 – 18 oz precooked polenta tube
1/2 cup cheddar cheese
1/4 cup red onions, finely chopped
12-14 large shrimp, shelled
8 sun-dried tomatoes, roughly chopped
1 tablespoon olive oil
2 teaspoon garlic powder
chives, finely chopped (for garnish)
1 lemon juice, freshly squeezed
salt and pepper, to taste

Preparation

1.  Cook polenta according to the package directions and towards the end add cheddar cheese. Reduce heat and allow cheese to melt slowly then combine them together.
2.  In a skillet heat oil over medium heat, sautee onion until translucent then add sun-dried tomatoes allowing it to soften for 2-3 minutes.
3.  Add shrimps to the skillet, cook until it is no longer pink.
4.  Season it generously with salt, pepper, garlic powder and stir everything together.
5. Remove from heat.
6. In a plate, put polenta then top it with sun-dried tomatoes & shrimp. Drizzle lemon juice.
7.  Garnish with chives and serve it warm.
Credit: Foodista

Quintessential Quinoa

0

You’re about to meet one of your favorite new dishes. Light, fluffy, and springy, quinoa is one of the healthiest seeds (that’s often mistaken for a grain) you can eat. And when paired with Tex-Mex flavors, it’ll make you want to dance. If you like, you can serve it topped with a dash of hot sauce or a small sprinkle of crumbled cotija or shredded low-fat cheese.

INGREDIENTS

  • 3  tbsp  extra-virgin olive oil
  • 1  small red onion  diced
  • 1  red bell pepper  seeded and finely diced
  • 1  Jalapeno pepper  seeded and finely diced (optional)
  • 3  garlic cloves  minced or pressed
  • 2  cups  quinoa
  • 1 1/2  cups  low sodium vegetable broth  or Garlic Broth (page 44 of the cookbook)
  • Juice of 1 lime
  • 1  can low-sodium black beans  with their juices, 15.5-ounce
  • 1  can no-salt-added diced tomatoes  with their juices, 14.5-ounce
  • 1/2  package frozen corn kernels  10-ounce, optional
  • 2  tsp  fresh cilantro leaves  plus more for garnish (optional)
  • 1  tsp  ground cumin
  • 1  tsp  seasoned salt
  • 1  tsp  chili powder
  • crumbled Cotija cheese  grated Parmesan cheese, or nutritional yeast, for garnish (optional)

INSTRUCTIONS

  1. Add the oil to the Instant Pot, hit  Sauté, and Adjust so it’s on the More or High setting. After 3 minutes of heating, add the onion, bell pepper, and jalapeño (if using) and sauté for 5 minutes, until lightly softened. Add the garlic and sauté for 1 minute.
  2. Meanwhile, put the quinoa in a fine-mesh strainer and rinse under cold running water for 90 seconds; drain well.
  3. Add the quinoa to the pot and toss until coated in the veggies and oil.
  4. Add the broth, lime juice, black beans, tomatoes, corn (if using), cilantro (if using), cumin, seasoned salt, and chili powder. Stir well.
  5. Secure the lid, move the valve to the sealing position, hit Keep Warm/Cancel, and then hit  Manual or Pressure Cook on High Pressure  for 1 minute. When done, allow a 10-minute natural release followed by a quick release.
  6. Fluff the quinoa with a fork, stir, and serve topped with additional fresh cilantro and cotija cheese, Parmesan cheese, or nutritional yeast, if desired.

RECIPE NOTES

JEFF’S TIP: Want red kidney beans instead of black? Have at it! Calories will increase by about 30, carbs by about 7g, and protein by about 4g.

Per serving
Calories: 295
Fat: 6.3g
Carbs: 50.5g
Sodium: 330mg
Protein: 11.8g
Fiber: 8.3g
Sugars: 3.7g

Photo Credit:- Cosori Air Fryers

Source:- Cosorithis


Spectacular Salsa

0

I know what you’re thinking: it’s unusual to cook salsa, much less pressure cook it. But this technique stews the veggies into the perfect texture, and infuses the entire salsa with incredible richness. Trust me, stewing salsa versus serving it raw makes a world of difference.
Photos by Aleksey Zozulya

INGREDIENTS

  • 3  tbsp  extra-virgin olive oil
  • 1  large spanish onion or 2 yellow onions  diced
  • 3  jalapeno peppers  seeded if desired and diced (optional)
  • 6  garlic cloves  minced or pressed, or roasted Garlic (page 42)
  • Juice of 1 lime
  • 1  can no-salt-added crushed tomatoes  28-ounce
  • 1/2  cup  White vinegar
  • 1/2  cup  Garlic Broth or water  (for the Garlic broth visit page 44 of the cookbook)
  • 1  tbsp  ground cumin
  • 1 1/2  tsp  seasoned salt
  • 1/4  cup  chopped fresh cilantro  omit if you think it tastes like soap
  • 1  can no-salt-added diced tomatoes  with their juices, 14.5-ounce
  • 1  can diced green chiles  with their juices, 7-ounce
  • 2  tbsp  raw honey or monk fruit sweetener
  • 1-2  tbsp  hot sauce  optional

INSTRUCTIONS

  1. Add the oil to the Instant Pot, hit  Sauté, and Adjust so it’s on the More or High setting. After 3 minutes of heating, add the onion and jalapeños (if using) and sauté, stirring occasionally, for 2—3 minutes, until slightly softened. Add the garlic and sauté for 1 minute.
  2. Add the lime juice and let the veggies simmer for 1 minute.
  3. Add the crushed tomatoes, vinegar, broth or water, cumin, seasoned salt, and cilantro (if using). Stir until well combined. Secure the lid, move the valve to the sealing position, hit the Keep Warm/Cancel Button, and then hit  Manual or Pressure Cook on High Pressure  for 10 minutes. When done, allow a 5-minute natural release followed by a quick release.
  4. Stir in the diced tomatoes, green chiles, honey or sweetener, and hot sauce (if using) until well combined. Allow to cool for 10 minutes, then transfer to an airtight container and let chill and meld in the fridge for 4—8 hours before serving. Store for up to 2 weeks in the fridge.

RECIPE NOTES

JEFF’S TIP: If you want your salsa chunkier and with more crunch, stir in a diced red onion just before serving.

Per serving
Calories: 86
Fat: 3.6g
Carbs: 12.7g
Sodium: 302mg
Protein: 1.8g
Fiber: 2g
Sugars: 8.2g

Photo Credit:- Cosori Air Fryers

Source:- Cosorithis

Cheap Steak With Mushroom Sauce and Brown Rice

0

Simple, affordable dinner. Used what I had in my apartment. Enjoy.

Ingredients

2 steaks–cheap ones will do just fine
1 cup  uncooked  brown rice
8 ounces  mushrooms  sliced
1/2 of a large  onion  chopped
2  garlic cloves  minced
3 tablespoons  dry  white wine
7 ounces  chicken stock
all-purpose flour
olive oil
salt
pepper
garlic powder

Preparation

1. Follow instructions on  brown  rice that correspond with one cup of uncooked rice. Take both steaks out and bring them to room temperature.
2. Heat  enough olive oil to  coat  the bottom of a medium-high  skillet.
3. Sprinkle one side of the steaks with  salt,  pepper, and garlic powder, and apply a thin layer of flour.
4. Put the steaks in the  skillet  seasoned  and floured side down.
5. Apply the  salt,  pepper, garlic powder, and flour to the other side.
6. Cook until nicely  seared  on each side and medium rare(depends on thickness). Remove steaks from pan and cover with tin foil to keep  warm.
7. Add mushrooms, onions, and garlic to the same pan–You may need to add more oil.
8. Cook until the vegetables are tender, then add the white wine.
9. Make sure to scrape the bottom of the pan to lift any bits that may be stuck.
10. Bring to a  boil  and let  boil  for one minute.
11. Add the chicken stock and bring to a  boil.  Let the sauce  boil  for about 5 minutes.
12. Serve  steak over rice and  top  with mushroom sauce.
Credit: Foodista

Split Pea Soup

0

When I was a kid, I was a bit skeptical about this one. The name is enough to make any seven-year-old giggle and the color can be … interesting. But when I grew up, I realized this soup is really just a more refined lentil soup that’s been Dr. Seuss-ified with the green split peas, and it has quickly become one of my favorites!
Photos by Aleksey Zozulya

INGREDIENTS

  • 3  tablespoons  ghee (store-bought or homemade  page 39) or extra-virgin olive oil
  • 1  yellow onion  diced
  • 2  ribs celery  diced
  • 1  large carrot  peeled and diced
  • 1/2  cup  dry sherry or additional broth
  • 5 1/2  cups  low-sodium chicken or vegetable broth
  • 1  tablespoon  Worcestershire sauce or sugar-free steak sauce
  • 1  teaspoon  seasoned salt
  • 1  teaspoon  black pepper
  • 1  teaspoon  dried thyme
  • 1  teaspoon  dried oregano
  • 2  leaves  bay
  • 1  pound  dried split green peas  rinsed
  • 1  ham bone or ham hock
  • 1/4  cup  plain 2% Greek yogurt  (store-bought or homemade page 36; optional)

INSTRUCTIONS

  1. Add the ghee or olive oil to the Instant Pot and hit Sauté. Once heated (about 3 minutes), add the onion, celery, and carrot and sauté for 5 minutes, stirring occasionally.
  2. Add the sherry and allow to simmer for another minute. Add the broth, Worcestershire or steak sauce, seasoned salt, pepper, thyme, oregano, bay leaves, and split peas and stir. Add the ham hock.
  3. Secure the lid, move the valve to the sealing position, hit Keep Warm/Cancel, and then hit  Manual or Pressure Cook on High Pressure  for  15 minutes. When done, allow a 15-minute natural release followed by a quick release.
  4. Discard the bay leaves and remove the ham hock (see Jeff’s Tips). Stir all the contents in the pot up from the bottom as the split peas will have basically become a puree and will thicken the soup immediately once stirred up.
  5. Stir in the yogurt (if using) until combined, and serve.

RECIPE NOTES

JEFF’S TIPs: If you want a slightly thinner soup, add another cup of broth in Step 4.
You can use some of the meat from the ham hock for garnish, if desired.

If you have leftovers, you can always save them in the fridge or even in the freezer, but note that the soup will get very thick as it cools–almost like a paste. This is because the peas continue to absorb the broth even after cooking. Once reheated, it will become soup-like again, but to achieve this, you’ll have to add some more broth of your choice while reheating and mix well to thin it out a bit. Use 1/3 to 1/2 cup of broth for each 1 cup of leftover soup you heat up.

Per serving
Calories: 459
Fat: 30.8g
Carbs: 13.2g
Sodium: 752mg
Protein: 31.8g
Fiber: 4.4g
Sugars: 2.3g

Photo Credit:- Cosori Air Fryers

Source:- Cosorithis

Chicken Adobo

0

Photo Credit:- Cosori Air Fryers

This is by far the most famous and most popular of all Filipino dishes. But every Filipino cook has his or her own version. The most popular ratio of soy sauce to vinegar in adobo is 1 to 2. It may seem like a lot of vinegar, but the long cooking time (at least 1 hour) mellows the tang of the vinegar and the chicken ends up falling-off-the-bone tender. The Instant Pot ® definitely speeds up this process.

INGREDIENTS

  • 1 1/2  cups  jasmine rice  300 g
  • 6  medium garlic cloves  peeled and smashed
  • 2  dried bay leaves
  • 1  tsp  black peppercorns or  or/2 tsp ground black pepper
  • 1  tsp  brown sugar  or more to taste (optional)
  • 1/2  cup  apple cider vinegar  120 ml
  • 1/4  cup  soy sauce  60 ml
  • 2  cups  Water  divided, 480 ml
  • 8  bone-in  skin-on chicken legs or drumsticks and/or thighs (3 to 4 pounds/1.5 to 2 kg)
  • Chopped green onions  for garnish

SPECIAL EQUIPMENT

  • 7-or 8-inch heatproof container  17.5- to 20-cm, I use a 2-quart/2-l ceramic soufflé dish
  • Steamer rack
  • Steamer rack

INSTRUCTIONS

  1. Rinse the rice 2 to 3 times until it runs clear. Drain in a fine-mesh strainer while you prepare the rest of the ingredients.
  2. Stir together the garlic, bay leaves, peppercorns, sugar, vinegar, soy sauce and ½ cup (120 ml) water in the pot. Use tongs to coat the chicken on both sides with the sauce. Try to fit the chicken in one layer.
  3. Nestle a steamer rack inside with the chicken. Tip the rice into a heatproof container and place it on the steamer rack. Pour 1/2 cups (360 ml) water over the rice.
  4. Lock the lid. Select  PRESSURE COOK/MANUAL  and set to  HIGH for 15 minutes. Make sure the steam release valve is sealed. Once pressurized (12 to 15 minutes), the cook cycle will start.
  5. When the timer beeps, let the pressure release naturally for 10 minutes. Then quick release any remaining pressure. When the float valve drops, press CANCEL and open the lid.
  6. Wearing heatproof mitts, remove the rice and steamer rack.
  7. Insert an instant-read thermometer into the chicken at its thickest part. The temperature should read at least 165 º F (71 º Celsius). If not, select PRESSURE COOK/MANUAL again for another minute or two. It will take much less time to build up pressure the second time since the food is already hot.
  8. When the timer beeps again, manually release the pressure. When the float valve drops, press  CANCEL  and open the lid.
  9. Now, you have two options: Using tongs, transfer the chicken to a broiler pan lined with foil. Broil the chicken in the middle rack for 3 to 5 minutes. Or, you can transfer the chicken to a serving dish and serve as is. Tent with foil to keep warm.
  10. Select  SAUTÉ  and set to HIGH/MORE. Reduce the sauce for 10 to 15 minutes until you’re happy.
  11. Strain the sauce through a fine-mesh sieve to catch any solids. Skim off fat from the surface.
  12. Drizzle the sauce over the chicken and sprinkle with green onions. Serve with the rice and a side of vegetables.

RECIPE NOTES

NOTES: Using the pot-in-pot method results in rice that’s softer than usual because it cooks longer. Feel free to combine chicken and pork together in one dish.

Source:- Cosorithis

Chardonnay And Herb Fagioli Soup With Chili Chive Croutons

0

Many chefs have a version of a Fagioli soup. Here’s my savory rendition with fresh herbs, white wine, homemade chicken stock, and topped off with fresh baked chili chive croutons.

Plus, a wine taste test…It’s Zin, versus a red blend and chardonnay. Visit my blog to see which one is perfect pairing for this soup! And to see how to make these crunchy homemade croutons! Forget the crackers 🙂

Ingredients

1 tablespoon olive oil
1 teaspoon dried purple basil
1 teaspoon dried Italian oregano
1/4 teaspoon crushed red pepper flakes
5 stalks celery, chopped
1 onion, chopped
2 pinches of salt, or to taste
1/2 cup Chardonnay (or other dry white wine)
1 cup homemade chicken stock (or canned)
2 cans Italian style tomatoes (or 1- 28 ounce can of San Marzano)
1 – 8 ounce can of tomato sauce
1/4 teaspoon sugar
1 cup uncooked multigrain spiral pasta (you can use white but cook time may be less)
1 – 15 ounce can cannellini beans, with liquid

Preparation

1. Heat olive oil in a large saucepan over medium heat.
2. Add herbs and pepper.
3. Stir continuously to release oils. It only takes about 30 to 60 seconds. Be careful not to let them burn.
4. Toss in vegetables.
5. Then salt.
6. Once they are tender and translucent pour wine in.
7. Allow to deglaze for 3 or 4 minutes.
8. Dump in stock and stir until it dissolves to a smooth consistency (if using canned just cook for 2 or 3 minutes.)
9. Stir in tomatoes and sauce.
10. Then sprinkle with sugar.
11. Simmer this on low for about 20 minutes.
12. Add pasta and cook approximately 10 minutes, until pasta is tender.
13. Add undrained beans and mix well.
14. Heat through.
15. Serve with fresh grated Parmesan or Romano cheese.
16. You can also include fresh basil leaves for a garnish if you have any.
Credit: Foodista

Taiwanese Spicy Beef Noodles

0
Photo Credit:- Cosori Air Fryers

Beef noodles are often considered Taiwan’s national dish. This recipe comes courtesy of Linda Shiue, or rather Linda’s mother. Linda is a physician who also teaches healthy cooking classes. Even though she’s an accomplished cook, she always defers to her mother when it comes to making this dish.

INGREDIENTS

  • 2  to 2 1/2 pounds beef chuck roast  (900g to 1.2 kg), cut into 1-inch (2.5-cm) cubes
  • 2  tsp  fine sea salt
  • 1/2  tsp  freshly ground black pepper
  • 2  tbsp  vegetable oil
  • 3/4  cup  chopped onion  120 g
  • 3  medium garlic cloves  peeled and smashed
  • 2  inch knob fresh ginger  peeled and cut into ½-inch (1.25-cm) slices
  • 2  medium Roma tomatoes  cut into quarters (4 ounces/120 g)
  • 3  cup  large carrots  peeled and cut into 1/2-inch (3.75-cm) pieces (8 ounces/240g )
  • 1/2  cup  soy sauce  120 ml
  • 3  tbsp  granulated sugar
WHOLE SPICES
  • 4  black peppercorns
  • 4  Sichuan peppercorns
  • 4  whole cloves
  • 1  to 6 dried red chilies  depending on how spicy you like it
  • Peel of 1/2 orange or tangerine  or 1 clementine
  • 4  star anise pods
TO SERVE
  • 8  oz  bok choy  Chinese (napa) cabbage or other Chinese greens, chopped, 240 g
  • 8  ounces dried thick Chinese wheat noodles  or 1 lb of (450 g) fresh Japanese udon
GARNISHES
  • Cilantro/coriander leaves
  • Chopped green onions
  • chili sauce
  • Chopped preserved Chinese vegetables  such as Pickled Chinese Mustard Cabbage or Sichuan pickles

INSTRUCTIONS

  1. Season the beef with 2 teaspoons salt and 1/2 teaspoon ground black pepper.
  2. Select  SAUTÉ  and set to HIGH/MORE. Add the oil. When the pot is hot, sear the beef on all sides, 4 to 5 minutes. Don’t worry if some pink remains.
  3. Add the onion, garlic, and ginger, and stir and cook for another 2 to 3 minutes. Add the tomatoes and carrots and stir and cook. Press  CANCEL.
  4. Add the soy sauce, scraping the bottom of the pot to remove any cooked-on bits and avoid the BURN warning.
  5. Add the sugar and whole spices: black peppercorns, Sichuan peppercorns, cloves, star anise, dried chilies and orange peel. Stir to mix.
  6. Lock the lid. Select  PRESSURE COOK/MANUAL  and set to  HIGH for 35 minutes. Make sure the steam release valve is sealed. Once pressurized (8 to 10 minutes), the cook cycle will start.
  7. While the beef cooks, bring a large pot of water to a boil. Add the bok choy and blanch for 1 minute. Remove with a spider or slotted spoon and rinse under cold running water.
  8. Wait for the water to start boiling again, then cook the noodles according to pack-age directions. Drain and save the noodle cooking liquid.
  9. When the timer beeps, let the pressure release naturally for 15 minutes. Then quick release any remaining pressure. When the float valve drops, press  CANCEL  and open the lid.
  10. Fish out the herbs and spices. Skim off fat from the surface. Taste and adjust seasonings as desired. The sauce should taste a little salty.
  11. Divide the noodles among 4 to 6 large bowls. Spoon some beef, carrots and sauce over the noodles and top with bok choy. Add some noodle cooking liquid to make it soupier if desired.
  12. Garnish with green onions and cilantro sprigs and pass the chili sauce and pre-served Chinese vegetables at the table.

RECIPE NOTES

NOTES: Udon is a thick wheat noodle that is usually served in soups. Fresh and frozen udon are available at Asian markets. For a gluten-free option, use gluten-free spaghetti or linguine. You can also use bone-in beef shanks for this dish. But parboil them first before cooking. My recipe tester Marcie suggests using a spice sachet to enclose the whole spices and for easy removal, but the flavors may not diffuse as well.

Photo Credit:- Cosori Air Fryers

Source:- Cosorithis

Lohan Mixed Vegetables

0

Commonly known as Buddha’s Delight or lo han jai, this vegetarian dish is eaten on the first day of the Chinese New Year. I’ve turned it into an everyday dish using some of my favorite vegetables with miso paste added for a truly delicious sauce!

INGREDIENTS

  • 1  tbsp  vegetable oil
  • 3  tbsp  minced Garlic  (3 medium cloves)
  • 3  green onions  white parts finely chopped, green parts cut into 2-inch (5-cm) pieces
  • 2  tbsp  white miso
  • 1  large carrot  peeled and cut into 1-inch-thick (2.5-cm) pieces
  • 4  oz  fresh or rehydrated* black mushrooms  halved (save the mushroom soaking water if using dried), 120 g
  • 8  oz  Chinese cabbage  cored and cut into 2-inch (5-cm) squares, 225 g
  • 8  oz  Firm tofu  cut into 1-inch (2.5-cm) squares or triangles 2 dried tofu sheets, broken into 2-inch pieces, soaked for 15 minutes in warm water and drained, 225 g
  • 2  oz  spoons soy sauce  60 g
  • 1  tsp  sugar
  • 1/2  tsp  fine sea salt
  • 1  small bundle mung bean noodles cut into shorter pieces  1 ounce/30 g
  • 1  cup  mushroom soaking water or water
  • 1  tsp  sesame oil

INSTRUCTIONS

  1. Select  SAUTÉ  and set to MEDIUM/NORMAL. Add the vegetable oil. When the pot is hot, add the garlic and the white portions of the green onions. Stir and cook until fragrant, 30 seconds. Add the miso paste and stir and cook for 30 seconds. Add the carrot, cabbage and mushrooms, stirring between each addition. Stir and cook for 1 minute. Press  CANCEL.
  2. Add the soy sauce, sugar and mush-room water. Stir to mix, scraping the bottom of the pot to remove any cooked-on bits and avoid the BURN warning.
  3. Add the tofu skin and mung bean noodles and mix everything together. Make sure the noodles are covered. Lock the lid. Select  PRESSURE COOK/MANUAL  and set the pressure to  HIGH for 2 minutes. Make sure the steam release valve is sealed. Once pressurized (8 to 10 minutes), the cook cycle will start. When the timer beeps, manually release the pressure. When the float valve drops, press  CANCEL  and open the lid.
  4. Add the sesame oil and remaining green onions. Stir for 1 to 2 minutes until the sauce reduces a little. There should be some sauce left, and it will thicken on standing. Serve immediately with steamed rice.

RECIPE NOTES

NOTES: White miso or shiro miso is made from soybeans that have been fermented with a large percentage of rice. The actual resulting color can range from white to light beige, and the miso has a definite sweet taste. Use more soy sauce or salt if you prefer not to use it.

Other than Chinese cabbage, bok choy, chrysanthemum greens or other leafy Chinese greens would be great in this dish. Snow peas too!

If you can’t find dried tofu sheets, use more firm tofu or tofu puffs.

*HOW TO PREPARE DRIED MUSHROOMS

Rinse then soak the mushrooms in warm water for at least 30 minutes. If you can plan ahead, soak them for 8 hours or more. When the caps are tender, pluck them out and squeeze out the excess water with your hands. Save the soaking water to use in your recipe.

Photo Credit:- Cosori Air Fryers

Source :- Cosorithis

Char Siu Pork Fried Rice

0

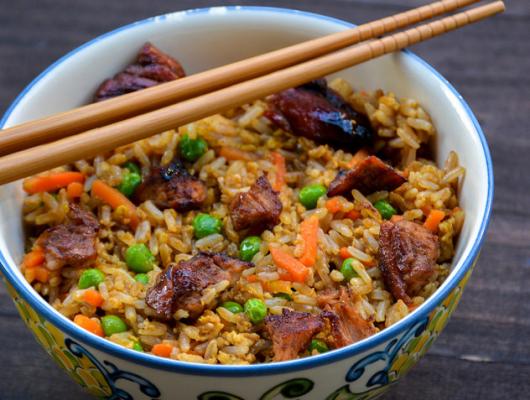
On Tuesday I featured some delicious Char Siu (Chinese Barbecue) Pork Buns. They highlighted sticky, crispy, and tender pork tenderloin from Recipe Tin Eats. Well, today I’m showing you how to use up all the leftover marinated pork. It’s as easy as three words, Pork Fried Rice.

The barbecue marinade elevates the pork in this dish and gives it that authentic takeout flavor. I love that you’re getting two meals out of the one piece of pork tenderloin.

For those of you who have not made fried rice before, I’m here to share the secret. It’s using COLD rice. So you will need to make your rice a day or a few hours in advance in order to yield the flavor and texture you want for perfect fried rice. I used brown Jasmine rice I got from the Asian supermarket on my visit, but just plain white rice will do. I just love Jasmine rice and how it cooks when reheating in a dish like this.

Now that you have the Pork Fried Rice part figured out,   here’s some ideas on what to serve it with:

According to Sommeliers a Riesling is the wine to pair with your Chinese food. So, just make a heaping bowl as your main course and a nice big glass of Riesling to wash it down.
Pair with another authentic Chinese dish like homemade Cashew Chicken (also from Recipe Tin Eats)
Make the rice the star, but get an extra dose of veggies with Chinese Broccoli with Oyster Sauce
Now you’ve got all the makings for a fakeout takeout meal. It’s sure to be delicious and a little bit better on that waistline without all the hidden sodium etc.

Ingredients

1 Cup diced marinated/cooked Char Siu Pork tenderloin ( http://www.behindtheplates.com/semi-homemade-char-siu-pork-buns/)
3 Cups cooked brown Jasmine rice (or regular white/brown rice)
½ cup frozen pea/carrot mixture
1 onion, diced
2 eggs
½ cup tamari or low sodium soy sauce
1 oz of fried rice seasoning (Kikkoman, Badia, and Sunbird all make versions)
1 tbsp sesame oil

Preparation

1. Cook Pork according to recipe for Char Siu buns in advance.
2. Dice up 1 cup of the tenderloin for rice. Set Aside.
3. Heat a deep wok or saute pan over medium high heat and sesame oil.
4. Add diced onion and cook for 3-5 minutes until translucent and softened.
5. Add the rice and let it cook for another 3 minutes or so. Push the rice to the outer rim of the pan to create a hole in the center.
6. in a separate bowl, crack and whisk the eggs together. Then pour the mixture into the hole in the pan. Let them cook and then scramble, slowly mixing the eggs into the rice.
7. Add the tamari, fried rice seasoning, and 2 tbsp of water to the rice. Mix well to blend flavors.
8. Add frozen peas and carrots along with the diced pork pieces.
9. Allow to cook for 3-5 minutes until everything is warmed.
10. Serve immediately.
Credit: Foodista